Lowe Roughneck 1752 project

TinBoats.net

Help Support TinBoats.net:

This site may earn a commission from merchant affiliate links, including eBay, Amazon, and others.

gabeskillzz05

Active member
Joined
Aug 20, 2014
Messages
42
Reaction score
0
I have been lurking on here for some time now, I eventually made a screen name to ask some questions but really haven't had much to contribute until now. I was looking for a boat that I could put an outboard jet to do some hunting/fishing for awhile and last summer I found the boat I was looking for. 1752 lowe roughneck with a jet tunnel. It has an open floor and drop deck in the front. It took awhile from when I went to see the boat originally until I actually had it in my name due to some paperwork issues from the previous owner. The boat sat in a yard for about 3 years but eveything seemed solid.

While Trying to get the trailer out of the yard I started thinking that it was way to heavy for the amount of boat. I figured the floatation was saturated. I got the boat home and used it a few times during archery season with a 25hp tiller I had and after that it sat over the winter while I searched for a motor. Luckily a friend upgraded his motor and sold me his 98' 50hp yamaha jet for a good deal.

Now that it is warm enough to be outside I started working on the boat. First thing we did was tear out the flooring to inspect the foam. I'm glad I went through the trouble because the foam was completely soaked. I decided that I wanted a forward console so I ordered on from AK McCollum.

Onto some pictures...

This is where I found it


The maiden voyage with prop motor


Starting on the floors


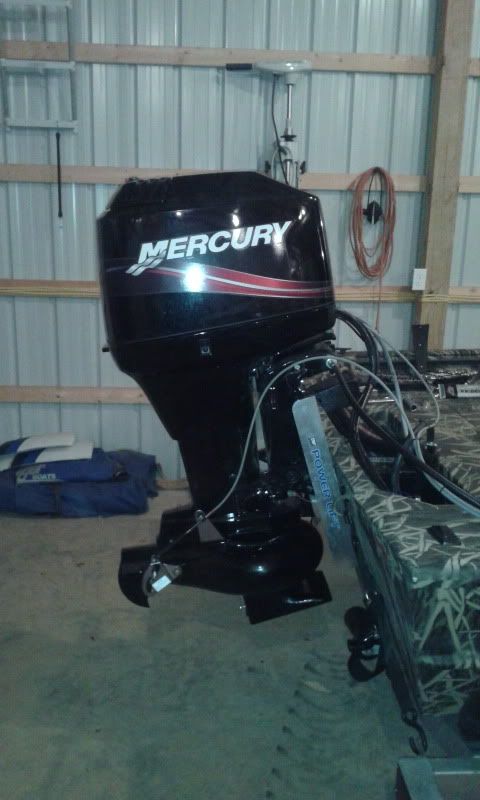
Today we hung the motor on the transom for the first time and I am a little worried... This is how the foot is when the motor is hanging on the transom


This is with approx 3" piece of wood set on top of the transom


This is how the top looks now, do I need to make some kind of bracket to raise my transom??

 
I have the Mercury 60/45 jet mounted about that high on my 1652 Lowe. Do any of the bolt holes line up? The motor doesn't need to rest on the top of the transom but if you feel more comfortable with it that way, you could have a transom riser made. You can kind of see how mine is mounted in this picture. I still have 1 more bolt hole I could go up but it's lined up with the tunnel now. I had to do the transom wedges to get mine tucked in more to avoid porpoising.
 

Attachments

  • bothboats2.jpg
    bothboats2.jpg
    50.3 KB · Views: 5,397
Jeff, I didn't get any pictures of that yet but the way it sits now I cannot move it up any further because of the hole spacing. It is also trimmed all the way in, maybe if I took the rod out of the bottom trim hole the motor would trim in a tad more but not sure if this is good practice or not. Maybe I should look into the wedges to get the foot closer to the tunnel.

Looks like your boat is laid out very similar to mine.
 
You will probably need the plates to raise the motor then to get the foot lined up like you have it on the wood blocks. You might not need the wedges until you can see how it runs mounted at the correct height. My boat has the shorter transom and I have a short shaft and it's still raised up to get the foot even with the top of the tunnel. It took me about 6-8 tries to get it lined up and I still get more spray than I would like. I think a jackplate would give the best adjustment, but they end up settign the motor back from the tunnel.

Link to the plates:
https://www.cmcmarineproducts.com/p...C-Static-Jack-Plate-5-inch-vertical-extension

Here's a picture of the plates, it's not my boat but they are basically angled aluminum that gets used in the jackplates.

2012-03-06203853.jpg
 
Thanks for sharing your build. That tunnel jet looks perfect, really like the setup.
 
Well I don't have any new pictures but I spent a bunch of money. I did some measuring and decided to buy the CMC static riser plates. This will push me back 1/2" due to thickness of the plate so I might need the transom wedges but I'll run it first and see how it does. We also measure and ordered the teleflex steering kit, wheel, throttle & reverse cable, 6' engine harness extension and a blue sea 6 position fused toggle panel.

Hopefully stuff starts showing up so we can get the motor mounted !
 
I finally got to work on the boat again. My buddy came over after work and we spent most of the night measuring to make sure we had things where they needed to be before we drilled holes in the transom. Taking our time paid off and when we lifted the motor on everything lined up well. I sealed up old holes with silicone and coated the inside of the new holes with it as well.

One thing that I am not sure about and was hoping I can get some feedback on is the jack plate mounting bolts. The lower holes on the Cmc plate just missed the bottom of my transom board. If I put a bolt there it would just be in the hull. I figured I could mount a piece of board down that low just to bolt into but not sure if it is even necessary. The plates are bolted on with one bolt each and then one bolt goes throught both the motor and the plates. And the 3rd set of bolts is on the top and just bolts the motor to thr plates.

Pictures of the goods:


CMC static riser plates. Thanks for the info Jeff!


During the unstall, note the lower hole locations


Motor finally mounted


This is where the motor sits at the lowest setting and trimmed all the way in, I realize I have to run it and tweak but does this look a little low. I hope it does because I gave 2-1/4" travel to adjust up but none to go down.


Sorry for the poor picture quality, the garage lighting isn't the greatest.
 
Awesome pics and updates! Love those skulls painted on your outboard too.

I'd say its just a tad low, but not by much, as you already probably know you want that tab flush with the front of your jet foot to feed it water. You'll have to run it a few times, if it's too low, you'll get more water splashing on your jet foot or bowl.
 
Nice looking boat I have a similar setup on mine and the leading edge of my foot is about 3/4" higher then the rear of the tunnel. The advice I was given was to set it so the top of tunnel lines up with the beginning of the intake grates and it's working well on mine.
 
I think I'm mounted just a little lower but when I went up 1 more hole it caused more spray back and cavitated more, that's why I ended up where it is now. I think you'll need to do some testing but that's a good starting point. I also have the transom wedges so my foot actually goes inside the tunnel on turns.
 
Well we got everything mounted up and ran over to the lake to hear the motor run. Backed it in and just left on the trailer. Fired up right away once we plugged the safety cord in lol. One thing we notice is that water was coming out between the jet unit and the mid section of the motor. Is this supposed to happen?? You can see in the pic below some water dipping out after we got home but when the motor was running it was spraying out.


[\url]
 
Shouldn't be spraying out. That's a sign that the mounting bolts are coming loose. Remove the foot, remove the impeller, remove the four bolts above the impeller and the one bolt in the back to drop the volute and drive shaft. This is a great time to pop the water pump apart and make sure it's impeller is in good shape as well.

Outboard Jets site should have the manuals for your model.
 
NOTE: Use red threadlocker on the bolts. Had mine back out as no threadlocker was used from the factory. I just escaped major damage to my lower unit ( https://forum.tinboats.net/viewtopic.php?f=82&t=13749 ). Good luck with your repair.
 
Okay found some time to work on the boat a little. I'm getting married next month so things are getting hectic and working on this project means less sleep #-o

I pulled the jet apart tonight and it definitely looks like it needs sharpened. Would this kind of condition cause any problems at high rpm? While taking it apart I checked all the bolts and they were all tight. I noticed that there is a small gap between the jet into and the adapter plate and again between the adapter plate and the motor shaft on the front. (Pictures below) this is where the water was coming out of when I ran the boat at the dock in the posts before. So should water come out of these openings? I find it hard that water woudnt come out now that I see the opening. Also is this liner still OK?

I also got the steering helm mounted and mounted the new analog yamaha tach that I ordered. It is bigger than I expected with a 3-1/4" cut out dimension but I made it fit in the console. Space is at a premium on the little forward console.


This is the gap on the jet unit:


This is the gap between the adapter plate and motor shaft:


Liner:


Hatch that I am using in rear deck:


Console location with more accessories mounted


Are those the Cabela's hatch covers? I want to cut open the rear sections as well to see if the foam is wet (I think it is, my boat leans to one side). What size did you go with for the hatch covers?
 
Yes it is the custom hatch for Cabela's. This one is the largest size. The cutout dimension listed online is slightly smaller than what you will actually need. When it showed up at my door the package was damaged and the hatch corners were bent up. For the price I paid for an aluminum hatch I wanted it nice so I returned it. A few weeks later browsing the local bargain cave at Cabela's I saw the hatch I returned for 1/2 price so I bought it. For half price Ill bend the corners back. :lol:

My foam was soaked, about 4" down into I we hit standing water. When I first got the boat I could hardly move it around the driveway by myself without a motor on it, now that the foam is gone I can move it easily with motor hanging on the back. Wish I would have weighed it. I'm going to replace most of the foam with extruded polystyrene except there the hatch is going.
 
That's the same side that my boat leans to so I think I need to tear into that rear section. If I do, I might as well put a hatch lid on it. I decided to keep my console on the floor right up against the front deck. The front deck is the best place for a reclining beach chair for those days when fishing is secondary. :lol: I can still cast pretty well from the beach chair and not spill my beverage! :wink:
 

Latest posts

Top