FishingBuds
Well-known member
Well I got a total story and cost now 
This is my first deck built boat project. It took longer than I thought. How well you want it to look depends on the amount of time you spend on it. Your prep work is everything in the out come of your boat. Cutting corners will show.
With that said, it can be the next best thing to casting out to the early a.m. mornings.
You need to think safety for yourself, I know personally first hand. I did not invest in a good respirator until later in the project. I paid for this with my health and wallet(which delayed my project by 6 months).
Be prepared for, equipment layouts and installation, measuring, timing, counting the cost and patience. Educate yourself first. This way you can mostly flow straight thru your project with minimal delays.
I picked up a 1973 1436 flat Jon & trailer.
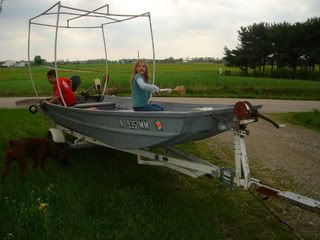
I decided to repaint it of course but, I needed to strip it down to bare metal because it had a previous paint job with visible brush strokes on it.
This is where a good respirator is needed(not a simple dusk mask) for those with respiratory issues. Stripping the boat about killed me, well lets say visit’s to the doctor were in order.
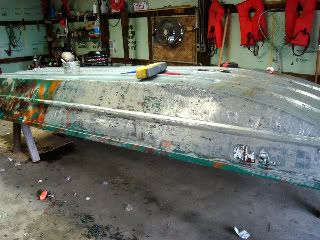
It’s a banged up boat, I had some cracks that I needed to fix. Use a small drill bit(1/16th) and drill at both ends of the cracks, This stops the cracks from getting bigger on ya.
I took all the hardware off, which was nuts, bolts, handles, and the jerry rigs.
I used a paint stripper I got from Wal-Mart for $10 bucks a gallon and used 2 of them, it took about a total of 30 hrs to strip this boat. I washed down the bare metal with mineral spirits afterwards.
I picked up some of those welding aluminum rods for repairs. Bought a good propane torch and went to town on it to fix unwanted holes that once held a bolt for some rig. After filling up six of these holes I quit doing it. The metal was warping on me. I took a friends idea and popped a bolt in it instead with some 5200 sealant.
The welding rods worked good for the cracks, So this I stuck with.
I made a new transom board because the old one was way to rotten, and I smothered it with Thompson water sealer.
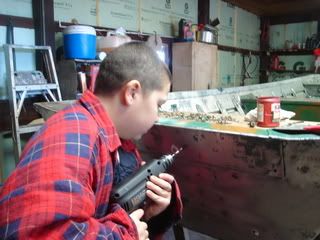
Ruff sanded the bare metal and shot a coat of automobile etching primer on it the same day, remember this-if you sand aluminum you must paint it the same day.
Give etching primer 24hrs to dry (some say sooner but I wanted it to bond)and bite into the metal before applying a finish coat.
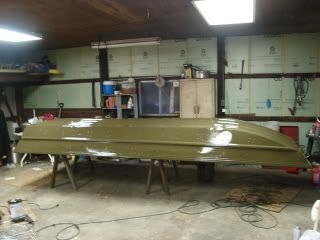
I picked up some marine olive green paint and rolled it on. I put it on thick and applied 2 coats, a 24 hr dry time between each coat. I had 4 days in this total.
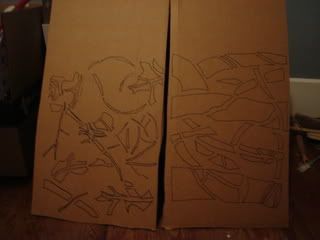
I got on line and copied some camo patterns. First drawled it out on etch paper, cut the pattern out and traced them on some thick card board and then cut that pattern as well. 3 days on this.
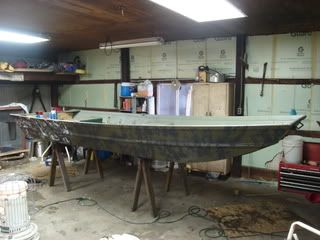
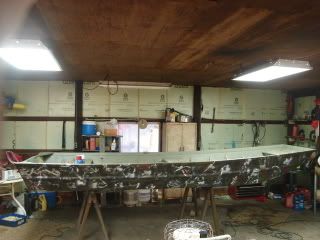
My camo background was the tree pattern and then on top I used the leaf and grass pattern. This took 1 full day to paint on.
I did not strip anywhere of the boat that I planned on covering with outdoor carpet or decking, this saved some time and elbow grease.
I started out with measuring the front bench seat for out door carpet from Lowes’. I used 3M adhesive glue spray to apply the carpet. This helped me better at applying.
I did try the outdoor carpet glue but it cost me on drying time and the worry of watching the carpet rolling back up.
The spray was awesome and I highly recommend it. Its fast and keeps you moven right along with no waiting periods. Please ware your respirator for this as well.
I first sprayed the top of the bench and the carpet that would touch in this area, I used the wife’s pin roller(you may want to ask first) and smoothed out the carpet. I then sprayed the edge of the bench and the face of the bench and then carpet like wise. I applied it by hand at this point. After this I then trimmed to fit on the edges.
Now for the front deck build. I did not go any higher than the bench seat. This boat won't see the big waters (liked to have a griz 1448 for those), so it should be fine for my local fishy holes.
Ok I did the aluminum bracing, I used 1" by 1/8 thick L-angle, It was a support thing for me, wood would have worked, I chose the aluminum for safer reasons for me .
I made three trusses at 3' long, totally custom fit, no formula. I made one and copied the other two from it.
I could've over killed it(my opinion) and ran the trusses all the way to the bow but really wasn't needed. You'll see in the photo I have a piece of L-angle laying there, I mounted it to the bow bench(1/4dim rivets), it'll catch the plywood. Me 250# and my 100# son and the wife(no weight intended) stood on the 5/8 plywood and walked about, it did fine.
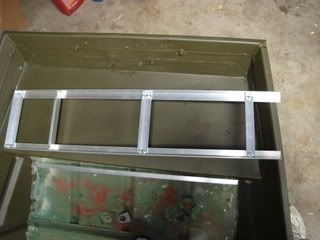
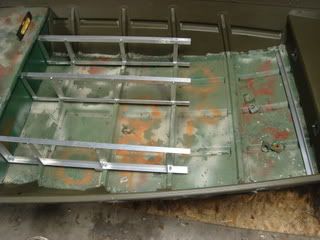
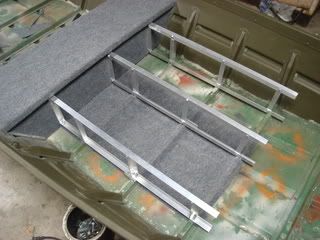
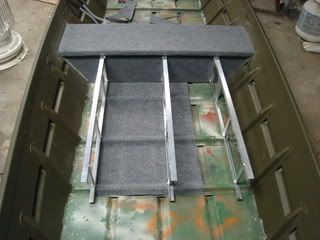
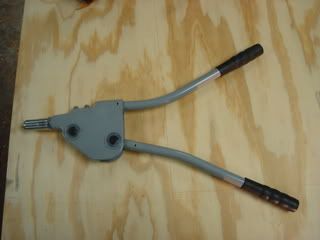
I used a "BigDaddy" pop rivet tool for mounting it to the boat ribs and bench seat. These are 1/4 in diameter rivets they use on autos and they are very proud of them--.61 cents each and you'll find them at your local automobile paint store, these are not going anywhere.
The "BigDaddy gun is expensive depending on where you get it. Starts out at $130 bucks, I've seen it for $40 bucks on ebay--I got this one at HarborFrieght.com for $13.95 isn't that somethen
I started out with a piece of cardboard and trimmed out a template as a deck, traced it on the 5/8 plywood and cut, I took off an extra 1/8 inch for carpet clearance. Drenched it with Thompson water sealer. Sprayed the 3m glue and stapled the edges.
I cut out a 14" X 16" opening for dry storage, I used the lid and cut back extra off for carpet and hinges. I used piano hinges from Lowe’s but, recommend getting longer screws cause the ones that are supplied are to short for this type of job.
I also laid down carpet on the floor where the storage would be and mounted the trusses over it. The deck is just sitting on the trusses, this way I can remove it when needed. Drilled holes for the handle in the lid and a hole for the seat pedestal. This all took about 2 days to complete.
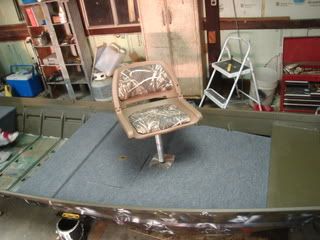
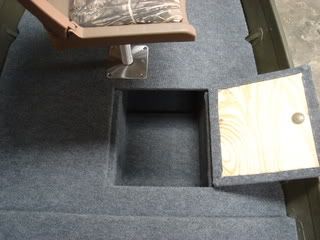
After applying the carpet to the back bench I pop riveted the seat platform on top.
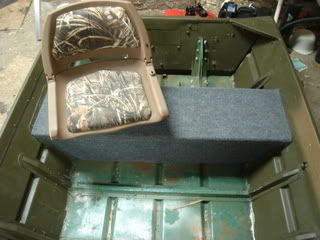
I then started the middle floor, once again using cardboard as a template. Once there I repeated my steps as I did on the front deck. What I did different here is I used 1 ½ by 1/8 thick aluminum square tubing. I ran three runners across the ribs of the boat. I laid down carpet where I planned to put three dry storages compartments. I added 5/8 plywood strips on top of the square tubing, then screwed down the plywood floor(5/8 thick) drenched with Thompson water sealer. This gave me a total clearance of 3 plus inches and its used for the big Plano boxes for plastics, and first aid kit and do dads. I Drilled for a seat pedestal in the middle this way I could take the seat off the back bench and add the pole for a comfy fit.
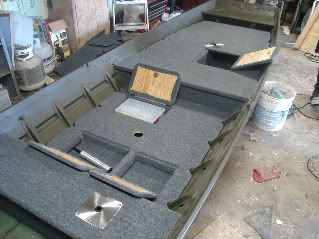
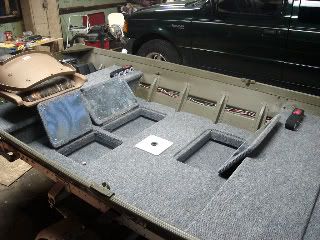
Up front on the bow I made a platform so I could hide the wiring hook ups, and have a place to mount the plug-ins.
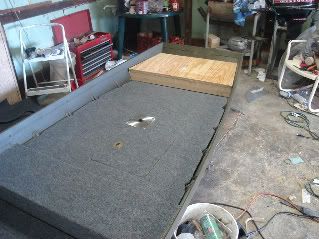
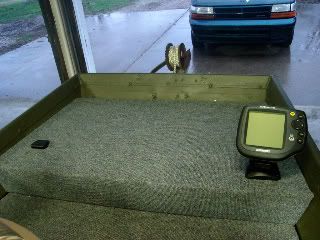
Well I made a simple little bass boat for me, not big and fancy but enough for me and the family to enjoy.
The toys for now are a on board charger, 55# MK hand control TM on the bow and a 525 Hummingbird. I was given a foot control TM for the bow, I want to keep it all electric.
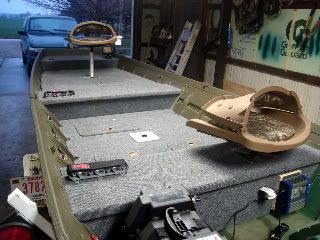
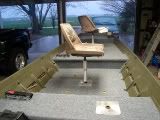
It was so nice to get back out on the water, awsome to see my son loven it

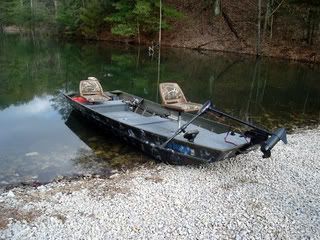
Loven it.
Boat project cost
Pcs. Description Price
2 gallons of paint stripper $10.00each
1 gallon Olive green marine paint $25.00
8 cans of etching primer $3.99each
5 cans of camo paint $2.99each
1 6’ X 18’ lowes outdoor carpet $60.00
3 cans of 3M adhesive spray glue $10.00each
4 piano hinges $4.95each
4 lid handles $4.99each
2 4’ X 8’ 5/8 plywood $18.00each
1 gallon of Thompson water sealer $16.95(I think)
6 8’ x 1” X 1/8” l-angle aluminum $16.95each
1 Big Daddy pop rivet gun $13.95
15 ¼ inch rivets $0.61each
1 20’ x 1 ½” x 1/8” square tubing $75.00
1 3’ X 4’ 16g sheet metal $18.00
Hand tools, screws & miscellaneous $45.00
1 Wal-Mart deep cell battery $75.00
1 Sea Sense power station Battery box $45.00
1 HummingBird525 fish finder $129.00
1 BP XPS 1 bank on board Charger $89.00
1 MK Endura TM 55# $165.00(got a rebate on it)
2 Springfield Three piece pedestal set $41.99each
2 Padded camo boat seat $25.00each
1 OMC foot control bow TM FREE!
1 1973 1436 flat jon boat & trailer $600.00
Total $1,757.36
ya gotta love it, cause ya can’t get rich off it!
This is my first deck built boat project. It took longer than I thought. How well you want it to look depends on the amount of time you spend on it. Your prep work is everything in the out come of your boat. Cutting corners will show.
With that said, it can be the next best thing to casting out to the early a.m. mornings.
You need to think safety for yourself, I know personally first hand. I did not invest in a good respirator until later in the project. I paid for this with my health and wallet(which delayed my project by 6 months).
Be prepared for, equipment layouts and installation, measuring, timing, counting the cost and patience. Educate yourself first. This way you can mostly flow straight thru your project with minimal delays.
I picked up a 1973 1436 flat Jon & trailer.

I decided to repaint it of course but, I needed to strip it down to bare metal because it had a previous paint job with visible brush strokes on it.
This is where a good respirator is needed(not a simple dusk mask) for those with respiratory issues. Stripping the boat about killed me, well lets say visit’s to the doctor were in order.

It’s a banged up boat, I had some cracks that I needed to fix. Use a small drill bit(1/16th) and drill at both ends of the cracks, This stops the cracks from getting bigger on ya.
I took all the hardware off, which was nuts, bolts, handles, and the jerry rigs.
I used a paint stripper I got from Wal-Mart for $10 bucks a gallon and used 2 of them, it took about a total of 30 hrs to strip this boat. I washed down the bare metal with mineral spirits afterwards.
I picked up some of those welding aluminum rods for repairs. Bought a good propane torch and went to town on it to fix unwanted holes that once held a bolt for some rig. After filling up six of these holes I quit doing it. The metal was warping on me. I took a friends idea and popped a bolt in it instead with some 5200 sealant.
The welding rods worked good for the cracks, So this I stuck with.
I made a new transom board because the old one was way to rotten, and I smothered it with Thompson water sealer.

Ruff sanded the bare metal and shot a coat of automobile etching primer on it the same day, remember this-if you sand aluminum you must paint it the same day.
Give etching primer 24hrs to dry (some say sooner but I wanted it to bond)and bite into the metal before applying a finish coat.
I picked up some marine olive green paint and rolled it on. I put it on thick and applied 2 coats, a 24 hr dry time between each coat. I had 4 days in this total.

I got on line and copied some camo patterns. First drawled it out on etch paper, cut the pattern out and traced them on some thick card board and then cut that pattern as well. 3 days on this.

My camo background was the tree pattern and then on top I used the leaf and grass pattern. This took 1 full day to paint on.


I did not strip anywhere of the boat that I planned on covering with outdoor carpet or decking, this saved some time and elbow grease.
I started out with measuring the front bench seat for out door carpet from Lowes’. I used 3M adhesive glue spray to apply the carpet. This helped me better at applying.
I did try the outdoor carpet glue but it cost me on drying time and the worry of watching the carpet rolling back up.
The spray was awesome and I highly recommend it. Its fast and keeps you moven right along with no waiting periods. Please ware your respirator for this as well.
I first sprayed the top of the bench and the carpet that would touch in this area, I used the wife’s pin roller(you may want to ask first) and smoothed out the carpet. I then sprayed the edge of the bench and the face of the bench and then carpet like wise. I applied it by hand at this point. After this I then trimmed to fit on the edges.
Now for the front deck build. I did not go any higher than the bench seat. This boat won't see the big waters (liked to have a griz 1448 for those), so it should be fine for my local fishy holes.
Ok I did the aluminum bracing, I used 1" by 1/8 thick L-angle, It was a support thing for me, wood would have worked, I chose the aluminum for safer reasons for me .
I made three trusses at 3' long, totally custom fit, no formula. I made one and copied the other two from it.
I could've over killed it(my opinion) and ran the trusses all the way to the bow but really wasn't needed. You'll see in the photo I have a piece of L-angle laying there, I mounted it to the bow bench(1/4dim rivets), it'll catch the plywood. Me 250# and my 100# son and the wife(no weight intended) stood on the 5/8 plywood and walked about, it did fine.


I used a "BigDaddy" pop rivet tool for mounting it to the boat ribs and bench seat. These are 1/4 in diameter rivets they use on autos and they are very proud of them--.61 cents each and you'll find them at your local automobile paint store, these are not going anywhere.
The "BigDaddy gun is expensive depending on where you get it. Starts out at $130 bucks, I've seen it for $40 bucks on ebay--I got this one at HarborFrieght.com for $13.95 isn't that somethen

I started out with a piece of cardboard and trimmed out a template as a deck, traced it on the 5/8 plywood and cut, I took off an extra 1/8 inch for carpet clearance. Drenched it with Thompson water sealer. Sprayed the 3m glue and stapled the edges.
I cut out a 14" X 16" opening for dry storage, I used the lid and cut back extra off for carpet and hinges. I used piano hinges from Lowe’s but, recommend getting longer screws cause the ones that are supplied are to short for this type of job.
I also laid down carpet on the floor where the storage would be and mounted the trusses over it. The deck is just sitting on the trusses, this way I can remove it when needed. Drilled holes for the handle in the lid and a hole for the seat pedestal. This all took about 2 days to complete.


After applying the carpet to the back bench I pop riveted the seat platform on top.

I then started the middle floor, once again using cardboard as a template. Once there I repeated my steps as I did on the front deck. What I did different here is I used 1 ½ by 1/8 thick aluminum square tubing. I ran three runners across the ribs of the boat. I laid down carpet where I planned to put three dry storages compartments. I added 5/8 plywood strips on top of the square tubing, then screwed down the plywood floor(5/8 thick) drenched with Thompson water sealer. This gave me a total clearance of 3 plus inches and its used for the big Plano boxes for plastics, and first aid kit and do dads. I Drilled for a seat pedestal in the middle this way I could take the seat off the back bench and add the pole for a comfy fit.


Up front on the bow I made a platform so I could hide the wiring hook ups, and have a place to mount the plug-ins.


Well I made a simple little bass boat for me, not big and fancy but enough for me and the family to enjoy.
The toys for now are a on board charger, 55# MK hand control TM on the bow and a 525 Hummingbird. I was given a foot control TM for the bow, I want to keep it all electric.


It was so nice to get back out on the water, awsome to see my son loven it


Loven it.
Boat project cost
Pcs. Description Price
2 gallons of paint stripper $10.00each
1 gallon Olive green marine paint $25.00
8 cans of etching primer $3.99each
5 cans of camo paint $2.99each
1 6’ X 18’ lowes outdoor carpet $60.00
3 cans of 3M adhesive spray glue $10.00each
4 piano hinges $4.95each
4 lid handles $4.99each
2 4’ X 8’ 5/8 plywood $18.00each
1 gallon of Thompson water sealer $16.95(I think)
6 8’ x 1” X 1/8” l-angle aluminum $16.95each
1 Big Daddy pop rivet gun $13.95
15 ¼ inch rivets $0.61each
1 20’ x 1 ½” x 1/8” square tubing $75.00
1 3’ X 4’ 16g sheet metal $18.00
Hand tools, screws & miscellaneous $45.00
1 Wal-Mart deep cell battery $75.00
1 Sea Sense power station Battery box $45.00
1 HummingBird525 fish finder $129.00
1 BP XPS 1 bank on board Charger $89.00
1 MK Endura TM 55# $165.00(got a rebate on it)
2 Springfield Three piece pedestal set $41.99each
2 Padded camo boat seat $25.00each
1 OMC foot control bow TM FREE!
1 1973 1436 flat jon boat & trailer $600.00
Total $1,757.36
ya gotta love it, cause ya can’t get rich off it!


