Suzuki DT6 Rectifer battery charging question

TinBoats.net

Help Support TinBoats.net:

This site may earn a commission from merchant affiliate links, including eBay, Amazon, and others.

John Wasmuth

Active member
Joined
Aug 23, 2011
Messages
36
Reaction score
0
Location
Kerr County, Texas
I hope this is the right section for this;
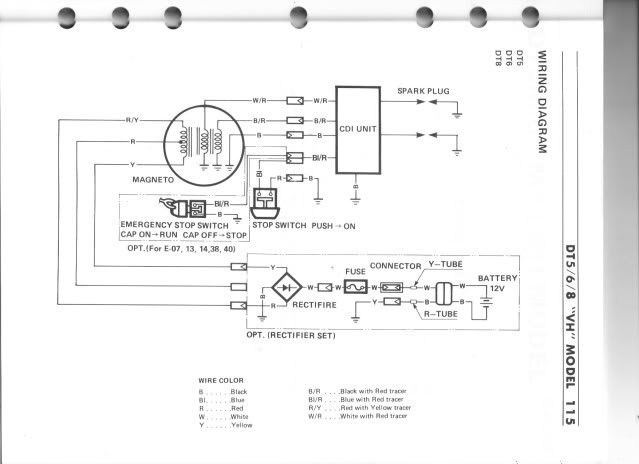
I have a 1987 Suzuki DT6 outboard for my jon boat. It has a lighting coil on the stator oposit the ignition coil that provides 12v to power 80w lights. The manual shows the optional rectifier set that is used to charge a 12v battery while the motor is running and shows the wiring diagram. The diagram shows that the fused hot line goes to a two prong receptical and a ground line to the engine frame. then it shows a two prong plug with a line to both terminals on the battery. My question is this; If the ground line is grounded to the motor frame and the other side of the plug to the battery goes to the negative terminal how does it charge the battery? Is it the same idea as using jumper cables where you hook up the positive cables to the terminals and the negative lines to the engine block?
I have located the rectifier assy but the wire set is no longer available so I have to build it.
 
Here is the schematic for the optional set up.
wiringdiagram.jpg
 
If you look back at the rectifier, you see the neg line is run to ground and the neg side of the battery runs to ground. That's essentially the same as those 2 being connected to each other.
 
Ok, thank you for your help. I didnt want to hook it all up until I had at least one other person tell me I was thinking right. I have the rectifier on the way and I am going to install it when it gets here. Supposedly it will kick out enough juice to keep the batteries charged while the engine is running so now I can finish my circut panel and install the Nav lights, anchor light, curtesy lights and then install the carpeted decking. I sure appreciate the assistance.
 
If it's rated output is 80 watts (and accurate), that's about 6.5 amps of charging, assuming no other electrical devices are drawing juice during that time. So it should charge pretty good.
 
John I'm confused? Where are the 2 yellow wires going now? Where are you getting your dc for the lighting? Sure you don't have a rectifier? Lighting circuit insn't pictured. I see the coil is center tapped. Is it using AC for the lighting? 12vac between each yellow to red? Anyway connect your 2 yellow wires to the AC side of the new rectifier and the dc side as it shows on the rectifier pos on the forward side of the diode, neg side can go to batt neg. Yellow wires can go to either AC connection. Red wire will be taped back. Run your lights from your battery once you have your charging circuit hooked up.
 
There is no rectifier on the motor right now. It has the lighting coil oposit the ignition coil on the stator. There is one Yellow/Red wire, one Yello wire, and one Red Wire. The rectifier is at the post office and I have to go pick it up. It has a Black ground or "Earth wire, a Yellow wire, and a White wire.
According to the schematics the yellow wire from the lighting coil connects to the yellow wire on the rectifier. The Yellow/Red wire from the lighting coil connects to the Red wire on the rectifier. The white wire coming from the rectifer is a hot line which a 20 am inline fuse is wired to a two prong plug unit. The black wire from the rectifier connects to the same bolt on the engine block as the CDI ignition ground wire. The two prong plug unit has its own ground which is connected to the engine block again on the female side and the male side runs to the battery terminals, one hot, one negative. The lighting coil can be used just for lighting while the engine is running in the absence of the rectifier, however the service manual suggests that the rectifer be installed and all lighting should be run off of a 12v battery.
I have tested the yellow wire with the neg end of my volt tester wih the yellow/red light as positive and have hooked up a lighted socket to them with an 80w light bulb and it works as stated in the manual. The plain Red wire coming from the lighting coil is also hot however on the diagram it leads to nowhere and is not used for the rectifier. The rectifier is installed on the exhaust head, the exhaust head acts as a heat sink to draw heat off of the rectifier.

With out the rectifier, the AC power coming off the lighting coil is 12vac @80 watts, which is fine for running nav lights but I was told it will cause harm to the batteries with out the rectifier and the inline fuse. I have read on a couple of different places that I had best be watchful of the volts going to the battery and shut off the current if it heads above 14.5 volts or it will overcharge the batteries and kill them quickly. So I am going to install a volt meter on the line from the plug to the batteries with a kill switch. Sure do appreciate the help.
 
It works!!! I had to build a bracket to mount the rectifier to the exhaust head, which the manual states it has to be so the bracket and exhaust head can act as a heat sink. Wired it up with a plug and after checking it all out fired the motor up, hooked the lines to a dead 12 volt marine battery that showed absolutely no life. Let the motor run for ten minutes and disconected the negative line and it showed 11.5 volts on the meter. Now I wont worry so much about batteries goin low on me at the worst moments.
 
John Wasmuth said:
I have read on a couple of different places that I had best be watchful of the volts going to the battery and shut off the current if it heads above 14.5 volts or it will overcharge the batteries and kill them quickly. So I am going to install a volt meter on the line from the plug to the batteries with a kill switch. Sure do appreciate the help.

I was wondering about that after you posted the schematic because I didn't see a regulator on the schematic. After reading the part about the rectifier needing a heat sink, it makes me wonder if the rectifier isn't in fact a regulator/rectifier built in to one unit. That would explain the need for a heat sink, because I don't see why a rectifier alone would need a heat sink since it's basically just an arrangement of diodes.
 
Thanks. JM you might be correct but I am going to need a better voltage meter than the one I have in order to check it. There have been many modifications since this motor was introduced in 1987, along with the DT5 and DT8, the lighting coil was only standard on the DT6 and DT8 series of motors but could be retro fitted on the DT5 series with a bit of work. This rectifier is about 1.5 inches wide x 1.5 inches long by 1.5 inches tall and the back of it is sealed with some type of epoxy and there are cooling fins on the top. I have read that the later kits sold for this motor were in fact rectifier/regulators but its difficult to tell except that I read that the ones with yellow/red, yellow, white, and black wires are the rectifier/regulator. Either way I need to use a better volt meter to see if the volts go up as the RPMS increase. If they dont then I wont worry so much about frying the batteries.

Now I have to build a switch panel/box to hook everything up to and make it look presentable. I dont think the fish will mind but I might have to post a picture of it some day and wouldnt wanta leave people going.... :shock: LOL!
 
Took the boat down to the river today to test it all out in real water. It worked perfectly. Used the trolling motor for a while until it hit 11.5. Then started the suzuki and ran it up the river a ways, watched the volt meter on the fishi finder steadly increase from 11.5 to 13.9 and finally 14. Shut off the suzuki and used the trolling motor again and after a while it dropped back down to 12.0v. Fired up the suzuki again and ran it for a shor time and voltage meter on the fish finder went back up to 14 in about 3 minutes. So far so good.
 
Good to hear you got it going. If you discharge your battery down to say 11.5v, then run the boat for just a few minutes and it's back up to 12.6, that's most likely just a surface charge and the battery will drain back down to 11.5v with very little use. So don't get fooled into thinking your battery is fully charged to the point that you don't need to monitor it for a while.
 
Top