Hello everyone I purchased a star craft mariner 160 last year. It had quite a few nasty suprises underneath the paint. It looks like the preivious owner did a bad job covering the hull with fiberglass bondo trapping water inbetween the hull and the bondo causing corrosion issues. I was going to try and cut my losses and get somthing new but I couldnt get any hits on selling it plus I think buying another boat would be Ill advised as ive never had one before and dont know how much use it will get. Im in the process of stripping all the paint off now. The problem is the hull is pretty leaky. Theres a bunch of minor pitting all around the hull it isnt pitted through except for one small area. There are quite a few pin holes ranging between 1/16 to 1/8" There is one area where it looks like the previos owner hit somthing with a couple holes that are probably 1/4 to 3/8 of an inch. Whats my best route to fix this. I cant weld and by the time I rip the deck off pull the foam and weld it it would just be better to get somthing else. I would think the same issues apply to brazing. I heard jb weld wont work because the hull flexes to much and causes it to fail. I was thinking of cleaning up all of the holes with my grinder, filling the holes with marinetex epoxy. Paint over the filled areas with coat it, and finally painting over the the coat it with alimihawk paint to protect against uv. I was trying to avoid painting the whole hull so I can moniter corrosion and make sure my patches hold up. Does anyone have any experiance with long term marine tex patches? If it helps the bilge pump would easily be able to keep up with the ammount of water comming in right now, I just dont like the idea of taking a leaky boat out on the water.
TinBoats.net
The original aluminum boat site!
You are using an out of date browser. It may not display this or other websites correctly.
You should upgrade or use an alternative browser.
You should upgrade or use an alternative browser.
Patching holes and corrosion on a Star craft Mariner
- Thread starter john92673
- Start date


Help Support TinBoats.net:
This site may earn a commission from merchant affiliate
links, including eBay, Amazon, and others.


I have never used marinetex in that manor, ie bottom coating. That hull looks pretty bad and suspect you will find more as you go. As much as it hurts, I’d probably sell it for scrap aluminum and find another hull. 
Thats an old picture before I got most of the paint off. I also think the pictures make it look a lot worse than it is. Theres sone white lite surface corrosion that has been comming off very easy with the grinder. Front half of the boat looks untouched its mostley in the back. Id rather give the epoxy a shot before I give up since I spent so much time removing paint. It doesent seem like it would take much time to patch the holes.I have never used marinetex in that manor, ie bottom coating. That hull looks pretty bad and suspect you will find more as you go. As much as it hurts, I’d probably sell it for scrap aluminum and find another hull.
- Joined
- Aug 14, 2016
- Messages
- 6,746
- Reaction score
- 3,630
- Location
- Northern California
- LOCATION
- Northern California
For the second picture, I was thinking about pop riviting a plate over it with 5200 sealent. Does it make sense to epoxy in the holes first?
I would not epoxy first. The patch buttered with 5200 should work.
Based on the pic's I would agree with FuzzyGrub. Your other post reminded me about your intended usage in potentially very rough conditions.
Last edited:
Deffinitly wouldnt do anything like that right away. Figured I would start out on some small lakes and go from there.I would not epoxy first. The patch buttered with 5200 should work.
Based on the pic's I would agree with FuzzyGrub. Your other post reminded me about your intended usage in potentially very rough conditions.


$45.99 ($0.14 / Count)
$49.99 ($0.15 / Count)
330 Piece First Aid Kit, Premium Waterproof Compact Trauma Medical Kits for Any Emergencies, Ideal for Home, Office, Car, Travel, Outdoor, Camping, Hiking, Boating (Red)
THRIAID


$104.98 ($104.98 / Count)
Ever-Ready Industries Premium Trauma First Aid Kit for Outdoors, Workplace, and Home - Exceed OSHA Guidelines and ANSI 2009 Standards - 240 Pieces - Includes Bonus Travel Kit
EVER-READY INDUSTRIES


$44.88
$49.99
Plano Angled Tackle System with Three 3560 Stowaway Boxes, Fishing Tackle Storage, Premium Tackle Storage
Amazon.com

$29.39
$34.59
Seachoice Cast Aluminum “S” Dock Cleat, Corrosion Resistant Aluminum, 12 in.
Amazon.com


$19.50 ($0.61 / Fl Oz)
$27.99 ($0.87 / Fl Oz)
Rust-Oleum, Bright Red 207004 Marine Coatings Topside Paint, Quart, 32 Fl Oz (Pack of 1), 11
Amazon.com

$11.95
$13.23
Extreme Max 5001.6068 Aluminum Air Gauge Pouch Holder for Enclosed Race Trailer, Shop, Garage, Storage, Silver
Snowmobilestudcom

$39.91 ($39.91 / Count)
$65.98 ($65.98 / Count)
Poygik Premium 420 Piece Large First Aid Kit for Home, Car, Travel, Camping, Truck, Hiking, Sports, Office, Vehicle & Outdoor Emergencies - Emergency Medical Kits, Businesses & Home Medical Supplies
POYGIK

$56.35 ($5.12 / Fl Oz)
$64.99 ($5.91 / Fl Oz)
Rust-Oleum 207013 Marine Boat Bottom Antifouling Paint, 1 Quarts (Pack of 1), Blue, 11 Fl Oz
Vera Tools

$62.37 ($62.37 / Count)
$70.88 ($70.88 / Count)
Besst Survivor Comprehensive First Aid Kits -Labeled Compartments Trauma Kits, Compact Emergency Kits for Car, Boats, Camping, Hurricanes and Outdoor Emergencies, Survival Medical Kits -265 Piece
Besst Survivor


$9.79 ($1.96 / Count)
Mothers Microfiber Polishing Pad and Cleaning Pads for Car Detailing, 5 Inch Diameter, Yellow, 6 Pack
S&T INC.


$23.88 ($23.88 / Count)
$26.88 ($26.88 / Count)
First-Aid-Kit-for-Car-Home-Travel-Camping-Businesses, 263pcs Compact Waterproof Hard Case, Public Emergency All Purpose Medical Kit - Perfect for Survival, Vehicles,Boat, Sports, Hiking (PUMIER)
Pumier Medical
$37.75
$41.94
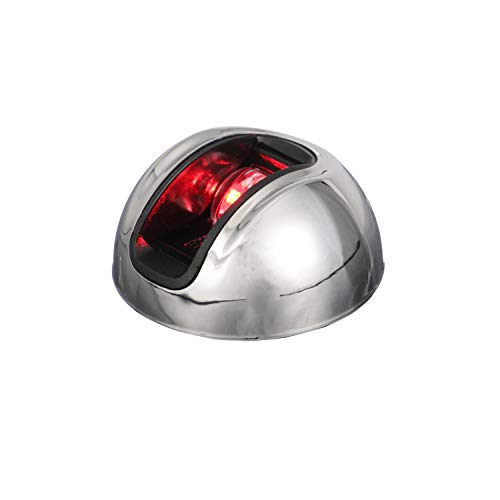
Attwood NV3012SSR-7 LightArmor 2-Mile Vertical Surface Mount Navigation Light, Red LED Lighting, Round Stainless Housing
Amazon.com
$29.86 ($4.59 / Ounce)
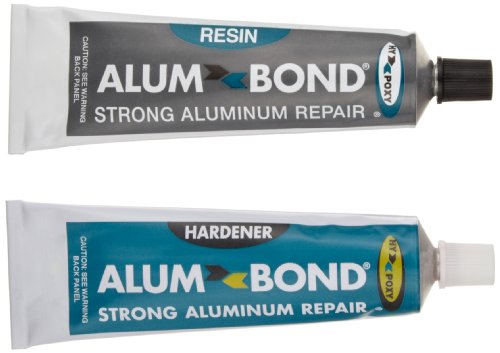
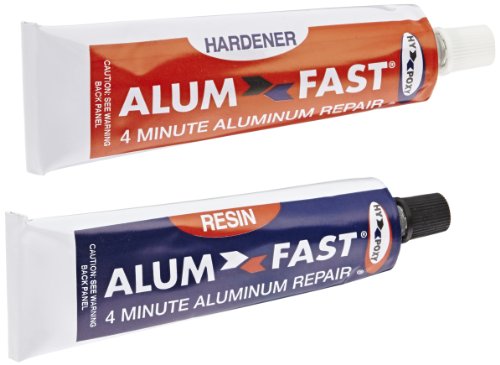
Hy-Poxy H-455 Alumfast 6.5 oz Rapid Cure Aluminum Putty Repair Kit
Amazon.com

Most epoxy coatings can seal seam or rivet leaks but not meant to bridge holes. Most are for applying inside the hull. The outside ones are more for a wear coating. My guess is this boat was left on the ground and partially filled with water, and sat for years. The prior owner did the bondo to hide it. Most of the foam is probably waterlogged. If you are going to attempt this kind of fix, recommend getting to both sides.
Yea I was planning on removing atleast part of the deck down the road. I just have a hard time convincing my self to do it because its not rotted yet. Im a little confused about why the epoxy wouldnt work though. Isnt filling a 1/8 or smaller hole in the bottom the same as someone filling in a screw hole? If I was confusing in my first post all of the larger holes are in one area and are getting patched with an aluminum plate. Anyway I got the bulk of the paint off now. Put smart strip pro on last night and left it overnight to strip the middle of the boat. Got the bulk of it off but need to do some touch up work. The front 2/3rds of the boat is clean aluminum. All of the issues are in the rear. I put more paint stripper on the outside of the bunks. Going to go remove that tomorrow. Im going to stick it out as long as I can and keep this updated. At the very least I learn how to work on boats.Most epoxy coatings can seal seam or rivet leaks but not meant to bridge holes. Most are for applying inside the hull. The outside ones are more for a wear coating. My guess is this boat was left on the ground and partially filled with water, and sat for years. The prior owner did the bondo to hide it. Most of the foam is probably waterlogged. If you are going to attempt this kind of fix, recommend getting to both sides.
- Joined
- Feb 18, 2009
- Messages
- 2,436
- Reaction score
- 2,333
- Location
- Perrysburg Ohio
- LOCATION
- Perrysburg Ohio
Going across the water at speed pounding on choppy water, all those little patches will probably pop loose or fail over a short period of time ! I would not want to go out in rough water with that boat in any way. For putting around in calm water with a small outboard you might get by. Cut your losses and start over, hopefully you learned what to watch out for !
I already have everything I need in order to patch it. If it doesnt work Im out a weekend. My plan was to run it a few times and keep leak testing it. If everything holds do a barrier coat over the whole bottom.
- Joined
- Aug 14, 2016
- Messages
- 6,746
- Reaction score
- 3,630
- Location
- Northern California
- LOCATION
- Northern California
Well, you have received some potentially discouraging feedback. At least you know what to watch for.
Something else I wonder about is the area with all the 1/16 - 1/8 pin holes. Is the hull skin in that area still solid? If you poked that area with a screwdriver, is it solid?. If not, then I would say it is time to throw in the towel. '
Otherwise, take pic's and post your progress. This forum is all about watching someone bring a tin boat back to life.
@FuzzyGrub 's makes a good point about a patch using pop rivets. The link below is to a video of a guy making a patch on the transom. One of the key points is to fully butter the patch with sealant. He put it on pretty thick, but not so thick the rivets won't fit. He also dipped the rivets in the sealant before installing them.
MrGiggles
Well-known member
Are the holes accessible from the inside? In the second picture, it looks like there's some rusty steel inside the hull behind the hole, if so, the corrosion is likely a result of the dissimilar metals reacting.
There are pop rivets made with a closed end that you can use below the waterline. I've never seen them on the shelves anywhere, but you can order them. As mentioned, regular pop rivets will leak.
It could be fixed if you're willing to put in the work. I'd make double patches of sheet aluminum, sandwich the hull between them with a strong sealant on both sides. You could fasten them with solid rivets, closed pop rivets, or stainless/aluminum nuts and bolts.
I had a 14' Quachita semi-v that had a 12" gash in the hull from running into something. I patched it on both sides just like I outlined above, never had any trouble with that area again. I did pop the hull again in the rocks, the hull was paper thin on that thing... Not a tough boat at all.
Thank you for all the imput. That rusty metal you were seeing is foam on the inside of the hull. Feels dry in that small section not that that means much. Thats the area thats getting the patch. I apreciate the video on how to do it correctly. It was my understanding that pop rivets leak on there own but I thought when you combine them with the 5200 it wont leak. I poked arround the hull especialy around any corrosion and no soft spots. I think the corrosion is on the outside. When I got the boat a lot of the bottom coating was very flakey and had water traped behind it. I think this traped water is what caused most of the corrosion. Today im finishing up most of the paint removal. I coated the outside edge with the smart strip pro and paper and let it sit 24 hours. Hit it with the pressurewasher and knocked most of it off. Ive got a bit of touch up but it makes more sense to do that with the grinder. I want to knock off all the corrosion anyway. Im going to pull the boat off the tarp and let everything dry out. Ill get some better pictures of the underside then.
Attachments


MrGiggles
Well-known member
Thank you for all the imput. That rusty metal you were seeing is foam on the inside of the hull. Feels dry in that small section not that that means much. Thats the area thats getting the patch. I apreciate the video on how to do it correctly. It was my understanding that pop rivets leak on there own but I thought when you combine them with the 5200 it wont leak. I poked arround the hull especialy around any corrosion and no soft spots. I think the corrosion is on the outside. When I got the boat a lot of the bottom coating was very flakey and had water traped behind it. I think this traped water is what caused most of the corrosion. Today im finishing up most of the paint removal. I coated the outside edge with the smart strip pro and paper and let it sit 24 hours. Hit it with the pressurewasher and knocked most of it off. Ive got a bit of touch up but it makes more sense to do that with the grinder. I want to knock off all the corrosion anyway. Im going to pull the boat off the tarp and let everything dry out. Ill get some better pictures of the underside then.
I have plugged the holes of a pop rivet with silicon, with mixed results. It's a bit needless though when there's a cost affective solution that eliminates the problem entirely.
Just curious, where in NJ are you boating? DO you leave the boat in the water overnight? If so do you have a bilge pump. Holes rotted into the hull of a boat does not sit well with me. If they were popper rivets I'd feel better about a repair.
thill
Well-known member
When I have a skin with a numbr of corrosion holes, I will sometimes drill them out and put solid rivets in them.
It works...
It works...
thill
Well-known member
Well, you have received some potentially discouraging feedback. At least you know what to watch for.
Something else I wonder about is the area with all the 1/16 - 1/8 pin holes. Is the hull skin in that area still solid? If you poked that area with a screwdriver, is it solid?. If not, then I would say it is time to throw in the towel. '
Otherwise, take pic's and post your progress. This forum is all about watching someone bring a tin boat back to life.
@FuzzyGrub 's makes a good point about a patch using pop rivets. The link below is to a video of a guy making a patch on the transom. One of the key points is to fully butter the patch with sealant. He put it on pretty thick, but not so thick the rivets won't fit. He also dipped the rivets in the sealant before installing them.
Good to see Dangar Stu again! He and I used to talk regularly. He came here to the US right as a hurricane hit, so we didn't get to meet in person. Really nice guy and he gave out some very good boat and engine knowledge. He's gotten away from making so many videos, but Dangar Marine has a pretty extensive library of helpful videos for boat owners. A+ in my book.
That being said, he should have filled the pop rivet holes with Sikaflex to keep salt water from eating the rivet from inside and eventually leaking, but he did mention that you can seal it from the outside.
Bantou
Well-known member
- Joined
- Sep 4, 2024
- Messages
- 133
- Reaction score
- 125
- LOCATION
- Central Texas
I’d check how far the corrosion around the smaller holes has spread first. Chances are, if it corroded enough to eat through, the metal around them is going to be extremely thin and brittle as well.How much of a pain is pulling the deck off. Im debaiting onnpulling the deck off and brazing thr smaller holes shut.
Similar threads
Boat For Sale
Starcraft Mariner 160 project/ parts
- Replies
- 0
- Views
- 313
- Replies
- 9
- Views
- 2K