20' Lowe Olympic Jon Boat

TinBoats.net

Help Support TinBoats.net:

This site may earn a commission from merchant affiliate links, including eBay, Amazon, and others.
On the 2" square tubing you used to attach the framing to the hull; did you simply clamp it to the hull and it formed to the contour or did you have to form it separately in a jig of some sort?
 
Jerry, I have been watching your progression of the modification of your boat. By the way very good looking, well thought out. You posted that you ordered 1/16" DP sheets of aluminum for decking. I am wondering if the 1/16" plate is thick enough. I have an Alumacraft 1448 that I want to put a front deck on and I was concerned with the thickness of plate that I would use. Your comments would bee appreaciated.
 
mmf said:
Lookin good Jerry! Glad you missed the hurricane too! Irene winds blew steady here all day today.
We had higher tides due to wind, but those pics from the east coast look scarry! :shock:

Mojo^ said:
On the 2" square tubing you used to attach the framing to the hull; did you simply clamp it to the hull and it formed to the contour or did you have to form it separately in a jig of some sort?
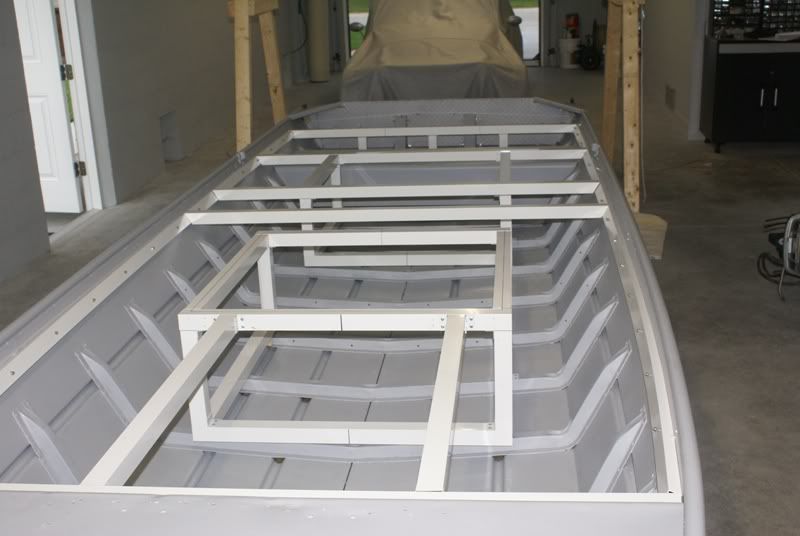
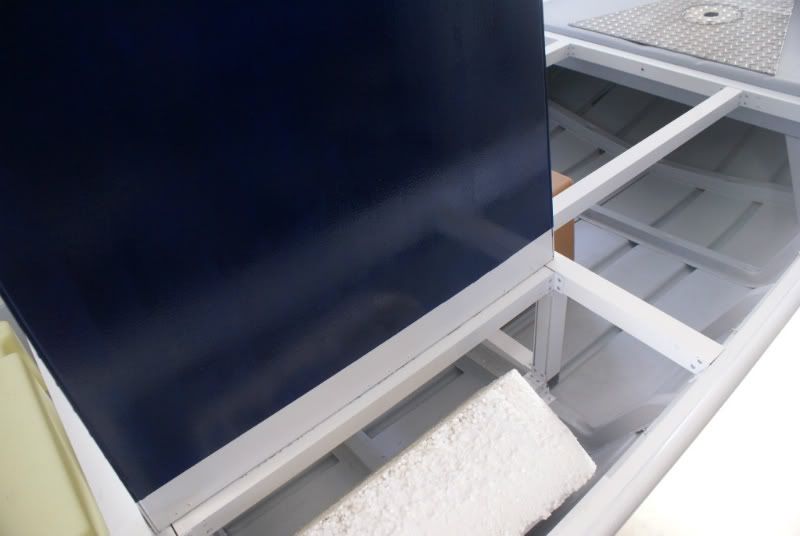
Mojo, the tubing on the side is 1x2 "C" shaped which makes it bendable. Starting at the bow, I just
kept adding clamps every few feet until it fit the line I had marked earlier. Bolted in place with
Stainless Steel screws and Nyloc nuts at 1ft spacing.
DSC00173.jpg


olbrazosDon said:
Jerry, I have been watching your progression of the modification of your boat. By the way very good looking, well thought out. You posted that you ordered 1/16" DP sheets of aluminum for decking. I am wondering if the 1/16" plate is thick enough. I have an Alumacraft 1448 that I want to put a front deck on and I was concerned with the thickness of plate that I would use. Your comments would bee appreaciated.
Don, The 1/16" DP is more flexible and requires more bracing than the 1/8 DP, but it is also lighter.
The square tubing that is being used for bracing is very light and stiff.
Weight is the enemy with small boats and that console is 4 sheets of 1/8 aluminum, each weighing about 25 lbs so I have lost 100 lbs of capacity.

Here is a link to photobucket where there are a few more pics.
https://s250.photobucket.com/albums/gg261/JerrySweet/
Thanks for looking and asking questions.....Jerry :)
 
boat looks frikin awesome!

small request.. could you take a few close up shots of your paint job? want to see how the finish looks when using a roller. i am still contemplation using a spray gun for a smooth finish.
 
Busbey, I think you get a lot more paint attached to the surface with a roller and the finish looks great if you use the white fine foam "professional" rollers, just my thought. :)
 
i agree about getting more paint on the surface. also, with the paint suggested, would i use a clear coat? is there any wet sanding involved?

what i want to see is an up close shot of the texture it leaves though. kinda like this.

fpinnin.jpg
 
Busbey said:
i agree about getting more paint on the surface. also, with the paint suggested, would i use a clear coat? is there any wet sanding involved?

what i want to see is an up close shot of the texture it leaves though. kinda like this.

fpinnin.jpg

Busbey, sorry to take so long getting back to your question. I just took these a few minutes ago. The roller had a 3/8 nap
which makes a slight pebble effect. For a smoother finish, use the foam "pro" roller.
For a mirror finish as in your photo, spray it. Spraying will involve multiple coats with wet sanding in between though.

DSC00237.jpg


DSC00243.jpg
 
Jerry, thanks! now i am in search of the "pro" roller for a comparison. yours looks great. i wasn't trying to get the mirror finish too much.

did you wet-sand it at all? i plan on either sanding down the paint to rough it up or continuing to take it all off to the bare aluminum. here are my thoughts, fix whats wrong please.

if bare aluminum, use self etching primer lightly >
rustoleum aluminum primer 2 coats >
wetsand?
2 coats of preferred color rustoleum topside paint >
wetsand?
1 final coat of rustoleum topside paint>
clear-coat of sort?

for the bottom of the boat, should i use something else over the primer? what if i want to keep it the primer grey color? would that rustoleum aluminum primer be good for UV protection and not chip and flake off?

a serious THANK YOU for your help.
 
Glad to help Busbey....that's what this website is all about.

The boat was pressure washed inside and out to get the dirt off
Wire brushed inside and out to get the loose paint off
Surface was wiped down with alcohol and a clean rag.
1 liberal coat of primer on the bottom
2 coats of white on the bottom
2 coats of navy blue on the sides
flipped over
1 coat of primer on the inside
2 coats of white on the gunnels
The console has 2 coats also.
There was no sanding, if I made a mistake painting (runs and such), I wiped it off and redid it. :)

There are no UV inhibitors in the primer, it is a bonding agent between the finish coat and the boat.
If you want the grey finish, then a Gloss grey topcoat (has UV protection) is the ticket.
 
good deal. going to get going on this soon. all i need is a day of sanding on the boat. next morning, clean with alcohol and start rolling the paint. how much time should i wait between coats? i may need to get up early in the morning to do this depending. i only have Saturday and Sundays to work.
 
Busbey said:
good deal. going to get going on this soon. all i need is a day of sanding on the boat. next morning, clean with alcohol and start rolling the paint. how much time should i wait between coats? i may need to get up early in the morning to do this depending. i only have Saturday and Sundays to work.
I forgot to mention that lacquer thinner is a good cleaner too and probably cheaper than alcohol.
Read all of the directions on the can and follow them religiously. :)
 
Busbey said:
.................
if bare aluminum, use self etching primer lightly >
rustoleum aluminum primer 2 coats >
wetsand?
2 coats of preferred color rustoleum topside paint >
wetsand?
1 final coat of rustoleum topside paint>
clear-coat of sort?

for the bottom of the boat, should i use something else over the primer? what if i want to keep it the primer grey color? would that rustoleum aluminum primer be good for UV protection and not chip and flake off?

a serious THANK YOU for your help.

Busbey, Don't want to get between you and Jonboat Jerry or your preferred was of doing something. I spoke with the Rustoleum Customer Service the other day about this topic. They said no sanding was needed between coats of paint if previous coat was not over a week old. If previous coat was over a week since applied they would rough it up a little. Just trying to save you some work or you might give them a call to double check. I guess I don't like to use sand paper very much if I don't need too! :wink:
 
Hey Jerry, I thought I used a lot of rivets on my diamondplate but I bet you have surpassed my number just on your framework! It's really looking good too! Are you going to cut the diamondplate with a handsaw? If so, thought I would give you my findings at least my experience doing it.....I tried using a carbide tipped blade at first but it gave me a very rough cut edge and it was hard to guide correctly for me, that's when I tried the fine tooth plywood blade which gave a much better cut and much more easy to guide, the only negative was having to pick the aluminum out between the teeth occasionally. I used a dental pick for this, and you must oil the blade alot. You can tell when it's time to pick the blade because it will stop cutting good and you will feel drag on the saw. It is very time comsuming cutting the aluminum too as you can't afford to make a mistake, as I measured and re-measured several times before I took the plunge! I hope this goes well for you! Keep up the great work ol-boy! :D
 
JonBoatfever said:
looks good, any updates?
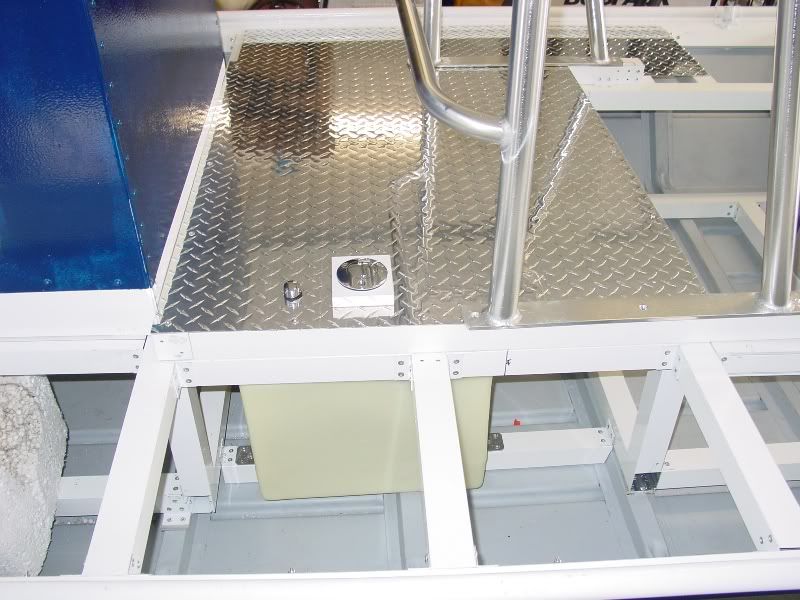
Hey Fever, The fuel tank fill and vent fittings are plumbed and the tank is decked over.
Now I can mount the leaning post on the decking. Still have to connect the fuel supply line
to the water separator in the back.
I'm beginning to deck in portions of the boat that won't be accessed.

mmf said:
Hey Jerry, I thought I used a lot of rivets on my diamondplate but I bet you have surpassed my number just on your framework! It's really looking good too! Are you going to cut the diamondplate with a handsaw? If so, thought I would give you my findings at least my experience doing it.....I tried using a carbide tipped blade at first but it gave me a very rough cut edge and it was hard to guide correctly for me, that's when I tried the fine tooth plywood blade which gave a much better cut and much more easy to guide, the only negative was having to pick the aluminum out between the teeth occasionally. I used a dental pick for this, and you must oil the blade alot. You can tell when it's time to pick the blade because it will stop cutting good and you will feel drag on the saw. It is very time comsuming cutting the aluminum too as you can't afford to make a mistake, as I measured and re-measured several times before I took the plunge! I hope this goes well for you! Keep up the great work ol-boy! :D
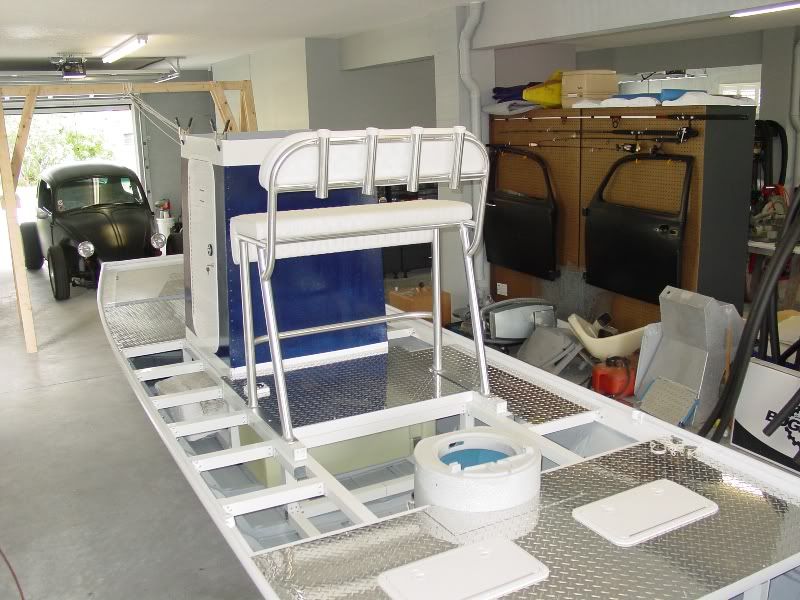
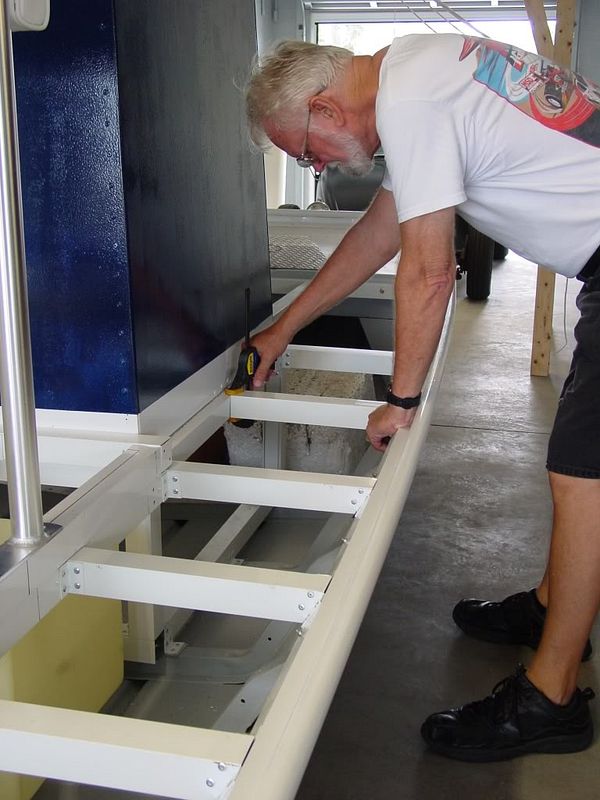
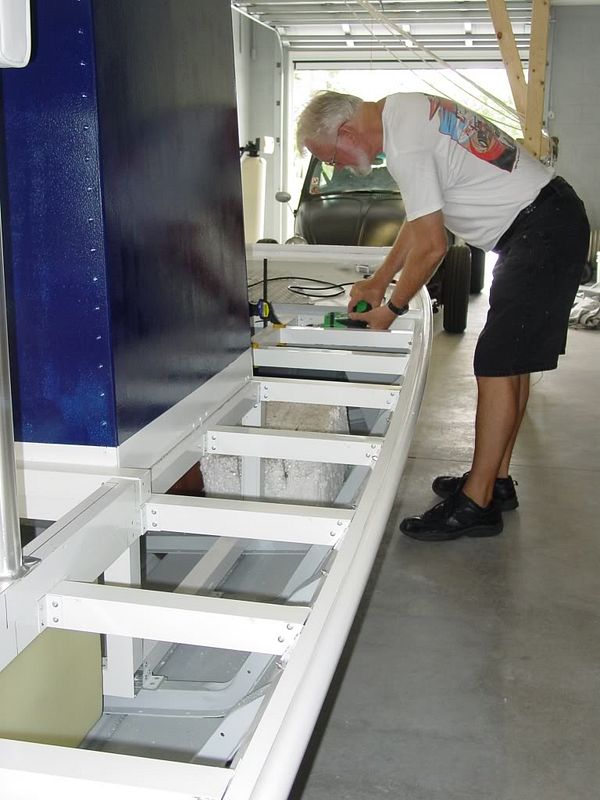
I have a skill saw with a fine cabinet grade carbide blade that is the "go to" for cutting the larger sheets of DP (4 x 10)
For slicing up the box framing or angle I have a compound miter saw with a 10 inch 80 tooth cabinet grade carbide blade also.
For cutting the smaller DP for hatches etc. I use my B&D table saw with a 10 inch 80 tooth cabinet grade carbide blade.
I'm sure that after this project is done I will have to replace all of them since they will be trashed, but in the mean time, they sure make life easy. You are right Mike about measure, measure, measure, then cut. I also use a T bevel to check an angle and transfer it to the miter saw.
Slow progress now, can't find hinges and hatch pulls locally.
Thanks for looking guys, I hope to get some pics up later today. :)
 
Got more licks in today. :)
Fuel fill and vent
DSC011182.jpg

Two new hatches
DSC011192.jpg

right side DP going in
DSC011212.jpg

front deck
DSC011162.jpg

as soon as I can get the steering installed, I can bolt the leaning post down.
DSC011202.jpg
 

Latest posts

Top