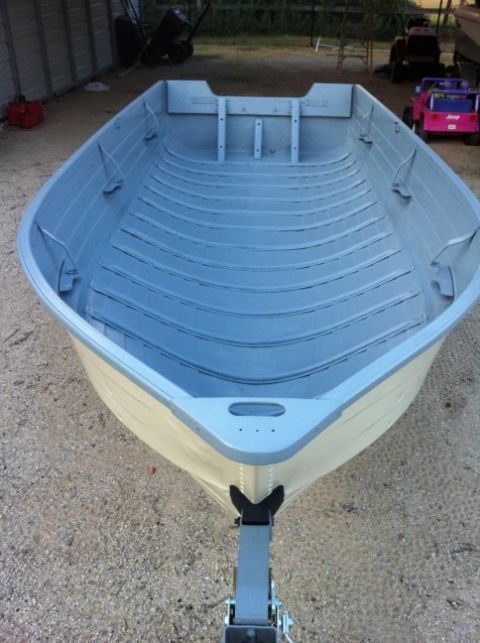
'68 Mirrocraft Rebuild

TinBoats.net

Help Support TinBoats.net:

This site may earn a commission from merchant affiliate links, including eBay, Amazon, and others.
Thanks Smackdaddy, though I am worried of the structural strength of the aluminum rivets.
I had two pieces joined with 2 pop rivets and was able to torque the rivets.
Stainless steel pop rivets are expensive, so looking at either self tapping screws or #8 bolts with lock nuts on pieces that are critical.
I do feel that the plywood would help add structural rigidity to the angle.
I hope to have the framework finished this weekend and will take some more pictures, but it can be difficult to see what things are with aluminum.
I am anxious to flip it so that I can finish the outside as that will be a bit of work in itself.
Once the hull is painted though, then I can begin to plywood the interior storage compartments, add flotation and finish the deck aluminum for the final deck. Can't forget to run electrical conduit either.

Russell
 
I do keep debating if I want to build any type of gunwale assembly in the main floor area. Reasons I keep hesitating is that I do not want to make it more than 6" in width at the top to keep from intruding upon the open area of the boat and sitting on the rear bench seat. Part of it would be used for open storage, then either end would be for flotation material. But overall, 6" wide at the top of it tapers down to not much at the curve of the hull, plus the total height would not be over about 11". Seems like a lot of work for what little I gain.
I have thought of just running two angles down from the gunwale to the floor ribs to stiffen the hull and to attach rod holders on one side, maybe make a simple assembly to hold fish finder and cup holder on the other.
 
A few pictures I took today. The basic interior frame is comple, all that is left is deck supports that will go in once I plywood the interior of each storage area. I am thinking of either 1/4" or 3/8" for the compartments, paint them all with a white outdoor deck paint.
The blue tape "x" in each picture designates a storage area.
I should be flipping the boat later this week to clean the bottom then start painting.
I took a look at the axle today, she looks straight, no camber built in, so may put the springs over the axle to lower it down 2-3". When I launch the boat, I have to put the rear wheels of the truck into the water about 6" deep.
 

Attachments

  • image.jpg
    image.jpg
    373.4 KB
  • image.jpg
    image.jpg
    173.6 KB
  • image.jpg
    image.jpg
    331.1 KB
Finally got the insides far enough along and flipped her over to strip the bottom in preparation of painting her. I have been doing test painting on scrap after having read up on this forum and others about painting aluminum.
 

Attachments

  • image.jpg
    image.jpg
    1.9 MB
  • image.jpg
    image.jpg
    840.1 KB
  • image.jpg
    image.jpg
    787.5 KB
When I was building the inside layout, I was wishing it was a 16' boat.

When I stripped the outside hull, I was wishing it was only 12' long.
 

Attachments

  • image.jpg
    image.jpg
    120.4 KB
[url=https://www.tinboats.net/forum/viewtopic.php?p=335294#p335294 said:
rscottp » 25 Nov 2013, 20:07[/url]"]Looks good! What are you going to do about the busted up keel?

First play with the Harbor Freight brazing rods out of curiosity.
If that frustrates me, take it to a shop have it welded.
Then grind clean to shape.
 
I will be interested to see how you do with those brazing rods. I tried some on my boat, alumaweld I think it was called. It kinda worked but the biggest issue was that the heat required really made the aluminum hull deflect and deform. It may work better on the keel because the aluminum seems much thicker. It has stayed where I put it on my boat after 2 seasons(I have now covered it with marine-tex). I don't think that I would use it again but I think it is good for some things.
 
Happy Thanksgiving everyone.

I kept putting off fixing the keel because of all the horror stories I heard of brazing aluminum.
First attempt was easy, let it cool, ground it to rough shape, filled in some spots, ground again and I dont see why people have problems.

Final sand some spots including holes I filled, vacumm it, wipe it down with acetone then wash it with white vinegar to give it a light etch.
Hopefully then tomorrow morning I can prime it with Rustoleum aluminum primer and let it fully cure.
 

Attachments

  • image.jpg
    image.jpg
    733.9 KB
  • image.jpg
    image.jpg
    649.5 KB
  • image.jpg
    image.jpg
    586.6 KB
  • image.jpg
    image.jpg
    660.3 KB
  • image.jpg
    image.jpg
    700.8 KB
The aluminum primer said 48 hours to recoat, I let it sit 72 hours. Had to press really hard, work at it with a fingernail to even scratch it.
Scuffed it up, rolled and tipped a coat of bare metal primer with some black in it to make grey.
Bottom of hull will be Almond color, sides and stern deep, dark red.
Wish I had thinned the primer a bit more, it flowed nice but still has some brush marks. But then I am used to spraying everything I paint.
Will let the primer now sit for 96 hours, waiting on the hardener to show up.
That will give me time though to light sand, tape off the paint line.
 

Attachments

  • image.jpg
    image.jpg
    165 KB
  • image.jpg
    image.jpg
    842.3 KB
Sanded the bare metal primer down with 220 grit.
I would rather sand a 30' wood/epoxy hull down. The rivets are a pain to work around and not take the primer off of.
Wiped it down fully and rolled a 2nd coat of primer on. This time I did not tip it with a brush, thinned it a little more and gently rolled it 2 different directions.
It layed down nicely flat as it dried.
I will let it cure till Monday when I will sand it lightly, then tape it odd for the Almond bottom paint.
If I do it right, I can roll 2 coats of topcoat in an hour without sanding between them, let it cure 2-3 days.
Then light sand and put a third final top coat on and let it cure.
 

Attachments

  • image.jpg
    image.jpg
    716.8 KB
I have the same exact hull configuration. How did you figure out getting the floor level? Did you terminate the L brackets you riveted to the ribs at the same strake line from front to back or something else. Here is my bare hull. The bottom shape and v are exact same as your boat. If you want to pm me that would be great too. I sure need some help. Thanks!

Lonestarinteriorpaint_zpsd057a6ad.jpg
[/URL][/img]
 
Yours is very clean looking hull, at times I wish I had painted the interior before starting.

Though there is a lot of information on this forum, it seems most people are lookers and not commenters. I was a bit surprised, though I was basing that on the Jeep forum where any post typically gets several comments, suggestions, ideas, etc.

Since I never received an answer about leveling, I researched pictures online of Mirrocrafts sitting in the water. I noticed that the hulls with a motor attached sat pretty level in the water at the juncture of the side/bottom hull. There is a lip or ledge running fore and aft at that point with rivets spaced an inch on center. I leveled using this point, from stern to just forward of midship, then compared it with the gunwales themselves, finding both reasonably close.

I leveled the floor using a simple laser level I have from the stern forward, marking the ribs where it hit. So the floor ends up 46" wide in the stern to abot 40" or so at the step up. The forward deck I ran at a slope up of just over 1/4" per foot to take into account that the hull does not seem to have the reserve bouyancy in the bow. By doing this, as I move forward on the deck, it levels out instead of dipping down.

I was disappointed last night when I went to begin top coating that the rustoleum pro paint requires a 24 hour dry period before topcoating. I had thought I could put a second coat on within an hour. Just means it adds an extra day and an extra sanding as I want at minimum of 3 topcoats. The first coat rolled on just a bit thin, not fully covering, but giving a good basecoat.
 

Attachments

  • image.jpg
    image.jpg
    115.1 KB
To expound upon leveling the floor with a laser, i made sure the hull was level both fore/aft, side to side. With a boat 45 years old one has to expect it is not perfectly square, even or anything else. You have to use your own judgement. The port gunwale was off a bit from the starboard even though all other aspects were level.

Oh well.

Leveling side to side was established using the gunwales at various places.
Once that was done, I had established the of the floor angles above the stern ribs at the centerline, 1 1/2" with a 1/2" air space below, giving me 2" of height.

The laser level I used, pictured below, shoots its beam out 1/2" above its flat base. I simply then laid 2 small pieces of 3/4" ply ocross 2 of the ribs at the centerline, making sure it was level with shims in all 4 directions. This had to be done so that I could slowly pivot the level to shine its beam on each rib from bow to stern, starboard to port. Where the beam hit the rib, I placed a mark with a marks all.

Pretty simple, quick.

As I laid the floor angles, I verified with a regular level that each was level side to side but also fore and aft with previous ones.
 

Attachments

  • image.jpg
    image.jpg
    673.1 KB
  • image.jpg
    image.jpg
    767.4 KB
First coat of Regal Red. Two more to go.
Thinking of putting a 1" wide black stripe at the transition line, sort of like how the blue tape looks.
Thoughts?
 

Attachments

  • image.jpg
    image.jpg
    570.5 KB

Latest posts

Top