Opinions on a fix

TinBoats.net

Help Support TinBoats.net:

This site may earn a commission from merchant affiliate links, including eBay, Amazon, and others.

jvanhees

Well-known member
Joined
Mar 20, 2013
Messages
186
Reaction score
0
Location
Brighton, MI
Figured I would post this up here as a separate topic, as it is important to get all the opinions I can on this...please let me know the best way to fix this oh experienced veterans!!! [-o< This is the joining piece of metal(keel ?) coming down from the front top - joining both sides together in front...If you followed this peice up further, to hook hole for the winch is there. This is a picture of the boat flipped over. sorry for the horrible terminology. I think this is where the PO ran his boat ashore all the time.

The large red circle is the main crack, and will be tig welded. The small red circle is the other crack I found...much smaller but will still need welding. The green circle is to show the that riveted seam..and it leaks alot across the whole seam..even with the junk from the PO.
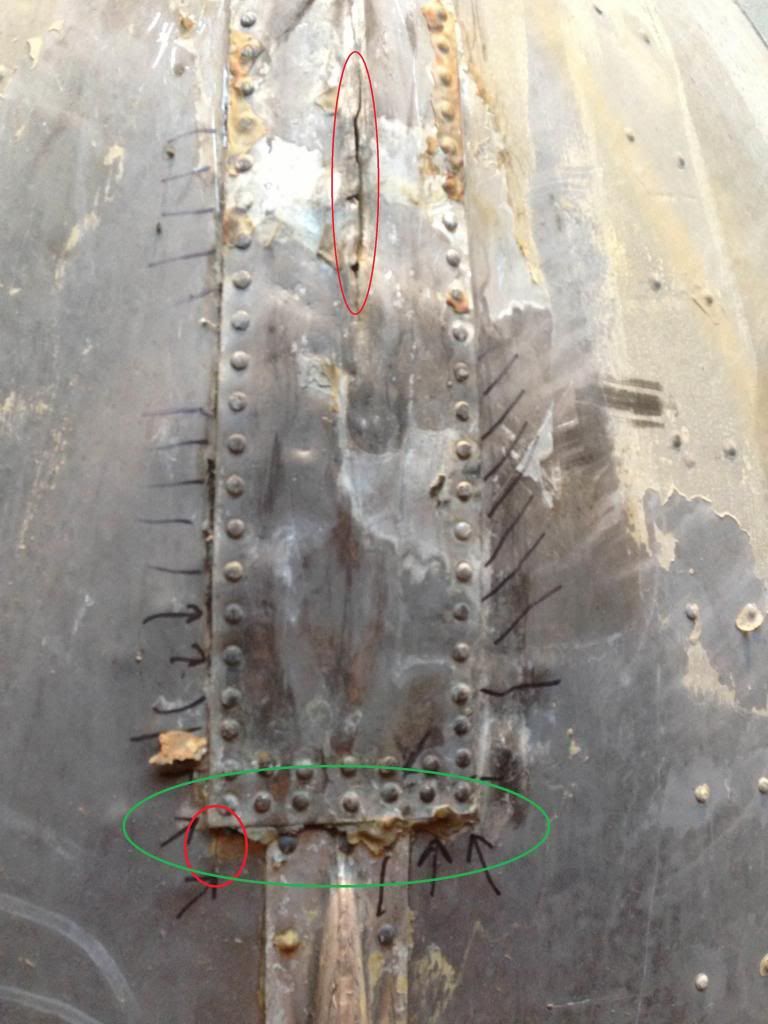
photo2.jpg


The blue rectangle shows the main problem area....how would you fix this?

1) Do I weld the 2 cracks, replace each rivet and seal with steeflex over top of it all? Will that be enough?

2) Weld the entire seal where the rivets are now all the way around the rectangle piece of aluminum(edge where marker lines point to), and also replace the rivets inside the welds...then steelflex?

3) Form a new piece of aluminum to go over what is currently there, extend wider by an inch on each side(size of the blue rectangle), and fully weld it in...covering over the entire area with a new peice of metal. Sounds the best...

Need some advise here! :?
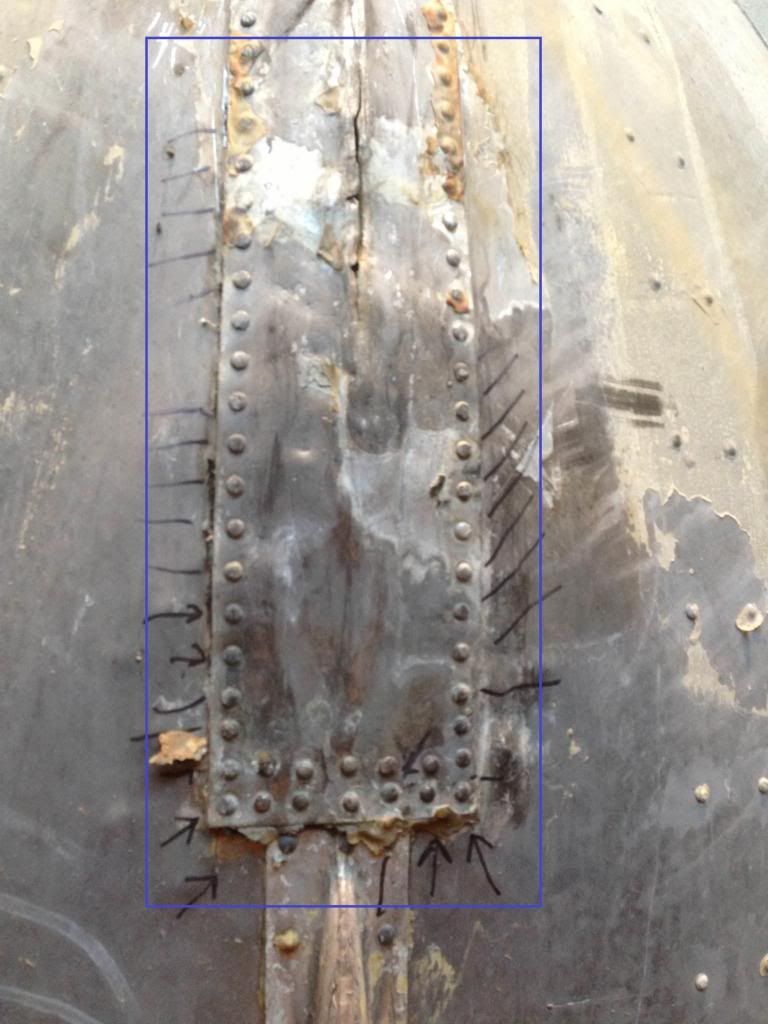
photo21.jpg
 
I am thinking the rivetted piece of metal is a patch, and am going to tear off the patch by drilling out each rivet, and then add a new piece where the old piece sits now.
 
jvanhees said:
I am thinking the rivetted piece of metal is a patch, and am going to tear off the patch by drilling out each rivet, and then add a new piece where the old piece sits now.
I am thinking you are right, it looks like a patch...but, since you are welding it anyway, instead of drilling out each rivet and tearing out the patch, why not just have the patch cut out and a new piece welded in...it would be a lot less work.
 
Depends on how your manufacturer built the boat.

On mine, that strip is present and runs from under the hull all the way up to the bow where it would be called a "Stem" on a wooden boat. This piece is part of the boat and not a patch.

Yours looks very similar to mine on the bottom of the boat.

Based on the limited view in the pictures I would say TIG the cracks and try rebucking the rivets. Since it looks like it's been beat to crap more than once, I'm willing to bet the rivets are loose and/or pulled.

Having the bejebbus beat out of it isn't helping either. I would probably look at trying to lightly hammer and dolly it back to close to it's original shape.

Then fill the hull with a couple inches of water and see if it leaks and go from there...
 
Sometimes there is a gasket type material where the seams meet. Welding can burn up the gasket material causing more leaks.
 
lckstckn2smknbrls said:
Sometimes there is a gasket type material where the seams meet. Welding can burn up the gasket material causing more leaks.


Good point, aluminum also carries the heat very quickly.

Talk to the gent who does your TIG welding and there are methods/techniques that can minimize heat damage while completing the weld.
 
Great white, ur right it runs up to the very top

Lck... U are also right... There is a black tar stuff that started leaking out when I hit it briefly with a torch... Which gives to the factory part argument....
 
great white said:
lckstckn2smknbrls said:
Sometimes there is a gasket type material where the seams meet. Welding can burn up the gasket material causing more leaks.


Good point, aluminum also carries the heat very quickly.

Talk to the gent who does your TIG welding and there are methods/techniques that can minimize heat damage while completing the weld.

I know it's a lot, but would you replace all the rivets if the rebuking doesn't work or put some goop or JB weld on there and pray?
 
I believe that I would entertain the idea of drilling out the rivets and cutting off all of the area that needs work. Have a new piece fabricated and then either take it to get tigged on, or go crazy with 5200 and some solid rivets.
 

Yup, thats an oem piece. Not a patch.

Fabricating it is do-able, but not easy if you're not experienced at it.

There is multiple planes in the piece and it will be very difficult to get it right.

If it were me, i would hammer and dolly the "f-d" up part as close to oem as possible, then TIG, then rebuck, then attempt a sealer if it all doesn't work.

The key to the seam leak is getting the pieces back into very close contact with each other. Then rebucking rivets pulls it all together. Finally sealer if it still doesnt close up.

The cracks are just a simple matter or rewelding...
 
wingsnhammers said:
I believe that I would entertain the idea of drilling out the rivets and cutting off all of the area that needs work. Have a new piece fabricated and then either take it to get tigged on, or go crazy with 5200 and some solid rivets.

good info, what would you recommend for solid rivets? Bull frog rivets and 5200?

great white said:

Yup, thats an oem piece. Not a patch.

Fabricating it is do-able, but not easy if you're not experienced at it.

There is multiple planes in the piece and it will be very difficult to get it right.

If it were me, i would hammer and dolly the "f-d" up part as close to oem as possible, then TIG (tig the cracks or tig around the entire peice??), then rebuck, then attempt a sealer if it all doesn't work.

The key to the seam leak is getting the pieces back into very close contact with each other. Then rebucking rivets pulls it all together. Finally sealer if it still doesnt close up.

The cracks are just a simple matter or rewelding...

Ok thanks for all the help GW, question above in red...

I am not sure how the dolly will work on the under side with another piece of aluminum in between and rivets, but will definitly try this method. Welding the 2 cracks obviously. Then I think I will be hammer/dollying & rebucking at the same time inevidably correct? Then once I weld and hammer/rebuck, I will retest.

If it still has leaky rivets, I will replace the each rivet with a solid or bullfrog rivet and 5200. Steelflexing over everything when done.
 
You can TIG just the cracks or you can TIG the whole piece.

Cost goes up the more you weld though.....
 

Latest posts

Top