14' Starcraft Semi-V Rebuild

TinBoats.net

Help Support TinBoats.net:

This site may earn a commission from merchant affiliate links, including eBay, Amazon, and others.
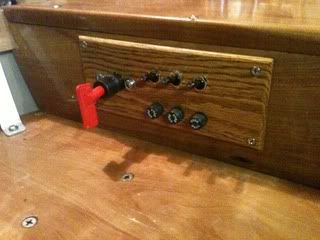
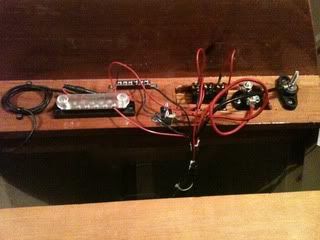
The project is coming along. I am still waiting for some electrical supplies to show up - come on Fed-Ex , just leave it at the door!

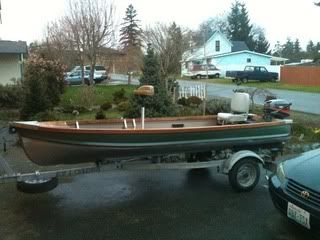
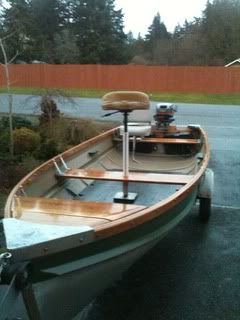
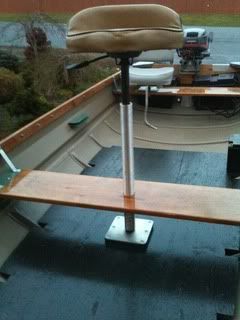
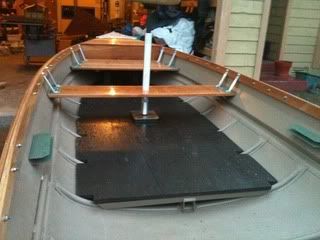
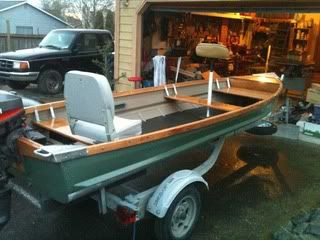
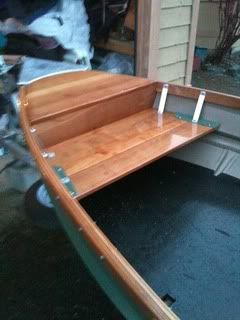
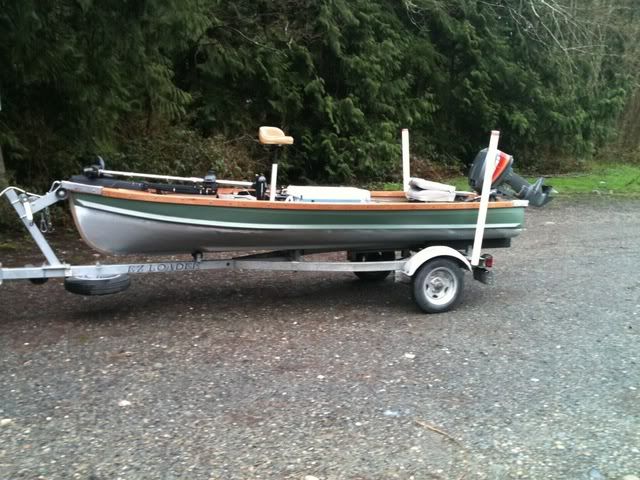
I got the flooring cut and fitted. The pedestal seat bracket is installed. I did some rattle can paint (for now) to make the boat picture pretty and I will be installing all of the wood parts this weekend. I should have a new set of pics on Monday =D>

One more paycheck and one more weekend and it will be time to go fish. That was the whole point in doing this, I think. #-o
 
New pictures from the past couple of weeks of work on the boat.

IMG_0265.jpg
IMG_0264.jpg


IMG_0267.jpg
IMG_0268.jpg


IMG_0269.jpg
IMG_0266.jpg


Work completed after the photos include wiring of 24v & 12v systems and construction of a battery box holder.
 
WOW! Looks good SkagBass!
I like the look of all of the stained wood. The wood gunnels look sweet!

Any more plans for your project?
 
Hey Brian, Man, this is a GREAT website!! Some much great info. thanks for the link!!
As I've said along the way,, you have a great project going there. Fine work. Now I can follow it from here. =D>
 
gmoney said:
WOW! Looks good SkagBass!
I like the look of all of the stained wood. The wood gunnels look sweet!

Any more plans for your project?


Thanks guys! For this current build, i only have a few more plans to execute. Electronics panel, sonar and mount the bow mount trolling motor.
This summer I will steelflex the bottom of the boat and touch up the rattle can paint job on the rest. Next year I hope to put in marine grade ply for the floor and get it carpeted. I also need to do 'something' in the area where i removed the middle bench.
 
bm3dufner: I did not keep track of the cost of this project. I don't like the fall out from the wife when she see's the big picture.
Most of the gear i purchased over the last two years so here is the best my memory can do.

Boat, motor, and trailer - $1800.
Trolling motor - $200.
Fishfinder - $300.
Jatoba (wood) $40 plus some computer work.
Bolts and screws - $100
Paint - $50
Electrical Hardware - $125
Aluminum framing w/welding - $70
Seats - $150
3 months of work - $priceless$

I would estimate i am in around $3000 for the finished boat.
 
Here are a few of the final pictures of the Spring build. I took it out on Saturday and caught a couple of smallies. It is noticeably heavier now, that 9.9 doesn't push it as fast as it used to. Some of my major concerns were answered. The pedestal seat holds sturdy. And the flooring is spacious and works well. The location of the livewell needs to be revisited, it is just a cooler so not much work involved in that. All of the electronics work well including the duel bank charger. I am so glad i wont have to haul batteries to and from the boat in between trips.

IMG_0274.jpg
IMG_0273.jpg


Made the switch plate out of a piece of oak. I dont like the way it looks with the jatoba. I will be reworking the area that the switch plate mounts to. I need better access under the bow.

IMG_0272.jpg


And a final picture at the launch.

IMG_0278.jpg
 
That thing looks soo good that the fish might just want to jump right in it with yah...

I have a question about the bottom of your boat. Did you spray anything on there to protect the bare aluminum and keep it from oxidizing? Do you plan on just cleaning and polishing it up every so often? I would like to do a similiar paint job on my build but I don't feel like paying $60+ on a quart of Sharkhide or similar product. Any help would be great.
 
The original owner had the whole boat painted silver. I did nothing to the bottom section yet. I plan on splurging and getting the steelflex to apply to the bottom this summer when it warms up.
 
gmoney said:
Polyurethane foam (closed cell foam) has a buoyancy of approximately 60 lbs per cubic foot. So divide the weight of your boat, motor and everything inside by 60 and that will give you a good approximation of how much foam you will need in order to keep your boat from sinking if you get swamped.

This is great info to have...thanks gmoney.
However my question for anyone that knows is:
If your boat has a good bilge pump installed with a reliable power source doesn't that completely eliminate any need for this "safety foam" ???
 
HookedUp443 said:
This is great info to have...thanks gmoney.
However my question for anyone that knows is:
If your boat has a good bilge pump installed with a reliable power source doesn't that completely eliminate any need for this "safety foam" ???
A bilge pump has a set flow rate, if water is coming in faster than it is leaving your screwed!
 
gmoney said:
HookedUp443 said:
This is great info to have...thanks gmoney.
However my question for anyone that knows is:
If your boat has a good bilge pump installed with a reliable power source doesn't that completely eliminate any need for this "safety foam" ???
A bilge pump has a set flow rate, if water is coming in faster than it is leaving your screwed!

HahaHa #-o #-o #-o Good Point.
 
Excellent job! I love the wood look...it makes the boat stand out from the rest

I'm beginning to seriously wish I had the time to redo my semi-v...you guys are all making me extremely jealous! haha
 
What an absolutely great job. I especially like how you incorporated the wood on the top of the gunwales, as it gives the boat a very classic look. Although I have been a member for a little while, I just recently got my hands on a 14' MirroCraft Deep Fisherman which I am going to start on as soon as I tie up a few other projects around the house (that way I'll stay off the wife's fecal roster).

My question for you is about the gunwales...is that the same Jatoba that you used for the seats and the forward decking, or is that ash. I know that ash lends itself well to bending (ie: snow shoes, windsor chairs...). Also did you have to steam bend it to get it to fit. The pictures you provided with the aluminum gunwales removed makes it look a little too delicate to bend a piece of hardwood stock against without damaging it. Did you bend it and clamp it against the rails before you removed the aluminum gunwales first?
 
Thanks for your comments.

The previous owner had a similar setup with the wood for the gunwales, so I did not replace any aluminum. This was my first time working with jatoba and with a boat. The original wood pieces that were replace were 3/4" thick and simply bolted to each other with the aluminum of the boat in between. I have done some steam box bending before and knew I didn't want to deal with that. I ended up ripping the jatoba into 3/8" thick slats then laminating them back together when installing them on the boat. Funny thing about Jatoba, it doesn't like epoxy too much. I found out after the fact that there is a chemical i should have treated the wood with prior to using the epoxy on it. The wood contains too much oil and I am told this chemical application would have helped with bonding. But, i have plenty of bolts in there to keep it together.

So basically after ripping to 3/8" they were very flexible. I started on the inside and would clamp two pieces of the 3/8" jatoba together, add two pieces to the outside and bolt them together. Very crude construction but it seems to have worked, the boat is very stable no bending of the sides while in the water.

Good luck on your project.
 
Top