1977 Fisher Marine 14ft Jon Boat...FRONT DECK BUILD

TinBoats.net

Help Support TinBoats.net:

This site may earn a commission from merchant affiliate links, including eBay, Amazon, and others.
Well still been really busy with work. So I have been trying to find a smaller motor. My dad is going to attempt to paint the inside of the boat on saturday.

We did get some good news this morning...my uncle has an older johnson motor that has been sitting in his garage for a few years...but he said if we wanted it to come and get it.


Will post updates as the mods continue.
 
Deffinitly keeping an eye on this one! I've got a 1470 Grumman that i'm currently working on. I've got some pictures and getting them setup and going to be starting a thread on it here soon. I'll keep a close eye on this one as well, as my intended use is for a duck boat as well. Great job so far! Keep us posted!
 
So I went to my uncles house last night to pick up the motor. It turned out to be a 1976 9.9 Johnson. Cosmetically the motor looks great. It has been sitting for about 5yrs. So me and dad are going to gut the thing and clean it all up. I think we are going to try to score a 15hp carb for this bad boy.

My uncle also had a 1975? 20hp Mercury 200 that he said we could have if we wanted. It was once converted to a remote steer. So if anyone in the Southern Illinois area is interested I would give the motor up for $100. It would be a good parts motor or maybe someone could fix it up.

99johnson.jpg
 
I noticed in your last image of the outboard you had one of the sliding seats removed. I have almost the exact same boat FM Netter 15, and excited to start into the mod but noticed that there is almost no way for me to access the nuts on the on the bottom of the slider track. How did you get the seat out? Did you twist it free from the track or where you able to get to the hardware?
netterCloseup.jpg

On the side panels a previous mod was made to hold foam panels and this does not leave room to get to the nylock nuts....
 
Well mine was as easy as flipping the boat over to paint it...and the sucker fell out. But we just got lucky haha.

We tried to use a wrench and a screwdriver...but as you stated there was no room to get to the nut. We were just going to grind the top of the bolt down and just punch it out.
 
Well I have good news and bad news...

The good news 1st. I sold the 40hp that came with the boat. Got $500 out of it.

Also scored a cheap piece of 2" foam. So I started cuttin it up to fit in the floor.


The bad news...We started tearing into the 9.9 that my uncle gave us. Some pieces on the carb were completely broken off so it will have to be replaced. One of the fuel hoses was hard as a rock and cracked. But on a side note it did have a new water pump, impeller, and housing.
 

Attachments

  • Foam.jpg
    Foam.jpg
    16.8 KB · Views: 3,323
  • Foam2.jpg
    Foam2.jpg
    26.8 KB · Views: 3,323
So I got fed up on waiting for a good enough day to use a gun to paint the boat. So last night after work I picked up some rollers and a paint brush.

I called my buddy this morning to help me get the boat flipped over and in the garage because my dad was not home.

And we went to town...


I will give it another coat on monday.
 

Attachments

  • paint.jpg
    paint.jpg
    21.6 KB · Views: 3,313
  • paint2.jpg
    paint2.jpg
    26 KB · Views: 3,313
  • paint3.jpg
    paint3.jpg
    24.6 KB · Views: 3,313
  • paint4.jpg
    paint4.jpg
    20.5 KB · Views: 3,313
  • paint5.jpg
    paint5.jpg
    27.2 KB · Views: 3,313
Put another coat on Monday morning...Do ya guys think I should roll another coat on or maybe spray 1 or 2 coats on? Or will 2 coats be enough?

front.jpg


rightside.jpg


leftside.jpg


ssscrews.jpg

These are the SS Stove bolts we used to replace the rivets for the transom support.

back.jpg
 
if you have the ability to spray it, I would spray on 2 more thin coats... it will be that much more stronger and last that much longer.

What you've done so far looks great!
 
Still been really busy with work, helping my dad remodel the house, and moving. Have not had time to do anything else with the boat.

Although I did finally get a 15hp carb for the '76 Johnson. Now we just got to find time to get the motor put back together.

I did stop by the other day to check on the paint on the boat. It has been on for almost 2 weeks and it seems to be getting a little harder. I talked to my bro-in-law and he said it took almost a month for the paint to get fully cured and setup when he used it.
 
Had a little time to go to my parents house this morning to work on the boat.

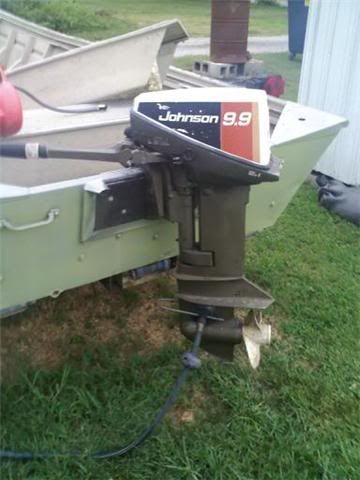
We ended up working on the motor instead. Got the 15hp carb installed with surprisingly no problems. Pumped up the ball and gave it a tug. 1st pull.....nothing. Little choke, 2nd pull....fired right up.

Let it run for about 15seconds before my dad shut the motor off and started cussing. There was no water coming out the "pee hole". So we took the lower unit off, took the water pump apart and inspected the impeller a 2nd time (pulled it apart after we 1st got the motor). It looked fine. We put it all back together and did a little looking. We could find no blockages or anything. so we put the lower unit back on. Dad said maybe he didn't get it on correctly the 1st time so he took extra precaution to get it back on right.

Started the motor back up and still no water coming out the "pee hole". Though there was water coming out the exhaust and around the prop. So we just figured on buying a whole new water pump kit and putting it in. Well with the knowledge of one of the fellow board members I did some research and found that 74-76 does not use the "pee hole" just the exhaust. We were really relieved to find that out.


Now on to even better news...My uncle had an older Minn Kota 36lb Thrust All Terrain Trolling motor laying around in his garage. He told us if we wanted it to come get it. We went and got it, hooked it up to the batter and pushed the button...nothing. Switched it over to continuous and it worked just fine. My dad just happened to have a switch that fit that trolling motor so we put it on and it worked just wonderfully.


Sorry for the rambling...not sure when we will get to work on it again but I'll keep this updated as we go.
 
Finally got all moved in to the new house and found time to get over to my parents house to work on the boat.

1st we put a new fuel pump kit in...luckily we decided to do this because whoever worked on the motor before us did not put the fuel pump back together right. The motor runs awesome now...just one more part to replace and it will be ready to go.

We finally got to get the inside painted. I have been waiting on this day to come like a child waits on Christmas day to come. One more coat of paint on the inside and I will be able to start my mods :D

primer1.jpg

Primer going on...

primer2-1.jpg


We had to move the boat down to my house to continue painting it because the wind pcked up and my dad didnt want paint to blow onto the neighbors house/cars.
paint1.jpg

After the 1st coat


paint2.jpg
 
do you plan to integrate the sliding seats into your mod? I see they are still in as you are painting the inside. I noticed that on mine the thickness of the paint on the inside of the track rail made it difficult to slide the seat where the paint was built up.
 
The front seat is permantly removed for a more open layout. As this boat will mainly be for duck hunting. the back seat will be covered with plywood as well as the back portion of the boat. So the batteries and gas tank will be hidden.

I plan on puttin some screws through the back seat to keep it stationary.

Put a 2nd coat of paint on it today. Will get some more pics up later.
 
Boats Looking good!!! wish mine was 50 wide (only got a 36......sigh....) Kuddos on the duck hunting part... I just built a blind for mine, I know you are just starting your mods, but here's the link to check out a pretty cheap blind... I think I'll have about maybe $85 total in it..... could be something to incorporate into your overall rebuild.

https://www.txwaterfowler.com/forum/forum_posts.asp?TID=20485

Here's the original design I got my idea from (he used Bimini hinges, they were a little to pricey for me)
https://mudmotortalk.com/mmt_v2/viewtopic.php?f=4&t=3347
 
Got the 2nd coat of paint put on Friday morning. Didn't have any time to work on the boat this weekend...had to help the G/F move yesterday and spent the day with her today. I did pick up some 1x3's and some MinWax Helmsman Spar Urethane to level out the floor before putting the AlucoBond Down.

Also picked up a 3'x3' anti-fatigue mat that will get cut up and fitted in the back where the gas tank and batteries will sit.
 

Attachments

  • paint1.jpg
    paint1.jpg
    36.8 KB · Views: 1,771
  • paint2.jpg
    paint2.jpg
    37.6 KB · Views: 1,771
  • paint3.jpg
    paint3.jpg
    32.2 KB · Views: 1,771
  • paint4.jpg
    paint4.jpg
    437 KB · Views: 1,771
  • paint5.jpg
    paint5.jpg
    35 KB · Views: 1,771
  • paint6.jpg
    paint6.jpg
    30.7 KB · Views: 1,771
Top