Alumacraft MV1448 Seadoo IB jet, Still jetting

TinBoats.net

Help Support TinBoats.net:

This site may earn a commission from merchant affiliate links, including eBay, Amazon, and others.
This is pretty awesome, the idea of the jet jon's is new to me, just recently discovered them, i really like what you have done, I like the flotation pods as well. I have two boats, and old sears 14ft jon, and my real project a 21ft flat bottom mamoth built by semco. I am going to have to use a spool gun quite a bit comming up here soon, i have a 180 miller and just picked up the 100 series spool gun, i have alot of experience working with metals, however not a whole lot when it comes to aluminum. If you have any tips on working with a spool gun pm me, i would appreciate it. I am going to be working with mostly 3/16 in thickness, have to weld in a new chuck of hull in the aft of the beast, you can check it out on my build in my sig. like i said, any advice is greatly appreciated as i have not yet started to practice welding with the spool gun. Thanks
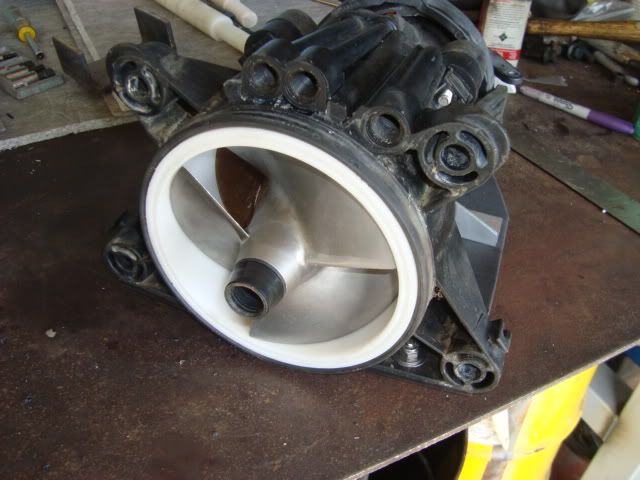
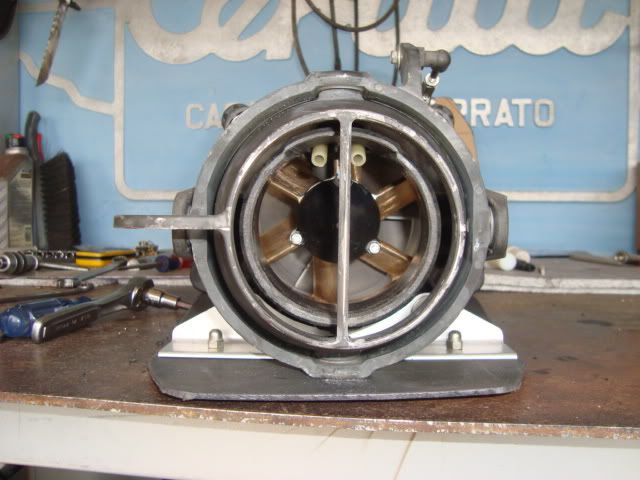
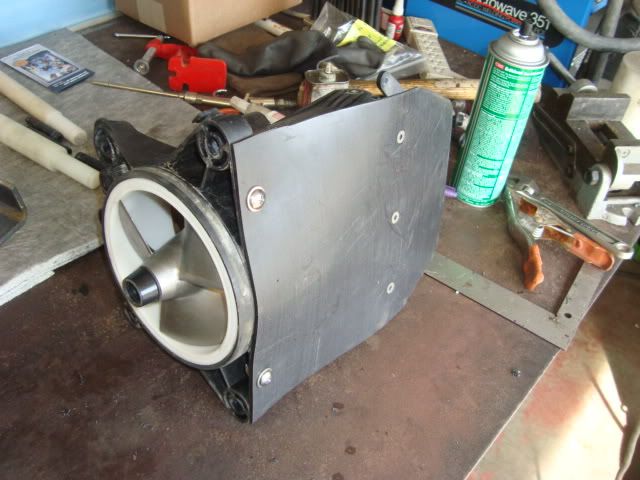
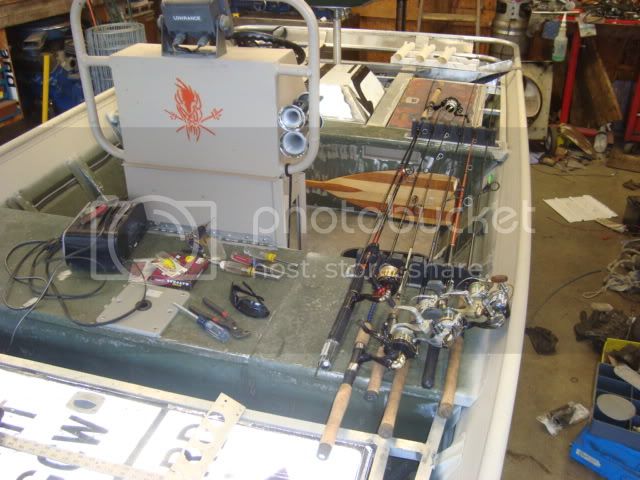
 
Flat bottom, sorry, been away doing a Cummins swap on '70 F350.

Spoolgun is like any wire feeder, just aluminum gives you less notice before it melts through...

Jamie
 
Well, I guess being bored in Afghanistan pays off. I've read the first page or 2 of your build numerous times, but never the whole thing until now. Wow. Absolutely awesome work. Great job Man.
 
Thank Mike, for what you guys are doing over there and also commenting on the boat.

The oldest and I had it out last Monday for the first time this year, river was up four feet so we slow timed it to let the engine and pump loosen up from sitting and made it all the way up to the dam. The boat ran great, dodged a couple obstacles like the filly it is. Fished for an hour or two, only caught one 11' smallie but had a great time. On the way back the wear ring blew apart in the pump, partially blocking the discharge so at 5k we were only doing 20mph. I have the pump torn down and the rebuild kit is here so I'll post up some pics as I rebuild it and replace the wear ring.

Jamie
 
Quick update, spent some time this week getting the pump rebuilt and wear ring replaced. Rebuild was pretty simple, made a custom driver for the seal and bearings. I did end up taking a die grinder to the bronze impellor housing, removed all the casting bumps and sharp edges as well as cleaned up the nozzle assy. I also took the time to make a small ride shoe to keep the water from backwashing over the stern and maybe with the work it'll go faster now. Used the mill to cut the aluminum angle and some cardboard to figure out the form.

New wear ring and driveshaft seals (mine were missing)
DSC00904.jpg


DSC00905.jpg


DSC00906.jpg


I'm out of silicone or I'd have the pump back on the boat.
Jamie
 
I really love this boat. Been out four times in the last two weeks, averaging about three gallons of fuel a trip. With the rebuilt pump the hull surges to plane out again, planes out around 20mph and just zooms faster from there. Cruise is 6400rpm @48 mph, tops out at 7k @51. Handling is very stable at speed, at 30mph it'll plow the nose forklift style if I need to. At idle it's back to being stable enough the oldest was able to drive us up a chute to retrieve and expensive lure last week.

Saw a bald eagle Friday evening so that was really cool. I was wondering why the local Canadian Geese were up on the cliff side next to the river, then this thing took off over the boat as I was trolling along. Amazing how the air sounds as it goes through their feathers. I have pics and some video I need to upload sometime.

I get lots of compliments on the hull and everyone either wants one or asks when I'll finish mine :) Fact is I'm having too much fun fishing it. I did find a pin hole leak on the pump housing so sooner or later I need to pull it down to a bare hull and reweld all the joints with the Tig. Maybe later, there's fishing to be done.

Jamie
 
Just bumping your post to the top for a guy I pointed here. He had what looked like a 1426 with a jet-ski motor. That thing just barely fit between the sides.
 
Thanks Ben, I don't have much to add for it, I love running this boat, had it out last night and twice last week. I am so happy with it, get lots of compliments and more stares.

It's loud, it's fast, and it missing a motor. :wink:
Kicking the rooster tail up even get's the swimming kids pointing at it. =D>

Jamie
 
Flatboat, thanks for the compliment. Lima, eventually. I have tan carpet and a case of the tan Rustoleum textured paint for patio furniture. Honestly I'm having too much fun working the boat now. We went out three times last week, hoping for two trips this week. The water is starting to clear up and top waters are hitting, my favorite time of year.

I need to do something with the ride plate because I'm blowing water all over the back of the boat with the depth finder transducer low enough to read. I need to finish skinning the rear deck, the kid keeps dropping fish through the holes, had one end up under the motor plate and he was a pain to get out. I told the oldest to catch bigger fish. :)

Jamie
 
Been dealing with the Berkley 6rod holders for two years, read about the golf club tubes vs. PVC so picked up ten of them at Dicks last night for $1.90 each. They are 34" long and 1.25" inside diameter. Follow along.

The old way, lures got tangled, rods got tangled and twice ended up on the pavement. As you can see, the rods blocked both hatches and I put them on this side because before they blocked the fuel tank access.
DSC00946.jpg


Used the mill to bore out some recycled angle. Kept the holes towards the lip so I could cut the hull profile on the long edge. Holes ended up being 1.40", the rolled lip on the tube is 1.5" so I think I would have to hole saw them to 1 3/8" and open the hole a bit if I didn't have the mill handy.
DSC00947.jpg


DSC00948.jpg


DSC00949.jpg


Oldest showing off his 'helpful' stance.
DSC00950.jpg


I'll bend a peice of sheet metal for a cover and probably put carpet on it. The lip hole is bigger for the carpet to go around the tube.
DSC00951.jpg


Finally Nate ready to go out. He likes catching, not so much the fishing part.
DSC00952.jpg


Now to do the other side and then the back. Once fit I'll pull the deck up and weld them to the hull and the extra tabs for the cover to screw into.

Jamie
 
Awesome man, I'm planning on doing the same thing for a rod holder. Didn't know you could buy the tubes at Dicks, let alone anywhere. My best friend works at a golf course, so I was just gonna see if he could "find" some in the pro shop...
 
Been tinkering... I was going to just get a sheet of aluminum bent and trim it to fit but now I think I'm going to recycle my front dack and the other half of the back seat since they have the rounded edge and use them from rod covers plates. That way I can mount some screw eyes on the face and place a couple small plastic lure boxed along the side of the boxes and they won't fly out of the boat. I'll take some pictures once I get further along.

Jamie
 
Here's some pictures I took this evening before work (12hr nights) showing the brackets welded in place and the old seat section. Should turn out well.

DSC00954.jpg


DSC00955.jpg


DSC00953.jpg


Brine, we're having some Georgia weather now, I'd melt if I had to deal with it all summer.
Jamie
 
Ok, half hour of work before going to work, eh? Cut the old rear seat up using my Skill wormgear saw. I love it because it's heavy enough that it doesn't kick or buck and even a nice dull wood blade slices right through the thin aluminum. Just placed the metal on a chuck of consumable plywood and cut away. Started big, then trimmed it to fit. Of course I had to jump on the panel to get the right angle too, precision tweaking. :?

I'm not sure how I'll integrate the bow cap so I left the side panel long. I'm thinking about making the cap this height so I can create a better extinguisher compartment and an anchor locker up front so I can keep the line and anchor off the casting deck. I was going to use a casting deck hatch for the anchor but I like this idea better. I think I'll just make a 4-5" hole in the top of the cap for the mushroom anchor to sit in, line down.

I like this design, I can still get a good grip on the gunnel cap to control the boat when I'm out of it. The top of the cap is 1.5" below the gunnel and 3.5" wide so I can sit something there without too much worry and the lip will work well to hold a small lure box.

I'll probably just dust them with some cheap tan paint until I'm ready to put the carpet on.

DSC00956.jpg


DSC00957.jpg


Now to do the other side...
Jamie
 
Nice. I may have missed it, but what's the plan for the handle end?
 
I'm not 100% sure. I have some bimini U brackets that I was going to just use a cheap bungy cord to hold the whole mess down as the reels sit on the middle bench. The rods going into the back deck have their reels resting in about the same spot. Seems too simple.

Jamie
 
Top