You are using an out of date browser. It may not display this or other websites correctly.
You should upgrade or use an alternative browser.
You should upgrade or use an alternative browser.
Rebirth of the Tin
- Thread starter CrappieReaper
- Start date

Help Support TinBoats.net:
This site may earn a commission from merchant affiliate
links, including eBay, Amazon, and others.
Zum
Well-known member
Darn shame we have to concentrate on making a living sometimes.Your boat is looking nice,I'm sure you will be thinking of mods while your working.
CrappieReaper
Well-known member
- Joined
- Dec 21, 2008
- Messages
- 49
- Reaction score
- 0
The weather was so nice today, I couldn't help myself but do something on the boat. One of the best things about Modding your own boat, is that you can make changes on the fly. I took a seat and pedestal off my glass boat, measured the tiller handle and placed the seat in the approximate area I would need a pedestal base. With all original aluminum still temped in place in the rear of the boat, I checked the amount of room I would have IF I left the sidewalls in place for storage compartments. It was cramped to a point and I first decided to go without any of it. Then thinking about it longer, I plan to do most my fishing from the front of the boat anyway. I normally go out by myself. I decided to leave it in and just modify the port side to allow room for the 6 gallon tank. There is still enough room to fish out of the back seat. I'll stick two seat bases back there, one for fishing and one for while underway.
After I finally made up my mind, I started cutting, drilling, fabbing parts for the fuel area. It's all I got done, but I can start to see the final product.
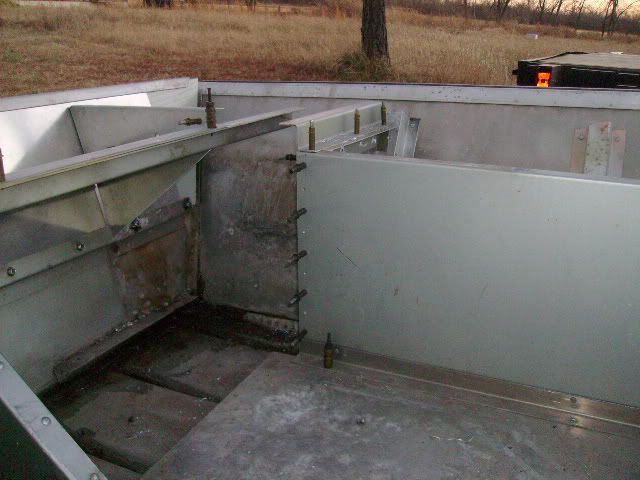
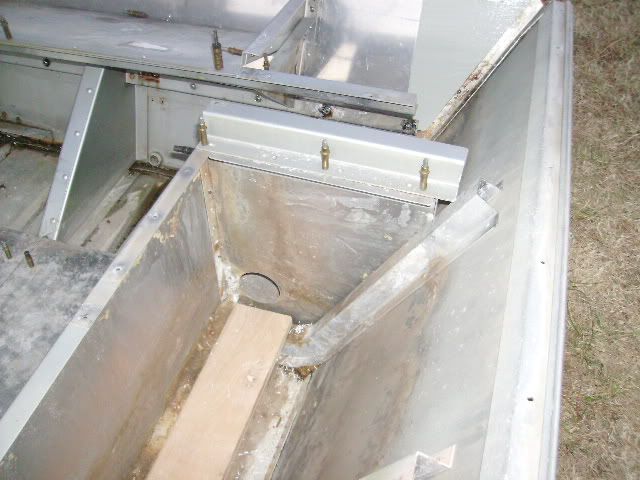
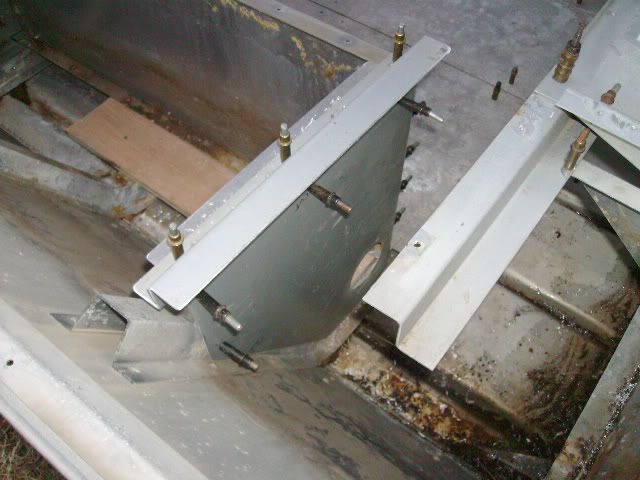
I'll save myself a bit of work, and have some decent storage.
After I finally made up my mind, I started cutting, drilling, fabbing parts for the fuel area. It's all I got done, but I can start to see the final product.


I'll save myself a bit of work, and have some decent storage.

$66.23 ($6.02 / Fl Oz)
Rust-Oleum 207013 Marine Boat Bottom Antifouling Paint, 1 Quarts (Pack of 1), Blue, 11 Fl Oz
Vera Tools

$26.99 ($0.84 / Fl Oz)
Star brite Premium Marine Polish with PTEF - Boat Wax That Seals & Protects Gel Coat with a High Gloss Finish
Best Connections

$61.67
Seachoice Sterling Series Boat Cover, Water Resistant, 14-18 Ft., Fish and Ski Boat
Autoplicity ✅

$29.39
$34.59
Seachoice Cast Aluminum “S” Dock Cleat, Corrosion Resistant Aluminum, 12 in.
Amazon.com

$12.88
$18.50
Flambeau Outdoors 4510 Super Half Satchel Soft Bait Organizer 15x8x6.25-Inch
Amazon.com

$44.88
$49.99
Plano Angled Tackle System with Three 3560 Stowaway Boxes, Fishing Tackle Storage, Premium Tackle Storage
Amazon.com

$8.99 ($1.80 / Count)
$9.79 ($1.96 / Count)
Mothers Microfiber Polishing Pad and Cleaning Pads for Car Detailing, 5 Inch Diameter, Yellow, 6 Pack
S&T INC.

$45.99 ($0.14 / Count)
$49.99 ($0.15 / Count)
330 Piece First Aid Kit, Premium Waterproof Compact Trauma Medical Kits for Any Emergencies, Ideal for Home, Office, Car, Travel, Outdoor, Camping, Hiking, Boating (Red)
THRIAID

$26.99 ($0.84 / Fl Oz)
Rust-Oleum, Navy Blue, 207002 Marine Topside Paint, 1-Quart, 32 Fl Oz (Pack of 1), 11
Vera Tools

$224.85
$267.79
Seachoice Folding Deck Chair, White, Marine Vinyl, Folds For Easy Storage
Amazon.com

$26.99
$29.99
Calamus Fishing Tackle Bags - Fishing Bags for Saltwater or Freshwater Fishing - Rip-Stop PE - Padded Shoulder Strap - Pliers Storage -Green
Landon Technology

$19.89 ($19.89 / Count)
$26.88 ($26.88 / Count)
First-Aid-Kit-for-Car-Home-Travel-Camping-Businesses, 263pcs Compact Waterproof Hard Case, Public Emergency All Purpose Medical Kit - Perfect for Survival, Vehicles, Boat, Sports, Hiking (PUMIER)
Pumier Medical

$29.86 ($4.59 / Ounce)
Hy-Poxy H-455 Alumfast 6.5 oz Rapid Cure Aluminum Putty Repair Kit
Amazon.com

$43.00
$47.79
STAR BRITE Telescopic Floating Extend-A-Brush Quick-Connect Handle with Boat Hook Attachment, 3'-6' (040054)
Amazon.com

$104.98 ($104.98 / Count)
Ever-Ready Industries Premium Trauma First Aid Kit for Outdoors, Workplace, and Home - Exceed OSHA Guidelines and ANSI 2009 Standards - 240 Pieces - Includes Bonus Travel Kit
EVER-READY INDUSTRIES
Big Buck said:I know this probally at silly question, but what are those things sticking up everywhere. Are those some kind of Rivot or something? Just a little curious.
I was too!
sac said:Nice Project and work. Oh and nice ClecosI was sheet metal in the AF
:WELCOME:
Thanks for joining! :beer:
sac
New member
- Joined
- Dec 30, 2008
- Messages
- 3
- Reaction score
- 0
Jim said:sac said:Nice Project and work. Oh and nice ClecosI was sheet metal in the AF
:WELCOME:
Thanks for joining! :beer:
Thanks for the warm welcome :USA1:
ben2go
Well-known member
sac said:Clecos. They hold the metal together after you drill a hole.
We used thousands of them on aircraft to hold the sheet aluminum while we rivet it all together.They keep every thing exactly where you put it.Measure 10 times and cut once. :LOL2:
The greatest thing made if you are riveting any metal.Big Buck said:I know this probally at silly question, but what are those things sticking up everywhere. Are those some kind of Rivot or something? Just a little curious.
There is a little pair of pliers that goes with them, that grips the side, and pushes down on the button on the back. When that is depressed, the front squeezes together, so it will fit in the rivet hole. Then, by releasing the pressure on the pliers, they two tabs on the front pull apart and back, snugly holding the metal together. They are real great, as you can drill a hole, and stick it in, while drilling the next hole, so the material doesn't slip, causing the holes to not line up correctly. But, as opposed to sticking a rivet in each hole as you drill it, you can then remove the whole piece, even after the holes are drilled, to do something else behind said panel.
They were originally designed for aircraft use, but the need for them elsewhere was quickly noticed, so they are in widespread use by most any place that rivets metals, especially aluminum.
CrappieReaper
Well-known member
- Joined
- Dec 21, 2008
- Messages
- 49
- Reaction score
- 0
Thanks Sac and others. Glad you chimed in. I am my own inspector on this rig, and am keeping good ED, but don't think I am going to worry too much about a flunked rivet, but as long as I'm not gonna take her up to 35k' and stick massive amounts of pressure to her, it's all good. The clecos are a wonderful thing. I wish I could teach one of my 9 year olds to buck for those hard to reach spots. My cherry max gun bit the dust and may have to use a sheet metal screw at times on this boat. I've got a bit more fabbing and fitting yet to do, but it will all fall into place in time. Hopefully, my goal for the end of January will be met. Wish I could just spend all day working on it. All the other posts have been good input one way or another. I enjoy reading them.
CrappieReaper
Well-known member
- Joined
- Dec 21, 2008
- Messages
- 49
- Reaction score
- 0
I was able to put some more time into the back end of the boat the last few days. I've got at least two more days worth of work to complete the "rough in" of the new "tillerized" area. I've stripped all the crap off the trailer to still have it legal and delivered it to Jake so it might get sandblasted as time constraints allow. Here's the photo update of what I was able to do recently.
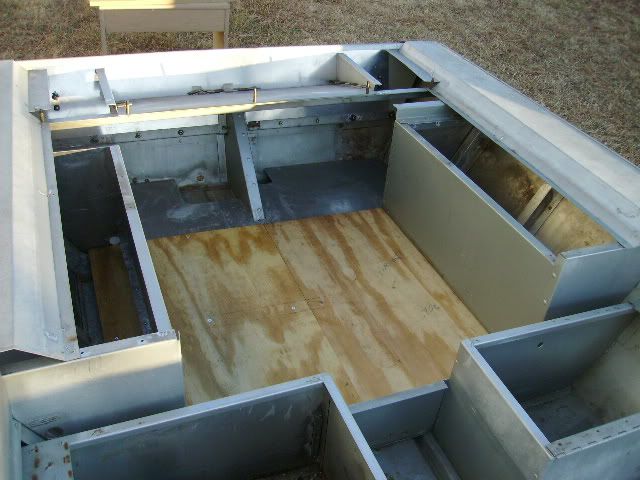
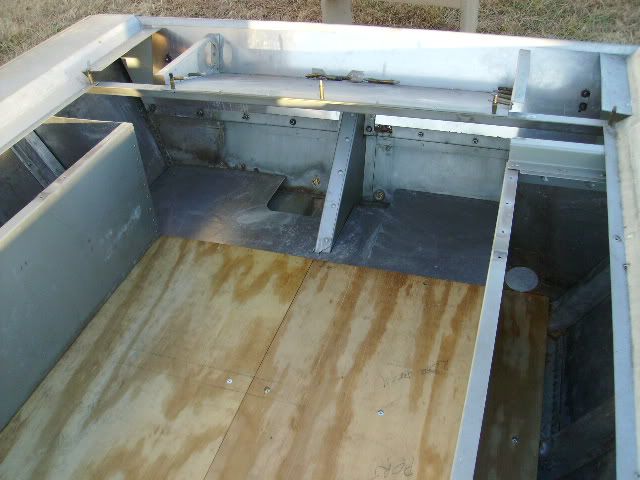
I went ahead and modified both original side panels in the back of the boat that once had urethane foam in the areas into storage boxes. I cut each side down and trimmed the scrap piece up in order to make the turn on the storage box and fasten in to an existing rib. This gives me plenty of room in the back of the boat for a 6 gallon tank, batteries, bilge pump and areator. I will also be able to access the area fairly easy to be able to bolt transducers and such. On the port side, above the fuel tank will be a small box open top to house an anchor. The Starboard side will have a hinged lid to allow easy access to the top of the Batteries for connection and charging purposes.
I used the original 5/32" Aluminum decking that was part of the underdeck for fuel and battery storage area as the new decking for the very back of the boat. Notice I cut out part of it on each side to allow plug access, and bilge placement.
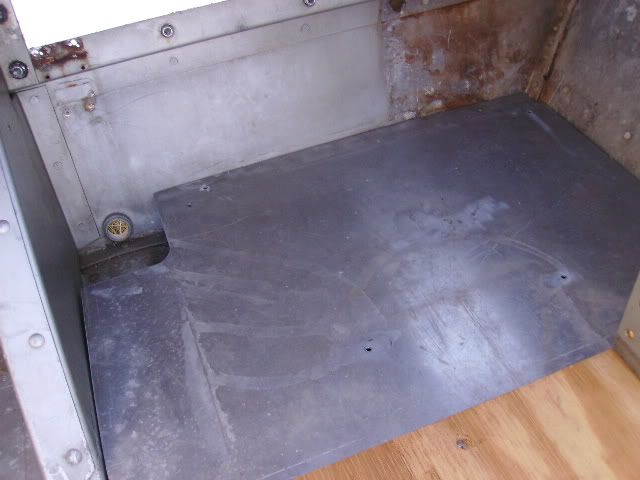
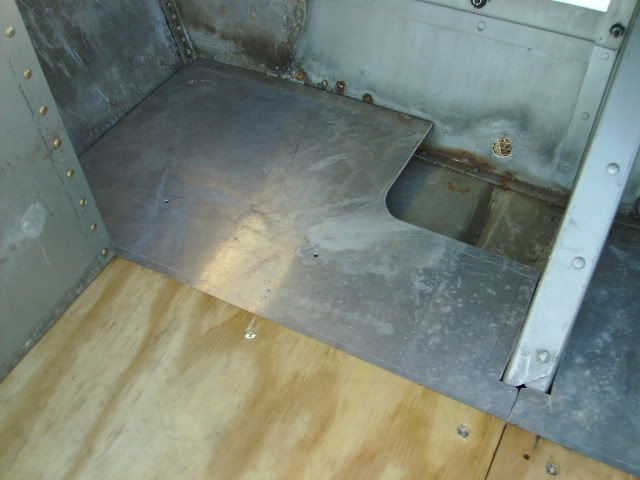
I have quite a way to go, but each day I put into it, gets me that much closer to my desired goal. I have not purchased one thing other than screws so far on the rebuilding project. All material that has not be recycled from the boats original setup, I had on hand in the shop.


I went ahead and modified both original side panels in the back of the boat that once had urethane foam in the areas into storage boxes. I cut each side down and trimmed the scrap piece up in order to make the turn on the storage box and fasten in to an existing rib. This gives me plenty of room in the back of the boat for a 6 gallon tank, batteries, bilge pump and areator. I will also be able to access the area fairly easy to be able to bolt transducers and such. On the port side, above the fuel tank will be a small box open top to house an anchor. The Starboard side will have a hinged lid to allow easy access to the top of the Batteries for connection and charging purposes.
I used the original 5/32" Aluminum decking that was part of the underdeck for fuel and battery storage area as the new decking for the very back of the boat. Notice I cut out part of it on each side to allow plug access, and bilge placement.


I have quite a way to go, but each day I put into it, gets me that much closer to my desired goal. I have not purchased one thing other than screws so far on the rebuilding project. All material that has not be recycled from the boats original setup, I had on hand in the shop.
Henry Hefner
Well-known member
Looks great so far. Great pics! Pictures really tell the story. Keep 'em coming!
 opcorn:
Waterwings
Well-known member
Lookin' real good! 8)
baptistpreach
Well-known member
Very Nice! You got quite a hull to start with, and it looks like you're turning it into one amazing rig! Some day, I think, a deal like that will fall in my lap, and when it does, I'm gonna turn it into a fish catching machine!! In the mean time, I'm really loving turning my jon into a crappie and cat machine!
CrappieReaper
Well-known member
- Joined
- Dec 21, 2008
- Messages
- 49
- Reaction score
- 0
I have finally started back on the Rebirth. I am starting to push hard as I have a camping trip scheduled for the 14th of March. Here's the poop....
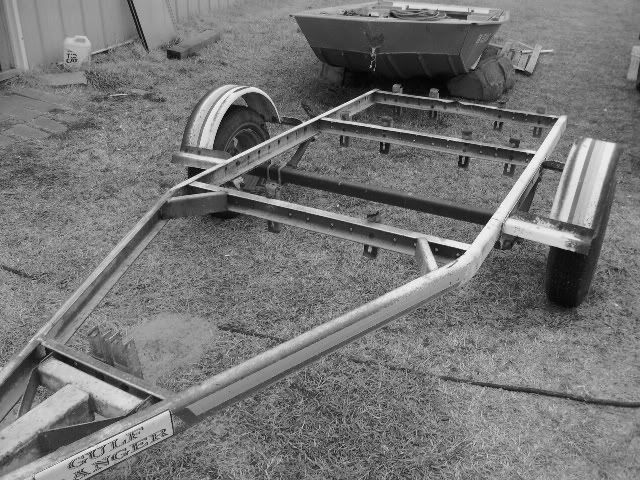
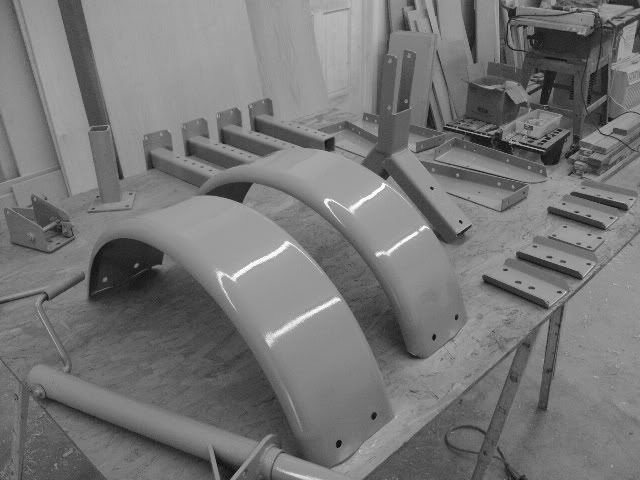
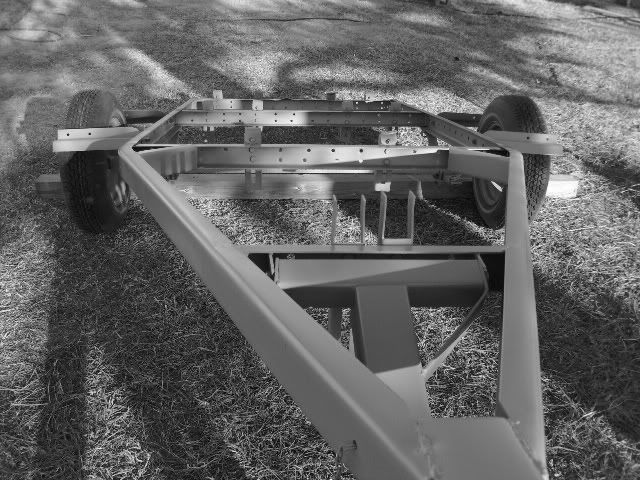
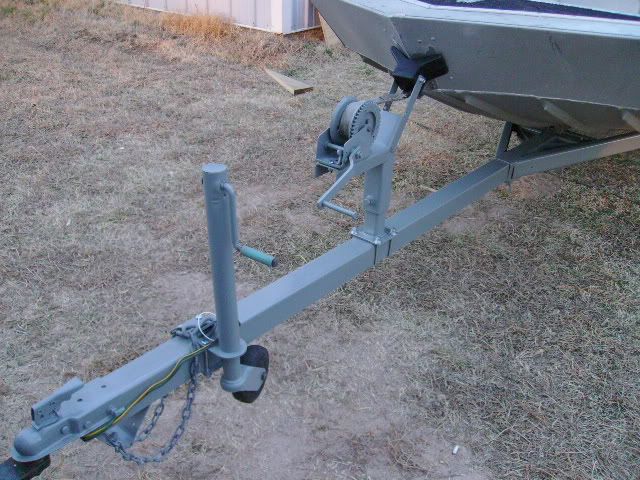
CrappieDentist was unable to blast the trailer for me at his work till sometime in the Summer. I picked the trailer back up and he let me borrow his portable blaster setup. It was a major pain, but not that bad and the results were great! I was able to remove all rust and paint.
One of the kids had set the camera up for B&W pics and I didn't realize it till after the SD card had been deleted. You can still tell a big difference though.
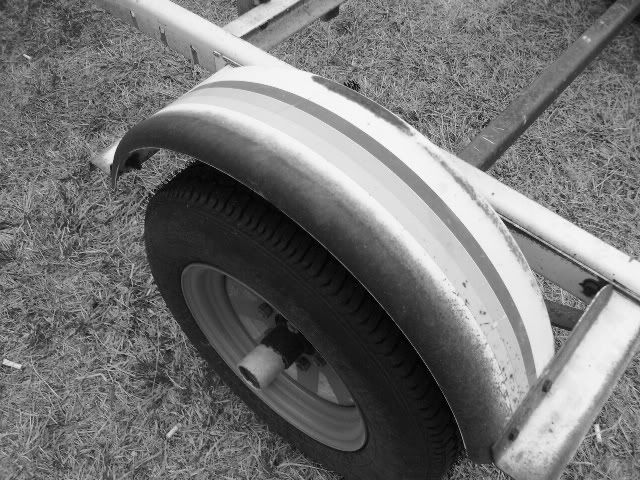
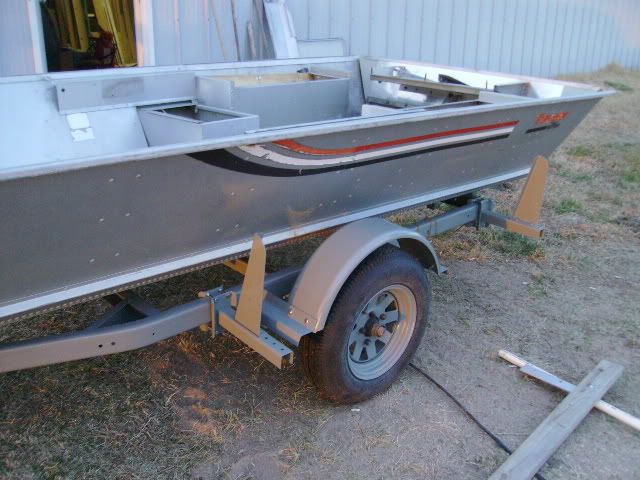
I'll complete the trailer with some solid sides for re-loading purposes on down the road. I don't want them in my way for now.
Before I put the boat back on the trailer, I wanted to get some more of the lower decking in. I pulled both sides of the rear decks to add doublers in the areas of the pedestal bases. I wanted to make sure I had some strength as I am going to have to used a wood screw vs. bolts to retain them. The side storage in the back really makes for a cramped area though. I am also placing all pedestal bases in the center. This allows whoever is sitting in one to be able to fish out of either side of the boat with nothing in the way. I am placing two pedestal bases in the back, one for operating the boat, the second for someone to fish out of. I moved it back towards the transom to give whoever is back there a little leg room. Most of the time, I'll be by myself, so it's no big thing. The forward section under deck was just too shallow to house a couple of batteries for the trolling motor. I've decided to stick them right under the bow cover at the front of the boat. It's a perfect fit for two! It will also add needed weight towards the front of the boat.
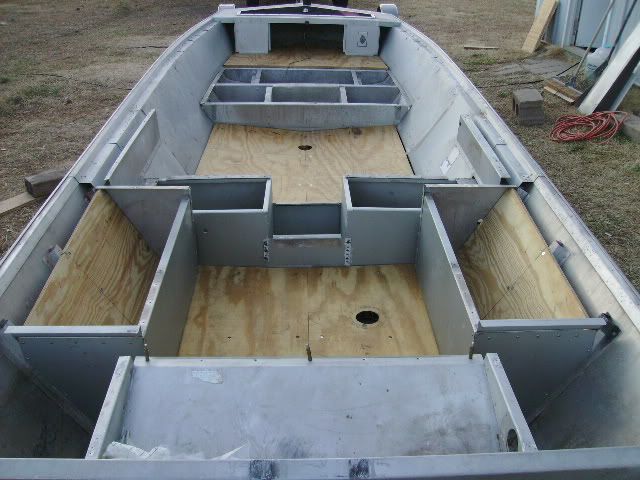
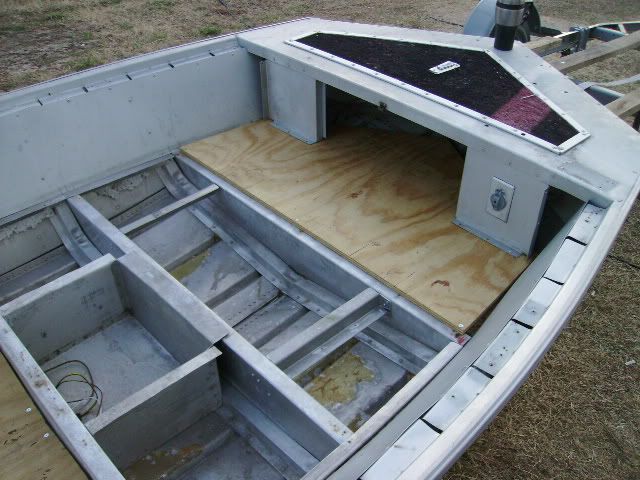
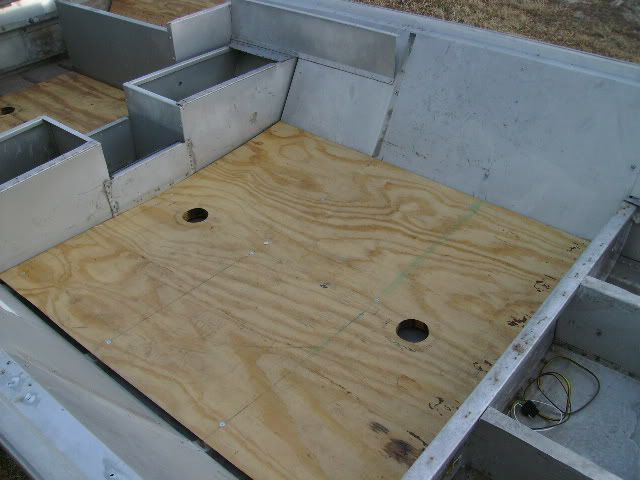
I have the forward deck cut, lids for livewell and storage cut, am working on side panel storage to boot. I need to buy some plumbing supplies now to get the water lines run for the livewells, bilges and areators. Once that's done, I'll install the forward decking along with the lids. I still need to create a switch box for the back. I don't want any switches sticking out that can be accidently broken. I plan to do my best to have her ready for carpet sometime Sunday, but I have many things to do before then.
I can begin to see the final product in my head and it looks to be a fine machine.
CrappieDentist was unable to blast the trailer for me at his work till sometime in the Summer. I picked the trailer back up and he let me borrow his portable blaster setup. It was a major pain, but not that bad and the results were great! I was able to remove all rust and paint.
One of the kids had set the camera up for B&W pics and I didn't realize it till after the SD card had been deleted. You can still tell a big difference though.


I'll complete the trailer with some solid sides for re-loading purposes on down the road. I don't want them in my way for now.
Before I put the boat back on the trailer, I wanted to get some more of the lower decking in. I pulled both sides of the rear decks to add doublers in the areas of the pedestal bases. I wanted to make sure I had some strength as I am going to have to used a wood screw vs. bolts to retain them. The side storage in the back really makes for a cramped area though. I am also placing all pedestal bases in the center. This allows whoever is sitting in one to be able to fish out of either side of the boat with nothing in the way. I am placing two pedestal bases in the back, one for operating the boat, the second for someone to fish out of. I moved it back towards the transom to give whoever is back there a little leg room. Most of the time, I'll be by myself, so it's no big thing. The forward section under deck was just too shallow to house a couple of batteries for the trolling motor. I've decided to stick them right under the bow cover at the front of the boat. It's a perfect fit for two! It will also add needed weight towards the front of the boat.


I have the forward deck cut, lids for livewell and storage cut, am working on side panel storage to boot. I need to buy some plumbing supplies now to get the water lines run for the livewells, bilges and areators. Once that's done, I'll install the forward decking along with the lids. I still need to create a switch box for the back. I don't want any switches sticking out that can be accidently broken. I plan to do my best to have her ready for carpet sometime Sunday, but I have many things to do before then.
I can begin to see the final product in my head and it looks to be a fine machine.
russ010
Well-known member
this is one of the best mods I've seen... way to go to maximize the area in your boat.
Brine said:Nice work. That thing is starting to look like a CAV.
Crappie Assault Vehicle.
:LOL2:
Nice work man! =D>
Similar threads
- Replies
- 0
- Views
- 635


