BigTerp's Tracker Sportsman 16' O/B Jet build

TinBoats.net

Help Support TinBoats.net:

This site may earn a commission from merchant affiliate links, including eBay, Amazon, and others.
angle iron trays are great for batteries...i cant having my battery just sliding or bouncing around...i decided to work some storage in to my deck...i wanted simple but my deck just wasnt big enough, and i ran into trouble when i tried to fit my floor with that stupid v rib...id have to cut my floor in to several pieces that would look like crap, so im just gonna box it all in and have a bigger deck...
 
[url=https://www.tinboats.net/forum/viewtopic.php?p=323657#p323657 said:
hercdrvrwo » Yesterday, 10:28 pm[/url]"]Looking good brother! Keep it up! Can't wait to see it ready for duck season!

Cheers
Herc

Thanks man!! I was browsing through yours this morning. Coming along nicely!! Early goose comes in September 2nd for us. Hoping to have things ready to go by then.
 
[url=https://www.tinboats.net/forum/viewtopic.php?p=323663#p323663 said:
marshman » Yesterday, 11:23 pm[/url]"]angle iron trays are great for batteries...i cant having my battery just sliding or bouncing around...i decided to work some storage in to my deck...i wanted simple but my deck just wasnt big enough, and i ran into trouble when i tried to fit my floor with that stupid v rib...id have to cut my floor in to several pieces that would look like crap, so im just gonna box it all in and have a bigger deck...

I agree. I have plastic trays that will screw into those pieces of angle. My batteries will be straped into those trays. Should be nice and solid.

Yeah, those goofy ribs are a PITA. My floor ends up coming up slightly to meet mine, maybe a 1/2" or so. Which shouldn't be a problem and will actually help get water back to my floor drains. If it raised it any higher than that I would have ended up doing the same thing your doing. The bigger deck will be nice, plus the additional storage you'll get underneath.
 
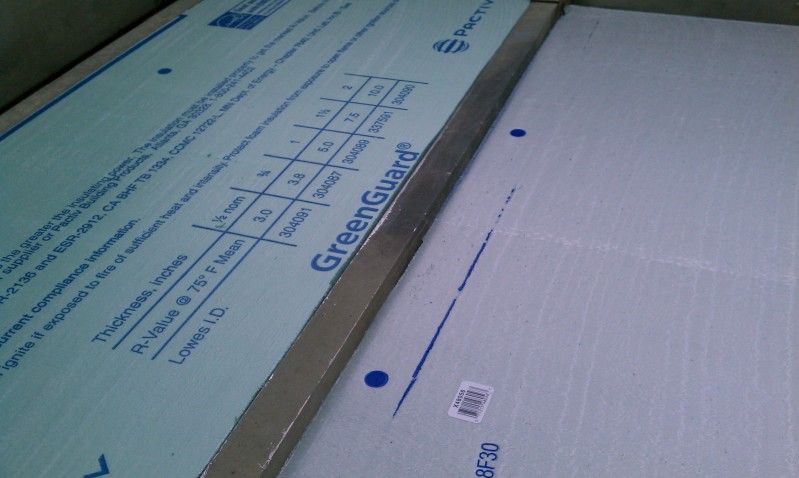
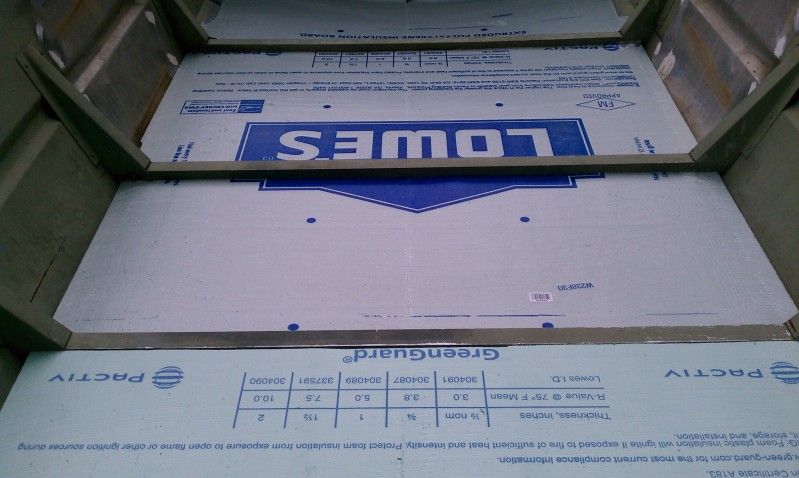
Got a bit done today. It kept trying to rain on and off, so I didn't get as much accomplished as I was hoping. Was able to completely finish up my floor. It was rather tedious getting things to fit just right, especially after installing the face plate on my deck extension. Also got all my foam cut and fit for under my floor.

Had to use 2 pieces of foam stacked on top of each other. One 1" piece and one 1/4" piece to equal the distance from top of rib to bottom of hull.
IMAG0861_zpsb0d8cc7e.jpg


IMAG0860_zps616c51cd.jpg


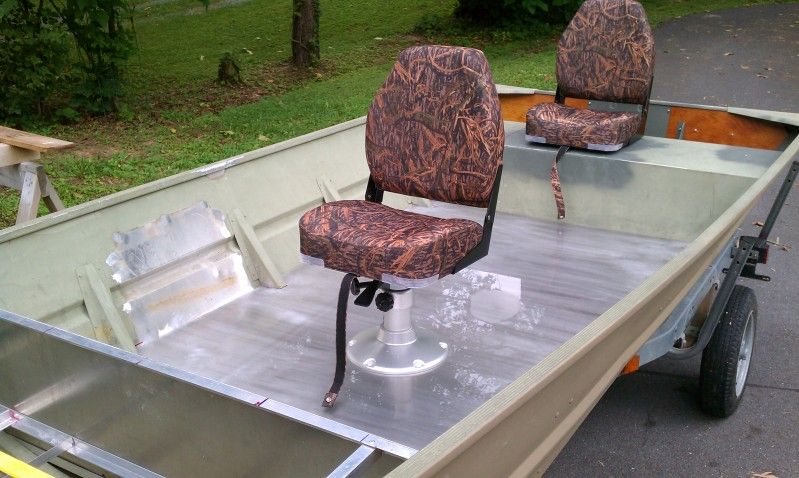
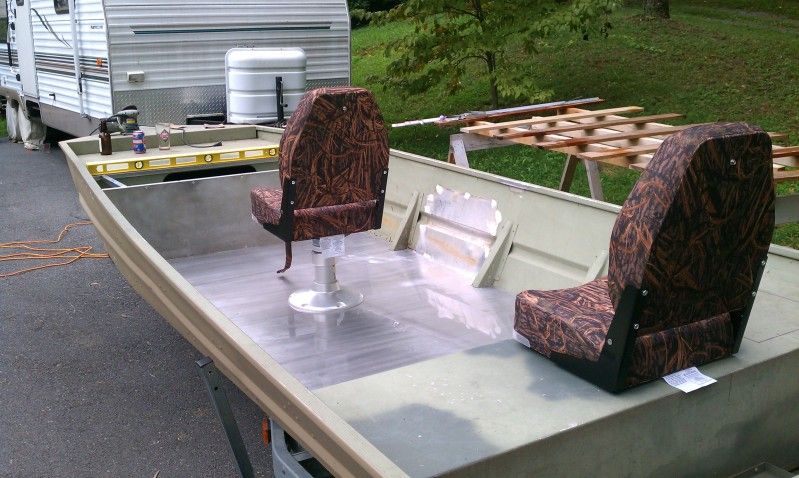
Laid out my captains seat to see exactly where I wanted it to sit. Threw on the rear passenger seat just for fun. It sure was nice seeing how things are going to look hopefully sooner than later. Also sat on the captains seat making motor noises (thanks Ranchero50) invisioning where I'd like my controls and stick steer to be. I don't think any of my neighbors say me though :oops:
IMAG0865_zpsf8a863b9.jpg


IMAG0864_zpscbe367f4.jpg


Wanted to start prepping the inside hull for paint, but the rain put a damper on that. Calling for rain again tomorrow hoping it'll stay dry for me.

Still need to drill my floor out for my captains seat, prep the hull for paint, prep my seat mounts for paint and then ACTUALLY paint. Then I can start installing all my accessories. Still need to order all my wire, connections, etc. as well.

We got the motor back from the machinist last week. My buddy has all the necessary components for the rebuild. Need to get that finished up and get the transom raised and we'll be in business!!
 
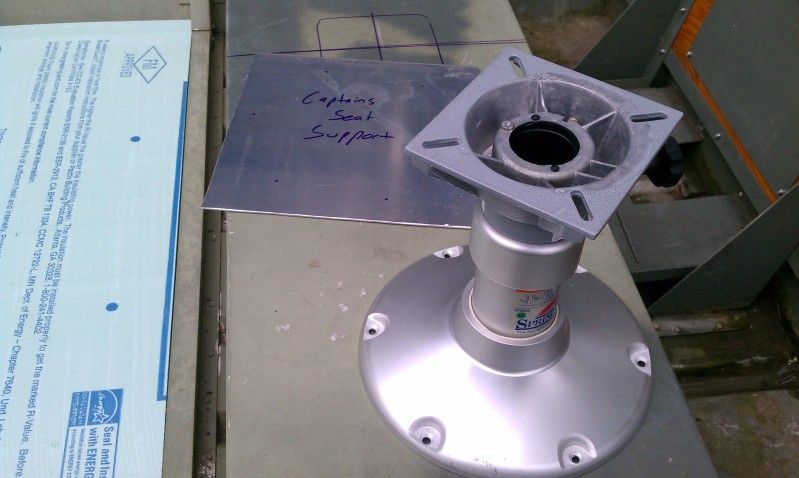
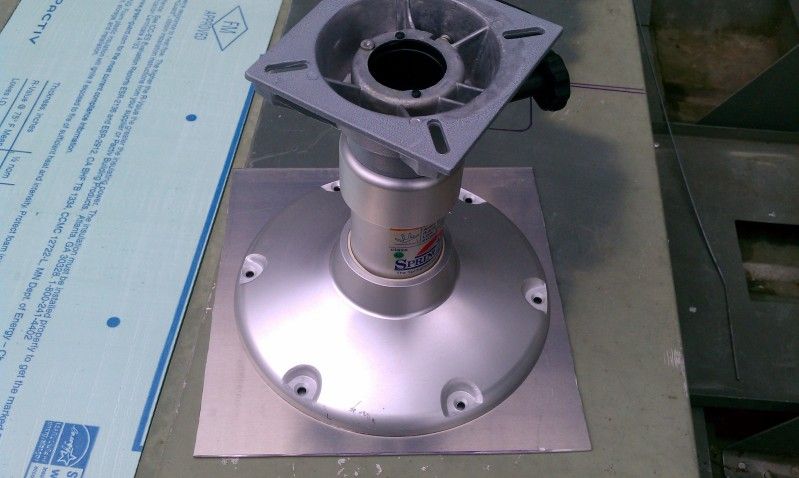
Looking for some opinions on how I'm going to mount my captains seat. I only have 1-1/4" of space from the top of my ribs to the hull. What I'm planning on doing is using stainless bolts, large washers and nyloc nuts to secure my pedestal base to the floor. I also cut out a piece of aluminum to go under my floor to add some support to the seat mount. So the base will be installed with bolts through the floor and through another piece of 1/16" aluminum sheet. I'll have to install my seat base BEFORE I install my floor. Only other way to do it would be to use screws thru the floor. And bolts, I'm thinking, would hold MUCH better than screws. Sound like a plan?

Here is my captains seat along with the piece of aluminum sheet I'm planning to use for extra support
IMAG0862_zpsedcd8dd2.jpg


IMAG0863_zpse12eeb18.jpg
 
On the seat I'd suggest getting a chunk of 1/4" plate and going rib to rib. Mount a 1" piece of angle on each rib so they top of the plate matches the top of the rib. You can tap the plate and thread your bolts from the bottom and nylok from the top. You can substitute a 1/4" chunk of angle from each set of seat bolts instead of a plate. The angle would probably flew less but it's more of a PITA to install. Countersunk Allen bolts are wonderful for hidden fasteners.

I used 1" x .125" angles on my front seat but I have less distance between supports so it was rigid enough.

Even sandwiching the .100" floor sheet I'm sure you'll have more movement than you want (when things get exciting) and it'll stress the screws you use to hold the deck on.
 
Your layout is real similar to what I've got planned. I think you're going to want your seat as far forward as you can comfortably get and still have legroom in front of you, I know you haven't run it with the jet yet but my boat is rear-heavy, especially with a passenger in back, and since our hulls are almost identical and motors are similar size I think you'll have the same problem.

I agree with Ranchero about the seat mounts. Use angle or plate to span between the ribs, drill and tap threads for the mounting bolts and thread them up from underneath before you put the floor down, that way you have studs sticking up and can put your nuts on from above.
 
Thanks for the advice!!

I'll have to play with my seat positioning, not sure how much further forward I can go comfortably. I'm a pretty big guy, 6'8" 250lbs. So leg room is key.

I get what you guys are saying about bolting my seat down from the top. I have plenty of sheet and angle left to add between one of the forward ribs. But how exactly would I create "studs" with my mounting bolts? I've never attempted anything like this. Not sure how I would keep my bolts from spinning as I tried to tighten down the nuts? Any suggestions on what type of bolts I should be using?
 
The old standard on stick steer boats is you want the seat as far forward where your legs can still stick out straight. That way when you hit something solid you'll pole vault out over the front of the boat and not get rolled into a ball on the bow.

Actually the further forward you are the easier it is to see down into the water and avoid the nasties.
 
Don't you mean IF and not WHEN?!?! :shock:

Makes sense on the distance from the front deck.

Still trying to figure out how to mount my seat in the fashion you and catmansteve described. Any tips??
 
The "seat mount framing" pieces you put in to run your bolts thru should be 1/4" or thicker aluminum, that way you can drill holes and use a tap to thread the holes to match the bolt threads. The bolt gets threaded in from underneath, and because it's threaded you won't have to worry about it turning when you go to mount the seat
 
[url=https://www.tinboats.net/forum/viewtopic.php?p=323971#p323971 said:
catmansteve » Yesterday, 7:13 pm[/url]"]The "seat mount framing" pieces you put in to run your bolts thru should be 1/4" or thicker aluminum, that way you can drill holes and use a tap to thread the holes to match the bolt threads. The bolt gets threaded in from underneath, and because it's threaded you won't have to worry about it turning when you go to mount the seat

Thanks. That makes sense.

The budget is starting to get tight, so I"d prefer not to have to buy anymore aluminum. PLus I have plenty of .125" sheet and 1" x 1" angle left over. Any suggestions on how I can mount this seat with the available materials I have on hand?

I'm planning on running out after work today to pick up my stainless hardware to install my bases. Any suggestions on what bolts I should get?

I definitely want this base to be solid, so if using what I have available isn't going to work, I'm not opposed to buying some more aluminum. I'd just REALLY prefer not to.
 
BigTerp said:
Don't you mean IF and not WHEN?!?! :shock:

Makes sense on the distance from the front deck.

Still trying to figure out how to mount my seat in the fashion you and catmansteve described. Any tips??
LMAO! Thanks guys I needed a laugh this Monday morning. :)
 
[url=https://www.tinboats.net/forum/viewtopic.php?p=323948#p323948 said:
BigTerp » Yesterday, 15:00[/url]"]Don't you mean IF and not WHEN?!?! :shock:

You're not running skinny until you're reaching for the seat belts...
 
[url=https://www.tinboats.net/forum/viewtopic.php?p=324141#p324141 said:
Ranchero50 » Today, 17:16[/url]"]
[url=https://www.tinboats.net/forum/viewtopic.php?p=323948#p323948 said:
BigTerp » Yesterday, 15:00[/url]"]Don't you mean IF and not WHEN?!?! :shock:

You're not running skinny until you're reaching for the seat belts...
Haha, best line I've heard for awhile

In all seriousness, I know a guy that bought a brand new boat, 17 or 18', had a center console put in, all aluminum decks, floors, high end bedliner, and a brand new 90/65 jet on the back, probably a $12-$15k rig. He's afraid to take it in less than 18" of water. Don't be that guy
 
[url=https://www.tinboats.net/forum/viewtopic.php?p=324042#p324042 said:
BigTerp » Today, 09:08[/url]"]
[url=https://www.tinboats.net/forum/viewtopic.php?p=323971#p323971 said:
catmansteve » Yesterday, 7:13 pm[/url]"]The "seat mount framing" pieces you put in to run your bolts thru should be 1/4" or thicker aluminum, that way you can drill holes and use a tap to thread the holes to match the bolt threads. The bolt gets threaded in from underneath, and because it's threaded you won't have to worry about it turning when you go to mount the seat

Thanks. That makes sense.

The budget is starting to get tight, so I"d prefer not to have to buy anymore aluminum. PLus I have plenty of .125" sheet and 1" x 1" angle left over. Any suggestions on how I can mount this seat with the available materials I have on hand?

I'm planning on running out after work today to pick up my stainless hardware to install my bases. Any suggestions on what bolts I should get?

I definitely want this base to be solid, so if using what I have available isn't going to work, I'm not opposed to buying some more aluminum. I'd just REALLY prefer not to.
The angle you have is probably strong enough, but you need something thicker to be able to tap threads through. Maybe find some scraps of 1/4" flat aluminum, 1"x1" squares, and glue, rivet, or weld them at the bolt locations. Gluing them on with 5200 would probably be easier, and since the edge of the block would be against the inside corner of the angle they couldn't twist
 
Thanks catmansteve!!

What I'm thinking of doing is installing 2 pieces of angle going from fore to aft between the ribs of where my captains seat will be installed. I'll cut a piece of .125" sheet to span this distance. I'll install my seat base with stainless nuts, bolts and washers thru the floor and thru the extra piece of sheet before I install my floor. I'll install my floor and in addition to riveting my floor down to the ribs I'll rivet my floor and the extra piece of sheet to the extra angle I installed. I envision those extra rivets only being a few inches off each side of the base. I'm thinking the extra sheet will help support my nuts and bolts better and by riveting all of this to the angle I'll install, it will help keep the floor from flexing from the stress from the seat???
 
How did you figure on your seat height? I Can't quite decide on the height for mime. I hate Sitting in friend's boats with Waders on at short heights, it bunches up and cuts off the blood flow. l have been thinking about 14" except it s the one with the curve in it.

Your boat js really coming along, I can't wait to see more pictures!
 
[url=https://www.tinboats.net/forum/viewtopic.php?p=324636#p324636 said:
hercdrvrwo » August 2nd, 2013, 10:25 pm[/url]"]How did you figure on your seat height? I Can't quite decide on the height for mime. I hate Sitting in friend's boats with Waders on at short heights, it bunches up and cuts off the blood flow. l have been thinking about 14" except it s the one with the curve in it.

Your boat js really coming along, I can't wait to see more pictures!

Thanks man.

I based my captains seat height off of the existing rear benches height from the floor. I figured I should keep it somewhat close to that. My rear bench is 12" from my floor. And honestly was fairly comfortable sitting on last year. A few inches would probably be nice, which is what a seat and seat mount should provide. Now I'm a tall guy (6'8") and I went with a manual adjustable pedestal that goes from 12" - 15.5" for my captains seat. I've yet to sit in it since my captains seat isn't installed yet, but it should be fairly comfortable. The 12" height will be nice for when running full throttle up river at 4 a.m., I'm sure I'll feel a little more secure. When/if the legs get tired or cramped I can pop the seat up a few inches for comfort.
 
Starting to round third and head for home with this project..........FINALLY!! Got a few things done over the weekend, but nothing major. Didn't grab any pictures either. Got pilot holes drilled for my captains seat and made a support for it that will fit under my floor. Got holes drilled for my seat mounts and stern light. And tested a few different colors for my camouflage stencils. I'll have to post some pictures to get your guys' opinion on that.

I have my front deck hatches and rear bench hatch being made my bassboy1 at Fish On Fabrications. Expecting to have those in hand sometime this week. Am planning to cut up my middle bench that I removed to make mounts for my controls and stick steer one evening this week. My control panel will go on the motor control mount and the sonar will go on the stick steer mount. Am picking up my hardware for my seats bases this evening, so I can also get my floor and seats installed this week. Once that is done and I get my hatches installed it'll be ready for the last round of paint (hopefully this Sunday). Then I can start installing my accessories and running my electric. Am planning on re-assembling the 50/35 Johnson jet, with rebuilt powerhead on Saturday.

Still alot of work yet to do, but she's getting there!! Hopefully I'll have some decent pictures to post soon.
 
Top