YJs 1236 Semi V Mod

TinBoats.net

Help Support TinBoats.net:

This site may earn a commission from merchant affiliate links, including eBay, Amazon, and others.
slick said:
Love your build and admire your patience. Waiting for the paycheck to arrive, it gives a man too much time to think. DANGEROUS!!!
Isn't that the truth. And especially DANGEROUS for me to be thinking. :lol: I don't just get one or two voices going in my head. I get a community all trying to talk at the same time. Gets me pretty confused at times.

slick said:
Keep in mind if you use the FRP, you will need a support system underneath it. You will probably need to keep your plywood. FRP is thin "plastic" type stuff that is used for wet applications like shower walls. When used for shower walls it is attached to sheetrock using contact cement. IMO you will not lose any weight.
Yep, the thickest I could find was .090" thick. Not good for me. I'm not a small guy. (240 lbs) I've run out of all the freebie material I've come up with and living on a disability pension, I only get paid once per month. OUCH. And that makes for a very long wait on payday. I think the least expensive way for me to go at this point would be to buy a 10' length of 6" PVC tube, 4 end caps, cut it in half and make 2 5' pontoons. One for each side of the boat. That should not only add flotation but add stability while I'm fishing.
 
onthewater102 said:
I would add a considerable amount of foam to your floor if swamping is an issue. Help keep the motors above water if you swamp.
Thankfully it's only been once when I leaned over to far and the boat flipped over dumping me, my dog, my camera gear and phone in the drink.
I've now got an aluminum ladder running down the middle sitting on top of the pink foam sheets cut to fit between the ribs. The plywood floor is supported by that and the curves of the hull and I'll be screwing that down to the ladder with SS screws to hold it in place.

BTW, I finished painting the inside today, and after a couple hours, my buddy helped me pick the boat up, flip it over and sat back down on the trailer. Tomorrow I'll finish taping it off to protect the red and hopefully get a couple coats on the bottom tomorrow.
 
We'll be heading to Myrtle Beach the middle of May - I took some measurements and if I separate the lower unit from the power head I can fit it all in the back of the car, so I can get the motor closer to you than CT...don't know how far a drive that would be from where you are in GA. Please let me know if you want it for sure - its been listed locally on craigslist for a while and now that there is hope of the snow melting I'm starting to get calls.
 
If you can sell it, go ahead. I don't think I'll have the money for it now. Just had some expensive stuff come up on my truck that has to get taken care of. I'd love to get it but it just don't look possible right now. I'm sorry.
 
Update: Woot, I am jazzed. Finished all the painting today including a couple coats of Crystal Clear Gloss. For a beat up old tin can, it's looking pretty good if I say so myself. Now time to start running some electrical wiring below the floor. Nav lights, fish finder, trolling motor and bilge pump. Also going to install a couple of 12v accessory plugs
Question here, What gauge of wire should be used going from the battery to the trolling motor? And how big of a fuse should be on it? Or should I use circuit breakers? It's about a 6' run, each way. It's a transom mount and the battery is near the middle of the boat.
 

Attachments

  • 20150310_172517_Smyrna Church Rd.jpg
    20150310_172517_Smyrna Church Rd.jpg
    47.1 KB · Views: 1,205
  • 20150310_172127_Smyrna Church Rd.jpg
    20150310_172127_Smyrna Church Rd.jpg
    43.9 KB · Views: 1,205
  • 20150310_172102_Smyrna Church Rd.jpg
    20150310_172102_Smyrna Church Rd.jpg
    51.9 KB · Views: 1,205
  • 20150310_142534_Smyrna Church Rd.jpg
    20150310_142534_Smyrna Church Rd.jpg
    28.5 KB · Views: 1,205
  • 20150308_135701_Smyrna Church Rd.jpg
    20150308_135701_Smyrna Church Rd.jpg
    58.8 KB · Views: 1,205
  • 20150310_175858_Smyrna Church Rd.jpg
    20150310_175858_Smyrna Church Rd.jpg
    58.9 KB · Views: 1,205
  • 20150310_175932_Smyrna Church Rd.jpg
    20150310_175932_Smyrna Church Rd.jpg
    65 KB · Views: 1,205
You don't need to run wire.
That looks too good to get dirty.
Hang it on the wall!!!!!!!
Nice job.
 
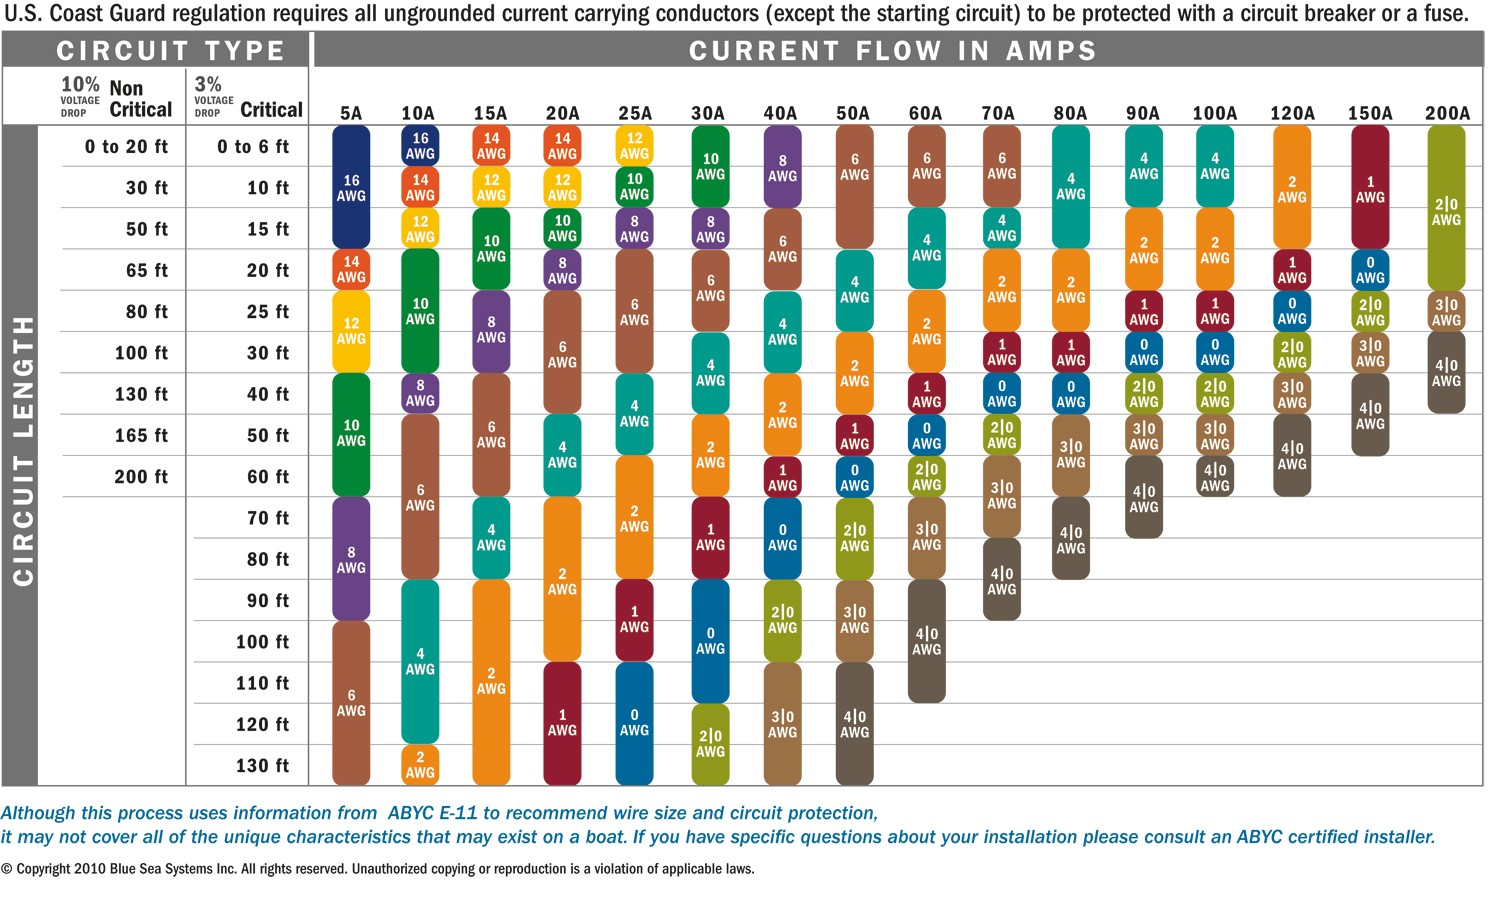
For your wiring questions - it all depends on how much current and how far you're running it. Keep in mind anything we do in a boat is considered "non critical" for the purposes of this table:

ZBZu2L7.jpg
 
Hi YJ,

I have been reading your thread a lot, it seems we have pretty close to the same boat (if not the same).
You've been doing an awesome job, I really like what you did with it, the paint looks great too!.

I was wondering if you ever figured out what make/model it is.
My thread: https://forum.tinboats.net/viewtopic.php?f=21&t=37144

Keep up the good work, I'll keep checking on it.
 
onthewater102 said:
For your wiring questions - it all depends on how much current and how far you're running it. Keep in mind anything we do in a boat is considered "non critical" for the purposes of this table:
Onthewater, thanks so much for the chart. I have saved it for reference and will most likely print it out and put it up in my shop. Thanks again, Buddy
 
Coersum said:
Hi YJ,

I have been reading your thread a lot, it seems we have pretty close to the same boat (if not the same).
You've been doing an awesome job, I really like what you did with it, the paint looks great too!.

I was wondering if you ever figured out what make/model it is.
My thread: https://forum.tinboats.net/viewtopic.php?f=21&t=37144

Keep up the good work, I'll keep checking on it.
Hi Coersum. Thanks for tagging along on my build. I'll be checking on yours as well.
As close as I have been able to find, the boat is most likely an late 50s - early 60s Sears Gamefisher so I registered it as a 1959 Sears Gamefisher.
I spent 2 or 3 weeks going through boat photos on the internet looking for features that matched what I had. Like the splash guard that only goes about half way forward and the bow brace/plate, bench seats that don't go all the way down to the hull floor, etc. I finally found a couple that matched all those and that's what they were. Hope this helps you out.
 
Y_J said:
Coersum said:
Hi YJ,

I have been reading your thread a lot, it seems we have pretty close to the same boat (if not the same).
You've been doing an awesome job, I really like what you did with it, the paint looks great too!.

I was wondering if you ever figured out what make/model it is.
My thread: https://forum.tinboats.net/viewtopic.php?f=21&t=37144

Keep up the good work, I'll keep checking on it.
Hi Coersum. Thanks for tagging along on my build. I'll be checking on yours as well.
As close as I have been able to find, the boat is most likely an late 50s - early 60s Sears Gamefisher so I registered it as a 1959 Sears Gamefisher.
I spent 2 or 3 weeks going through boat photos on the internet looking for features that matched what I had. Like the splash guard that only goes about half way forward and the bow brace/plate, bench seats that don't go all the way down to the hull floor, etc. I finally found a couple that matched all those and that's what they were. Hope this helps you out.

I went through the same process, noticed some version have different height of seats, ours has (mine at least) the same, at 4" I believe. But yes I looked at all that too, bow cover, seat, transom shapes, oars lock and also where the plates of aluminum meet to make seams. Mine is registered as "JON" year "0000" so I guess they didn't know either.

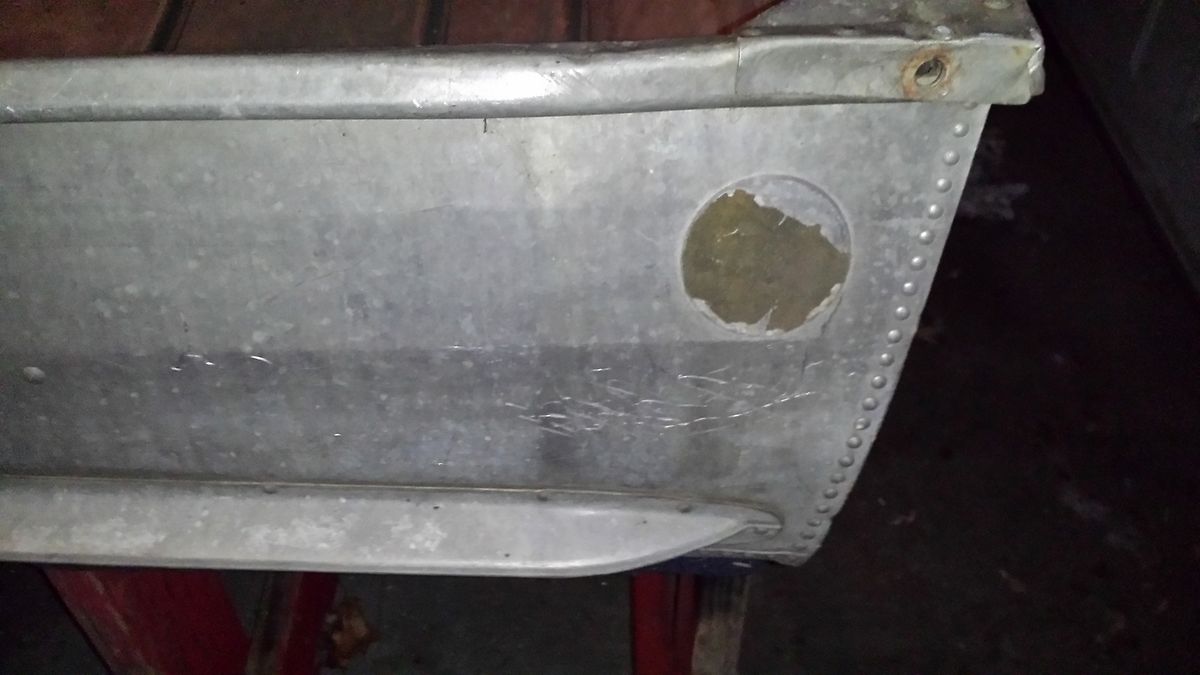
Did you have the round patch on each side by the transom like mine ?
 
Decal, it's was flush once I removed the left over glue part of it. None of the sears I saw had round decals, maybe just something a previous owner added.
 
Coersum said:
Decal, it's was flush once I removed the left over glue part of it. None of the sears I saw had round decals, maybe just something a previous owner added.
Very well could be something that was added by a PO.
I'm fixing to add a "Wired2Fish" decal to the back of mine.
I've also got a TinBoats.net decal but I think I'm going to put that one on the rear window of my truck.
 
Here's a quickie update from what I got done today and yesterday.
Yesterday, I got the floor completely screwed down (SS screws) to the aluminum ladder. I put a temporary screw in each end of the ladder side and stretched a string between the two ends which let me know exactly where the ladder was then put 5 screws along the string line thru the floor into the ladder. Did that on both sides and BAM.. That floor ain't going anywhere.
Then today I built the box that goes over the battery case. Put a piano hing on the front for the lid. I'll put a 7" seat pedestal on that for the front seat.
Tomorrow, I'll be building the box with a beveled top/lid for the Dash Board. All the switches, fuses and electrical connections will be inside and thinking of making it wide enough for the FF to be mounted on it as well.
Here's a couple pics of where I'm at right now.
 

Attachments

  • 20150315_164219_Smyrna Church Rd.jpg
    20150315_164219_Smyrna Church Rd.jpg
    36.7 KB · Views: 961
  • 20150315_164259_Smyrna Church Rd.jpg
    20150315_164259_Smyrna Church Rd.jpg
    37.2 KB · Views: 961
  • 20150315_164547_Smyrna Church Rd.jpg
    20150315_164547_Smyrna Church Rd.jpg
    44.2 KB · Views: 961
derekdiruz1 said:
god I can't wait to see this finished!

I truly look forward to the updates lol
TY derek. LOL I'm getting pretty antsy about it myself.
I also made stencils for the registration # last night. [-o< Spray the backs of them with temp adhesive, spray the numbers with a Glossy White, Let the paint set for a while then peel the stencils off and WHALA. :D
 
Top