14' Starcraft Seafarer Build

TinBoats.net

Help Support TinBoats.net:

This site may earn a commission from merchant affiliate links, including eBay, Amazon, and others.
Nicely done conversion.

Got a few ideas from it for my 12 footer.

For the compartments you aren't sure what to put in there, I'd rig up a nice permanent tackle box that could be slide up and down on rails instead of bungee cording the bigger one on the deck. Nice and clean, less deck space with clutter.

Just my .02........

;)
 
hey,

I just bought a seafarer that looks just like yours. I believe its a 1989. I'm trying to figure out what size solid rivets i should use, and was wondering if you know what size rivets you would use on yours? thanks
 
Umm......good question :-k ??? I didn't have to replace any rivets in the hull below the waterline and therefore didn't have to use any solid rivets. I just covered all of the rivets with Gluvit to provide a flexible water tight seal. Knock on wood the one small leak that was there has stopped.

The only holes i drilled through the hull itself were where the old seat mounts were, and for them I used a 3/16" pop rivet. When I drilled them out it seemed like that was the diameter of the original rivet in there. So I think 3/16" is what you will need. Be careful of using pop rivets below the waterline though as water will leak in through the center.
 
Well the season is finally here ... the season for mods on our tin boats that is :D . Bass season is on hold for at least a few more months here in PA #-o . I made a few upgrades from last summer until now. I got into fishing Bass tournaments with my neighbor. We fished quite a few summer tournaments here in NEPA at Beltzville State Park. We used his 19ft Lund Pro - V, there is just a little bit more room than my tin, but I hope to fish one or two tournaments with mine this summer on a smaller electric only lake in the area. We did make the club championship in the fall, but only caught two dinks. It was on the last nice day in October and therefore pleasure boat paradise on the water. People everywhere, but we at least weighed in though.
Just before sunrise and the start of the tournament. Thought it was a cool picture with the fog over the water.
tournament.jpg


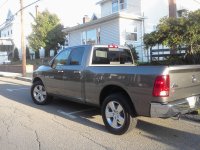
I upgraded the tow rig as well. 2011 Ram Big Horn. I hope it can handle towing the little tin around lol.
truck.jpg

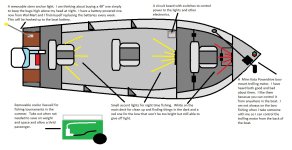
Alright, and now to the plans for 2012.
Boat 2012 Mods.jpg

1. Last summer I upgraded my motor to an 18HP Evinrude. It runs great but I would like to clean it up a bit by getting rid of some grease, repainting the motor, and add new decals to the hood.

2. I would like to add a new stern or anchor light. I have a battery powered one right now but it isn't very bright and it sits right level with where I sit, which draws the bugs at night right to me. I would like to add one with a plug in base that reaches higher than where I sit to keep the bugs above my head. Plus I don't have to replace the D batteries every week.

3. A small switch board that can control the lights and power to the fish finder.

4. A new bow mount trolling motor. I am looking at a Minn Kota Power Drive V2. I know there are mixed thoughts on them but I have never used a foot control trolling motor before so I don't think they would be hard to switch movements like from a cable. I 99.9% fish lakes so I don't need to fight currents (which I heard they are bad with) and I don't get too close to cover for the reaction time of the electric drive motor to be too slow. Finally I like the idea that it won't take up too much space on the deck and you can control it from anywhere on the boat. I sometimes fish from the stern which would allow me to control the boat from there.

5. I am thinking of adding small accent lights into the sides of the deck facing the middle. This would help see at the end of the night when cleaning up. I also found small red tinted ones to maybe use when switching new lures or unhooking a fish. The low red tint will keep me from going blind. I would also hook them up to the switch board.

6. Finally, I would like to make a small cooler livewell. I heard one of the Bass clubs in the area is moving their tournament to a smaller electric only lake. This would be perfect since my tin would move well on a small lake and not have to keep pace with larger boats that have 200+ HP. I would like to be able to remove the livewell when not in use since this would save on weight and space. I have seen the kits from BPS with the pump and aerator.
 
I was able to get started this past weekened on fixing up my "new to me" 1968 Evinrude. Even though it was considered a classic when I was born ( 20 + years old ) it still runs like a champ. The previous owner I bought it from said that the motor was on his parents neighbors aluminum fishing boat. When they were selling the motor he bought it for his boat as a kicker motor to go fishing, but never really got into fishing. The motor just sat on a kicker mount on the back of his boat. Overall it has the wear of a motor its age (faded decals and paint, a ton of grease built up, and some minor scratches.) I plan on removing the grease, repainting the motor components, and finally repainting the hood with new decals. I would like to try and have the motor look as close as possible as it does now.

The motor as it started.
motor left side.jpg

Like I said the motor hood isn't in too bad of a condition for its age but its scratched and scuffed. I would like to sand it down to a smooth surface, prime, paint, decal, and clearcoat the surface.
hood right side.jpg

Three of the emblems on the hood are painted tin. They are attached by small plastic clips on the back. These are in pretty good shape and I would like to take them off to paint the hood and then place them back on untouched.
hood back.jpg

The inside of the motor is covered by a thin film of grease and oil. I plan on just cleaning or wiping out the inside.
engine right side.jpg

The original owner bought a whale tale for the motor. I have read mixed things about them. It works fine on the boat and allows it to plane at a lower speed, but I don't know if it slows down the top end speed? They drilled holes and bolted through the cavitation plate so I think if I remove it the holes might create drag and slow down the boat anyway? I will just keep it on the motor once it is cleaned up.
whale tail.jpg

The 44 years of grease build up. I needed to scoop most of it off with a screwdriver. I used car motor grease remover to get most of it off, then scrubbed it with a mixture of greased lightning and dawn to remove the film. There are still a few corners that I couldn't reach so I am thinking of going to the car wash and using the power washer to give it a one final good cleaning.
Once it is sanded down I will wipe the surface with acetone to make sure it is a clean as possible.
grease.jpg

Originally I wanted to break the motor down into as many pieces as I could. But after trying to remove the power head to release the lower unit I decided to just let it go. The bolts to release the power head were rusted solid. I was afraid that I would break them off so I just decided to let them be.
take apart 1.jpg

A few pieces of the motor that came off.
take apart 2.jpg

The transom mount bracket. Once again you can see the grease build up that I would like to remove prior to paint. I plan to cover the serial # up and other original decals with tape before you paint.
take apart 3.jpg

The swivel steering bracket and tiller handle.
take apart 4.jpg

To get the tin emblems off the motor I had to cut these little plastic clips off. I was wondering if anyone knows where I could find them?
inside clips.jpg

Finally, the rubber killswitch knob. When I bought the motor it was dry rotted and starting to fall off. I am looking for a new one. I have searched several outboard dealers and they only seem to sell the entire cutoff switch unit as opposed to just the rubber push knob. I included the cap to get some perspective if anyone can help.
killswitch.jpg
 
Hi This is first post.I have the same starcraft only 12 foot long.I was wondering what year did you finally come up with? My boat has no HIN or title I have nothing for paperwork.I just sent out paperwork to try to get a HIN number.I was also wondering What you think I should get for motor.I have been using 3 horse to put put.I want something to get me there in fair time not all day lol.I am thinking of getting 9.8 nissan or something similar.Do you think it would be good for 2 people in boat to get around?
 
Mine is officially a 1971 according to the state of PA. That's what my registration says. It depends how much extra weight you add to the boat. With the weight of the frame, floor, and people, the lil 9.5 just couldn't get it on a plane thats why I upgraded to the 18 HP. The max HP for my boat is 20HP so I am really close to that, but the boat flys now. Overall I think the 9.5 was just under powered because I see guys on the lake with modern 9.9HP's moving around pretty well. So I would think that a 9.8 would work great on your boat on your smaller boat. Most of the guys on here have that size motor on their 12 footers.
 
Hey Guy,

If you dont mind me asking what did you use for paint on the exterior of the Boat, Ive read and re-read the thread and cannot seem to find it, the paint came out well as did the whole boat.

I may use this as a blueprint for my build.... A 1950's Ski Champ, though ill have to add the brackets through the Hull as the Ski Champs did not have your " standard " bench seats....

Anyways, that info should help... Thanks
 
JFlanagan said:
Hey Guy,

If you dont mind me asking what did you use for paint on the exterior of the Boat, Ive read and re-read the thread and cannot seem to find it, the paint came out well as did the whole boat.

I may use this as a blueprint for my build.... A 1950's Ski Champ, though ill have to add the brackets through the Hull as the Ski Champs did not have your " standard " bench seats....

Anyways, that info should help... Thanks

I coated the inside and outside of the boat with self etching primer. The inside I used Rustoleum Gray one quart and brushed it on. The outside I used Pettit Easypoxy. It was expensive but it has held up very good...worth the cost. I used jade green and platinum. Once again I brushed it on. I didn't have the setup to spray it on so I spent the money for a quality brush to give it a fine top coat. I don't have any photos since I was rushing to get the boat seaworthy at that point, but that was my process.
 
atuck593 said:
JFlanagan said:
Hey Guy,

If you dont mind me asking what did you use for paint on the exterior of the Boat, Ive read and re-read the thread and cannot seem to find it, the paint came out well as did the whole boat.

I may use this as a blueprint for my build.... A 1950's Ski Champ, though ill have to add the brackets through the Hull as the Ski Champs did not have your " standard " bench seats....

Anyways, that info should help... Thanks

I coated the inside and outside of the boat with self etching primer. The inside I used Rustoleum Gray one quart and brushed it on. The outside I used Pettit Easypoxy. It was expensive but it has held up very good...worth the cost. I used jade green and platinum. Once again I brushed it on. I didn't have the setup to spray it on so I spent the money for a quality brush to give it a fine top coat. I don't have any photos since I was rushing to get the boat seaworthy at that point, but that was my process.

Was the Pettit you used for the bottom of the exterior rated for bottomside use? All I can find is Black or Blue in underside rated Pettit paint...rest is all topside? That self etching primer, was it Rustoleum as well?
 
ty...
Both colors of the Pettit paint were Topside paint. It was from their Easypoxy line. My understanding of bottomside use is for if you plan on being in saltwater with your boat. I think it's so sea critters don't cling to or start growing on your boat if it sits for a little while. Either way I am happy with the paint it has held up well for me. The only thing is once you paint your boat you have to let it sit a full week to 10 days before you can take it into the water.

I used Rustoleum self etching primer inside and out. The Rustoleum inside has held up well too. I only have a small scratch from when I hit a pot hole, my trolling motor being stored inside the boat put a scratch on the one side. Other than that I am happy with that as well.
 
I spent much of my early days on the water in that same boat. The engines it had during my time the same 9.5 and the next body style of 18hp 'Rude. Great boat and nice work on the project.

Sam
 
sams said:
I spent much of my early days on the water in that same boat. The engines it had during my time the same 9.5 and the next body style of 18hp 'Rude. Great boat and nice work on the project.

Sam
Thanks Sam.... I have nothing but good things to say about the boat and motor combination.

I have been working on my season 2 mods for my boat the past few weeks. I have re-done the motor...added a new trolling motor...and working on a few other toys. The weather has been awesome as of late and I have been in full swing working. I am hoping to have it back on the water by this weekend at the soonest but definitley by Easter break. Here is an update on some of the work from the motor re-paint.

Motor Prep 1.jpg
I sanded down all of the rough spots. The paint was on there pretty good, but it was faded and chipped. I taped off all the decals and areas I didn't want painted.

Motor Paint 1.jpg
I used Rustoleum Self Etching primer. A few light coats with a light sand in between.

Motor Paint 2.jpg
Motor Paint 3.jpg
Motor Paint 5.jpg
I used Duplicolor Automotive paint from spray cans. The color was light blue metallic.

Motor Paint 6.jpg
The hood was Duplicolor gloss white.

Decals 1.jpg
Decals from the year the motor was made.

Decals 2.jpg
There was a small plastic decal on the back that was very faded. I taped off the area and painted it using old model paint that I had.

Done 1.jpg
The final product after several coats of Duplicolor Clear Coat.

Done 2.jpg
Done 3.jpg

New Toys 1.jpg
A few more toys to add to the boat. Some music while spending time on the water and heading to my fishing spots. I already have most of it installed on the boat but I just haven't had time to upload any of the photos.
 
Awesome job on the motor, it looks practically factory new!

I like the sound system too! I'm doing something similar on my build but just completely bypassing the CD player all together... just using an amp on a toggle switch that I can connect to an MP3 player/smart phone. Figured since I had an amp lying around, I could spend $30 on marine speakers and make a sound system! :D
 
I have a starcraft seafarer as well and I am wondering where you got your boat cover? Also what you used as supports for the cover? Any information would help out greatly!
 
hey, nice build!

i see you've got the 18 now, but about just "putting along" with the 9.5... maybe it wasn't putting out all the power it was supposed to. gunked up carb or not being at a proper rpm range at WOT?

i just say that because i have the same boat and my 9.9 planes it no problem with a little more than half throttle... pushes it to 17 mph by myself or 14 with another person aboard
 
Thanks... I haven't noticed any slipping of the motor on the diamond plate so far. It has been on there for a year now and at wide open throttle the motor bites in nicely.
 
Top