14' Starcraft Seafarer Build

TinBoats.net

Help Support TinBoats.net:

This site may earn a commission from merchant affiliate links, including eBay, Amazon, and others.
My build has really depended upon the weather since I don't have a garage to work in. I have been working on the different pieces of the build that can be completed in my basement. I am hoping that today was a sign that Spring is here 54 and sunny. Since I can't paint the boat or apply Gluvit to the boat due to the unpredictable weather I have turned to fixing a few minor odds and ends. The trailer for my boat is in great shape it's a 1999 Long made of unpainted galvanized steel. One problem I wanted to fix was not being able to see the trailer when backing down the ramp to take the boat out of the water. The bed of my truck sits up a little high which blocks my line of sight. I priced a few already made bolt on guides from Cabela's and BPS but they were all easily over 100 bucks. Money I don't need to spend when I can have someone help back me down the ramp for free. Once again this site did not leave me down.

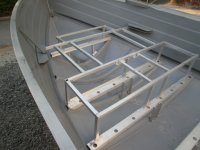
I have seen a few guys build guides out of PVC and aluminum on here and figured that this would be the best solution. I can't remember which member came up with this idea but I want to give them credit for their creativity because this is not my idea. I bought an aluminum square tube ladder support from Lowe's $25 and it came with all the mounting hardware needed (I would sewar the company that made this product also designed it as a guide for us tin boaters). I also purchased a piece of 2" PVC pipe with 2" caps for $6. Using lock washers I had at the house I put the guides and sights on the trailer this afternoon.
 

Attachments

  • P4020071 - Copy.JPG
    P4020071 - Copy.JPG
    248.9 KB · Views: 6,543
  • Guide While Loading.JPG
    Guide While Loading.JPG
    256.9 KB · Views: 6,543
  • Guide Materials.JPG
    Guide Materials.JPG
    309.6 KB · Views: 6,543
atuck593 said:
Thanks Bassaholic thats a nice looking boat you have there yourself as well. (Ha same boat and outboard.) I like the simple layout of it. How well does the little 9.5 push the boat with the added weight? I can't test it out yet as the lake up here is still frozen. Also, when you have the motor attached to the boat and tilt it up to pull out of the water (like in your picture) ratchets keep it in place. However, do you have a release lever or something to allow the motor to go back down to the running position? The previous owner said that you just need to push it back down when you would like to use it. Does this seem right?


Yeah it doesnt get on plane with me and my buddy in it. Still waiting to try a few things out ( put a stabalizer on the motor, shift some weight, and run without any deck). But yes raising the motor is kinda tricky and doesnt seem right but it is. You gotta kinda start lifting and on the right side theres a bar that runs up and down on the transom mount. Lift until you feel it come loose and slide it forward, then lift it till you can slide it back into the next notch. If you want i could send a few photos. I had my motor guy give the ups and downs on it when i had mine re-built.
 
Bassaholic...thanks I just went down to look at that lever it does lock the motor in that tilted position. I guess I will just have to grease the fittings really good when I re-grease it. Thats a bummer though that the 9.5 won't get it on a plane. I have seen a ton of 14 footers with a 9.9 on them and figured .4 HP wouldn't make that much of a difference.
How does your transom mount trolling motor work up on the bow? I have an Endura 50 and I am thinking I will have to build a pretty strong bracket up there and or mount it directly to the side of the boat. Sorry for all the questions...I just figured since you already have done what I would like to do you could offer some of your experiences. Thanks.
 
Alright...I know it has been awhile since my last post on the build but I have been making some progress the past few weeks. A little Trout fishing...a little prep work...and some shopping for parts have kept me busy. Here is the progress so far through several pictures. I find that it helps me to see through pictures what others have done rather than just reading about it. As always if anyone has advise for the build please don't hesistate to share. This is my first build so I am learning as I go.
 

Attachments

  • Ready For Paint Interior - Copy.JPG
    Ready For Paint Interior - Copy.JPG
    296.1 KB · Views: 5,845
  • Gluvit Applied - Copy.JPG
    Gluvit Applied - Copy.JPG
    302.5 KB · Views: 5,845
  • Gluvit (1) - Copy.JPG
    Gluvit (1) - Copy.JPG
    302.6 KB · Views: 5,845
  • Decal Before - Copy.JPG
    Decal Before - Copy.JPG
    241.4 KB · Views: 5,845
  • Middle Bench Rivets Drilled - Copy.JPG
    Middle Bench Rivets Drilled - Copy.JPG
    216.7 KB · Views: 5,845
  • Middle Bench Seat Removed - Copy.JPG
    Middle Bench Seat Removed - Copy.JPG
    288.7 KB · Views: 5,845
  • Middle Bench Rivets - Copy.JPG
    Middle Bench Rivets - Copy.JPG
    214.3 KB · Views: 5,845
  • Middle Bench Support Before - Copy.JPG
    Middle Bench Support Before - Copy.JPG
    265 KB · Views: 5,845
  • Spare Tire 2 - Copy.JPG
    Spare Tire 2 - Copy.JPG
    287.6 KB · Views: 5,845
  • Spare Tire - Copy.JPG
    Spare Tire - Copy.JPG
    275.9 KB · Views: 5,845
  • Aluminum - Copy.JPG
    Aluminum - Copy.JPG
    296.8 KB · Views: 5,845
  • Boat Decks - Copy (2).jpg
    Boat Decks - Copy (2).jpg
    110.7 KB · Views: 5,845
The build is finally getting into full swing. The weather for the first half of the week was nice enough to get a few coats of paint on the interior of the boat...and the thunderstorms the second half have at least allowed me to strip the paint from the outside. Next week I plan on building the frame for the front and rear casting decks since the interior is painted.
 

Attachments

  • Exterior Paint Remove 1 - Copy.JPG
    Exterior Paint Remove 1 - Copy.JPG
    241 KB · Views: 5,629
  • Exterior Paint 2 - Copy.JPG
    Exterior Paint 2 - Copy.JPG
    236 KB · Views: 5,629
  • Paint Remover - Copy.JPG
    Paint Remover - Copy.JPG
    254.4 KB · Views: 5,630
  • Interior Paint - Copy.JPG
    Interior Paint - Copy.JPG
    220.7 KB · Views: 5,629
  • Interior Primer - Copy.JPG
    Interior Primer - Copy.JPG
    235.5 KB · Views: 5,630
  • Spray Paint Handle - Copy.JPG
    Spray Paint Handle - Copy.JPG
    260.6 KB · Views: 5,630
  • New Rivets.JPG
    New Rivets.JPG
    235.4 KB · Views: 5,629
I have been very busy as of late working on the boat. I have set the goal of trying to have it finished by Memorial Day Weekend. I figured a nice three day weekend to get some fishing and time on the water in. I have been able to frame the floor, front deck, and rear deck. For the first time working with aluminum angle and square tube I don't think it turned out half bad. I just made sure to measure three times and cut once.
I picked up the aluminum from a surplus/scrap yard which sold it per pound rather than by the foot. I would recommend that route to anyone looking into supplies for their build. A retail store like Lowe's or Home Depot had single pieces for over $20 which would cost a small fortune. Also if you have a choice I would go with the angle iron since it can be riveted directly together. If you use square tubing you will need angle brackets to connect the pieces together which can also add up in cost.

After three days of work, 300+ holes drilled, countless pieces cut, and over 300 rivets, it is finally done. I have also cut out the template for the decking which I will start cutting the plywood tomorrow. I picked up 5/8ths thick untreated for the decking and floor. I think that 3/4ths on this small of a boat would have been a little overkill as well as a lot of extra weight.

Finally, thinking ahead I have also ordered Easypoxy by Pettit which should be here by the end of the week to paint the sides and bottom. It was reccommended by a few of the guys on here as a good quality paint. The sides will be Jade Green and the bottom will be Platinum Gray.
 

Attachments

  • Back Plate.JPG
    Back Plate.JPG
    271.8 KB · Views: 4,762
  • Transom Diamond Plate.JPG
    Transom Diamond Plate.JPG
    245.2 KB · Views: 4,762
  • Decking Template 3.JPG
    Decking Template 3.JPG
    276.6 KB · Views: 4,764
  • Decking Template 2.JPG
    Decking Template 2.JPG
    286.6 KB · Views: 4,762
  • Decking Template 1.JPG
    Decking Template 1.JPG
    270.3 KB · Views: 4,762
  • Whole Boat Frame.JPG
    Whole Boat Frame.JPG
    252.2 KB · Views: 4,762
  • Rear Deck Frame.JPG
    Rear Deck Frame.JPG
    271.6 KB · Views: 4,763
  • Front Deck Frame.JPG
    Front Deck Frame.JPG
    286.5 KB · Views: 4,762
  • Tools of the Trade.JPG
    Tools of the Trade.JPG
    277.6 KB · Views: 4,762
  • Aluminum - Copy.JPG
    Aluminum - Copy.JPG
    296.8 KB · Views: 4,762
Man you are doing an awesome job with this boat. I just recently bought a 81 Gamefisher 14' V boat and have been looking all over for good ideas and have found some here and some there but you just put them all together. So I guess this is my way of saying, :roll: "Sorry man, great job but Im gonna steal your idea"..lol. I am excited to see you next steps. Thanks for the help already.
 
jsreichenbach said:
Man you are doing an awesome job with this boat. I just recently bought a 81 Gamefisher 14' V boat and have been looking all over for good ideas and have found some here and some there but you just put them all together. So I guess this is my way of saying, :roll: "Sorry man, great job but Im gonna steal your idea"..lol. I am excited to see you next steps. Thanks for the help already.

Sounds like you have a good boat there to start with. Good luck on your build you will have to post some pics of your progress. I don't mind "borrowing" ideas lol since I did the same with my build. I didn't realize that all of these mods could be made to such small tin boats. I am glad I found this site. I plan to be posting a few more pics of my build soon, but I am working hard to have it completed by the Memorial Day deadline I set. I really want to get the boat back together to get out a start fishing already.
 
" I love it when a plan comes together."
After the past week of absolute crap for weather....mother nature made up for it today. I would have rather been on the lake fishing today but getting the boat 90% done is as close to second as I would like to be. At this point all I have left is paint the outside, and carpet the wooden pieces. I was able to get a mock build up, run the motor, mount the seats, mount the battery box and tray, and finally get a good coat of paint on the inside. I will explain in the pictures below.
 

Attachments

  • Front View High Seat.JPG
    Front View High Seat.JPG
    267.9 KB · Views: 4,687
  • Middle and Rear High .JPG
    Middle and Rear High .JPG
    279.3 KB · Views: 4,687
  • Rear View High.JPG
    Rear View High.JPG
    282.2 KB · Views: 4,686
  • Side View Low Good.JPG
    Side View Low Good.JPG
    265.9 KB · Views: 4,686
  • Homemade Battery Box Tray 2.JPG
    Homemade Battery Box Tray 2.JPG
    264 KB · Views: 4,687
  • Homemade Battery Box Tray.JPG
    Homemade Battery Box Tray.JPG
    267.3 KB · Views: 4,686
  • Gas Tank Tied Down.JPG
    Gas Tank Tied Down.JPG
    287.3 KB · Views: 4,686
  • Gas Tank Tie Down.JPG
    Gas Tank Tie Down.JPG
    256.4 KB · Views: 4,686
Hay u might run into problems with that dimond plate on the back of the transom like that. U want it to bight into that peace of wood on the back of the transom on the out side. As for the peace on the inside of the boat that one should be good and help keep bolts from maring up the transom. As for the rest of the boat it looks sweet nice job.
 
ENIRB said:
Well, it's Memorial Day... was the deadline met?
And then some... had it out Saturday, Sunday, and then tonight. The boat met all of my expectations. It was perfectly stable to fish from both decks (bow and stern) as well as stand and fish from the middle. My girlfriend was happy that she had a place to tan on the front deck during the day. I didn't mind the view either.

I do however, have a few things that I would like to tweak and fix. ( I guess it comes with the territory. ) The motor worked great for having not run all winter. One pull and we were off. Hovever, she is way underpowered, no plane but I think relilable. A few of the hatches need a little more support, and finally I need to bow mount my trolling motor. Having two motors in the back is a little tight and you have to be careful as to not hit gas motor while trolling with the electric. Finally, mount a permanent bow light for night. I bought a clamp on thinking it would be easy, but leaning all the way to the bow and then having to worry about dropping it in the water. My project tomorrow is to mount a permanent one. Hopefully tomorrow I will have pics of the finished product thus far.
 
Well here are some updated pictures of the finished product. As always there are little things to work on but they will come over time. I have been out every night so I haven't really had time to post some pictures until now.
 

Attachments

  • Light and Tackle Hatch.JPG
    Light and Tackle Hatch.JPG
    253.8 KB · Views: 3,066
  • Extra Hatch.JPG
    Extra Hatch.JPG
    253.1 KB · Views: 3,066
  • Bow Hatch.JPG
    Bow Hatch.JPG
    248.8 KB · Views: 3,066
  • Battery Hatch.JPG
    Battery Hatch.JPG
    257 KB · Views: 3,066
  • Bow Front.JPG
    Bow Front.JPG
    234.1 KB · Views: 3,066
  • Both Motors.JPG
    Both Motors.JPG
    298.3 KB · Views: 3,066
  • Whole Boat Inside.JPG
    Whole Boat Inside.JPG
    279.4 KB · Views: 3,066
  • Whole Boat Front.JPG
    Whole Boat Front.JPG
    278.9 KB · Views: 3,066
  • Whole Boat and Tow Rig.JPG
    Whole Boat and Tow Rig.JPG
    275 KB · Views: 3,067
  • Rear Motor.JPG
    Rear Motor.JPG
    268 KB · Views: 3,066
  • Starcraft Logo 2.JPG
    Starcraft Logo 2.JPG
    250.4 KB · Views: 3,066
I have the same model but with 4 seats.. Can't remember what the model is..
I really want to remove the second seat from the back to give me some floor space.
I don't see where you did any bracing to replace the bracing from the origional seat..
What were your thoughts on it?
Thanks!
 
jasper60103 said:
Very nicely done.
Btw, I rather have my TM on the bow as well. I just seen a foot control model on craigslist. I'm tempted.

Hey thanks.... last night I clamped the trolling motor onto the right side of the boat as close to the bow as possible. I used a piece of 2 x 4 for the trolling motor mounts to dig in to and I swear that there was a wake behing the boat when I was at full speed. That is also with three of us in the boat. I guess it is easier to pull the boat through the water rather than push it. I would like to find a more permanent way to mount it though... still thinking.

cjldad said:
I have the same model but with 4 seats.. Can't remember what the model is..
I really want to remove the second seat from the back to give me some floor space.
I don't see where you did any bracing to replace the bracing from the origional seat..
What were your thoughts on it?
Thanks!

Mine is a 1971 Starcraft Seafarer. It only had three benches to begin with. I bought thicker pieces of aluminum tubing with the intention of using them to brace up the inside in the middle. This is only what I did based on how it has worked out for me but I have noticed no hull flex on the sides at all without those supports so I didn't put them in. I think that since I have aluminum framing attached to the sides and bottom of the boat for the decks and floor they bring everything together nice and strong. Another reason I may not notice anything is I because I do have an underpowered motor on the boat. The lil 9.5 just putts along it's no speed demon. I have also been caught in the wake of a speedboat that came up from behind me and passed me with no flexing issues as well. I figure if it is working well now why change it or mess with it, but if I have to it "should" be as easy as adding the pieces to the side and securing them to the floor.
 
Jon Boat,

I wasn't sure if I would be able to upgrade the carb on that model or how much it would cost so... I went searching and found a 1968 Evinrude 18 horse for a pretty good deal. I just picked it up this week and is in decent shape for the year. Man does the boat fly now though... it can get up on a plane no issue at all. I am glad I made the upgrade.
 
Top