86BassTrackerV17 1st fishing trip w/son 10/11/13 vids p15

TinBoats.net

Help Support TinBoats.net:

This site may earn a commission from merchant affiliate links, including eBay, Amazon, and others.
Ranchero50 said:
My bandsaw is a Porter Cable portaband held in a vise. #-o
Yeah, but you have a CNC mill. Argument denied. :mrgreen:

Ranchero50 said:
He could but I think it would flex too much based on how the motor mounts and twists the hull. Either wood or a fiberglass replacement would be better I think.

I've seen some nicely done aluminum transoms, built primarily with extrusions. It may not be best in this particular boat, but I wouldn't dismiss the notion in entirety.
 
Zum said:
Nice work again.
I know your trying to match the transom up the same way it was before,nice and tight like but have you ever thought about just strengthing it up with aluminum(transom) and scraping the wood all together?
Just wondering.

Zum,

I'm thought real hard about it. I also have looked at making/pouring a 100% fiber glass transom or having a board cut and mahogany board planed down to the thickness I need from a place called Peach State Lumber in Kennesaw, GA.

I finally decided I didn't have enough mechanical aptitude to come up with an aluminum structure that would be stiff and durable enough for the application. I really like the idea of making a 100% transom, but the costs were around $250.00-$300.00, a little bit too much when there's so much else to do.

Fiber-glassing the plywood laminate or "painting" the transom with fiberglass resin seems like a good idea and I'm real tempted by that approach, but cost is again an issue along with the difficulty acquiring the fiberglass related materials in this area.

Another idea is to have Peach State Lumber in Kennesaw cut and plane me a solid Mahogany transom. Cost of this is right at a $100.00 plus tax and gasoline costs to drive there (an hour drive or so from here one way). This approach would also require some type of water proofing and I'm not sure the mahogany would be any better than laminated plywood. I'm still debating this one in my mind.
 
Ranchero50 said:
He could but I think it would flex too much based on how the motor mounts and twists the hull. Either wood or a fiberglass replacement would be better I think.

It looks good. One nice thing is you can unload the boat in the garage, then work on the trailer then the boat pisses you off too much.

Jamie

Yep, you've got the same thought I have, the aluminum flex and how to prevent it. I know the answer is some type of frame work, I just don't have quite enough mechanical aptitude or mechanical engineering background to come up with it.

I'm also with you on the wood or fiberglass, with the fiberglass being a better solution and one I'd like to do.

But ultimately, I'm having to go back to plywood due to the fact I can pick up enough plywood for not only the transom, but also some of the decking. Plywood will weight more than the aluminum, but with this boat and if I don't use carpet, it may give the benefit of some desired (balancing) added weight up front and sound deadening. A consideration I hadn't thought of earlier. Choices, choices.

I've about reached the "I want to take the boat off and work on the trailer, it's simple" point. More decisions than I originally expected on the boat. I'm wanting mindless labor for it's simple pleasures and dang if my engineering background didn't wake up and kick me.
 
bassboy1 said:
Ranchero50 said:
My bandsaw is a Porter Cable portaband held in a vise. #-o
Yeah, but you have a CNC mill. Argument denied. :mrgreen:

Ranchero50 said:
He could but I think it would flex too much based on how the motor mounts and twists the hull. Either wood or a fiberglass replacement would be better I think.

I've seen some nicely done aluminum transoms, built primarily with extrusions. It may not be best in this particular boat, but I wouldn't dismiss the notion in entirety.

Jamie has a CNC mill? Dang Jamie, I wish you lived near here. I have several items I can think of I'd like to have fabricated for this boat I can't find commercially.

Bassboy, do you have a link or pics of those transoms? I'm real curious.

I'd go with the fiberglass if doing it didn't cost so much. I hate to admit it, but the plywood is winning out based on I can use the extra for decks up front. Sound deadening and weight is likely to become and issue in this boat long term if I don't go with carpet. And I really DO NOT want to go with carpet and won't if I can find some light-colored rubber locking mat for the decks.

If anybody knows where to get light-colored interlocking mat with a fine mesh for cheap, please let me know.
 
Here's one from this site. The concept was a good one, but I think the execution left a little bit to be desired.
https://www.tinboats.net/forum/viewtopic.php?f=3&t=5306&hilit=aluminum+transom&start=50

Here's one from bowfishingcountry.com (forum is password protected, so I just had to steal the picture from it).

100_5309.jpg


I've seen a handful of nicer ones, but I can't remember off the top of my head where they are at. If I get a chance, later on, I'll try to search for a few of those, and post them up.

A number of the newer aluminum boats, even some of the cheaper cookie cutter boats (including Tracker, if I remember correctly), are built with aluminum transoms from the factory. No reason the same concept couldn't be retrofitted into an older one.
 
Bassboy,

After looking at those pics, I'm liking the concept. The critical part for me is I'm hanging a 300 pound plus motor off of it and I have to bolt it on as well. I'd like to do the all aluminum transom, but I'll need to find tubing that's a true 1 1/2" by say, 2" to 4" I'm thinking, then I'll need to find someone to weld it up.

Okay, I'm going to stop work on the boat other than clean up and see about getting the boat off the trailer and repair the trailer so I can transport. Going to need some ideas on how to get the boat safely off the trailer and onto some sawhorses, etc.

If anybody has some good ideas on removing a heavy tin, please post or provide a link.

Thank you all,

Dave
 
My boats rated for 60hp,has an all aluminum transom.
I'll take acouple pictures of it if you want?
Wonder if you could gear up some type of sling(straps/net?) and use that nice new cherry picker.
Does it extend(wide) enough?
Thought I seen a picture on this site of someone using one,I'll try to find it.
Just wondering how he straped/slinged it .
 
You could lower to bow/trailer down as low as it will go, then place some blocks under the rear hull, then lift the bow/trailer up as far as it will go. the rear hull should be resting on the blocks and not the trailer bunks at this time, then use that picker to hold the bow up and pull the trailer part way out till the trailer tire hit's the picker. Then lower the bow back on the trailer and put some blocks under the hull at the end of the trailer and pull the trailer out from under the boat. little time consuming but works

just a idea.

Awsome build so far-really enjoy seeing it
 
Zum said:
My boats rated for 60hp,has an all aluminum transom.
I'll take acouple pictures of it if you want?
Wonder if you could gear up some type of sling(straps/net?) and use that nice new cherry picker.
Does it extend(wide) enough?
Thought I seen a picture on this site of someone using one,I'll try to find it.
Just wondering how he straped/slinged it .

Zum,

Yes, I would very much appreciate as many good detailed pictures of your boat's transom. Good idea on the cherry picker, I already have straps on hand I can use. If you can find a pic of someone using the cherry picker to remove the boat, I'd love that as well.
 
Arrowhand said:
You could lower to bow/trailer down as low as it will go, then place some blocks under the rear hull, then lift the bow/trailer up as far as it will go. the rear hull should be resting on the blocks and not the trailer bunks at this time, then use that picker to hold the bow up and pull the trailer part way out till the trailer tire hit's the picker. Then lower the bow back on the trailer and put some blocks under the hull at the end of the trailer and pull the trailer out from under the boat. little time consuming but works

just a idea.

Awsome build so far-really enjoy seeing it

Arrowhand,

That's another good idea and I think with that, I should be able to get it done. A good idea, I'm thinking and would allow me to not force my buddy to drive 30 minutes over here to get the boat off the trailer.

Thank you for the compliment on the build. As you go along, a guy really need some of those to keep him going and not feel overwhelmed.
 
I did what Arrowhand said for getting the boat off without the cherry picker. Once the transom was on the sawhorses I was able to physically slide the boat off to the next saw horse. Admittedly, this was after applying the steelflex, and the boat was completely stripped.
 
Thought I replied to this in an edit earlier?
I either messed up or it's on someone elses post:)

Arrowhand has it pretty much bang on,lower the tongue,block the stern(jack posts,wood,cement blocks,syrofoam blocks.),then use the cherry picker to lift the bow,either bow post or strap near the bow.Should be able to angle the trailer out after it's lifted,then block her up good.

Not sure how strong your ceiling joists are but a block hanging from the ceiling would work good also.Even a sturdy tree with a block(winch).

May not even need your C.picker but hey you have it and it may be easier with it.

I'm just getting home,to dark right now for them pictures but I plan on going fishing tomorrow so I'll get a few shots of that transom for you.
 
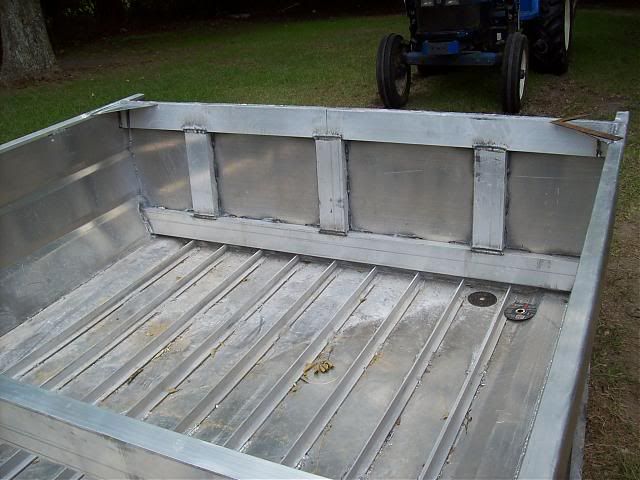
Heres a few pictures.
My boats has a 100 gauge skin,the bracing and tubing looks close to 1/4".
The seats are part of the structure as there is bracing welded to it.
The 2 middle braces go right to the floor,where my tunnel hull is.
The 2 stainless bolts you might see is where I had another outboard mounted.
The tubing seems to be around 11/4" by 3",sorry didn't bring a ruler to get better measurements for you.
Maybe someone without a false floor can post you a picture to see how they are welded to the ribs/floor.
Oct.14 (1).JPG
Oct.14 (2).JPG
Oct.14 (3).JPG
 
Zum said:
Heres a few pictures.
My boats has a 100 gauge skin,the bracing and tubing looks close to 1/4".
The seats are part of the structure as there is bracing welded to it.
The 2 middle braces go right to the floor,where my tunnel hull is.
The 2 stainless bolts you might see is where I had another outboard mounted.
The tubing seems to be around 11/4" by 3",sorry didn't bring a ruler to get better measurements for you.
Maybe someone without a false floor can post you a picture to see how they are welded to the ribs/floor.

Zum,

I want to make sure I'm understanding you here. Please confirm if the statements I make about welding are correct.

You're saying your boat's overall aluminum sheathing is .100" and the tubing used for bracing the transom is one quarter inch thick.

There are two large, very thick aluminum braces that go straight to the floor and from what I can see, are welded at all attachment points.

The tubing dimensions are 11" long, 4" wide and 3" deep and are also welded in place.

The two stainless bolts are filling holes where another outboard was mounted.

Let me know if that's got it.

Thank you for posting this. It's very useful information. Was the big bracing always there? As in part of the original setup?
 
DaveInGA said:
Zum said:
Heres a few pictures.
My boats has a 100 gauge skin,the bracing and tubing looks close to 1/4".
The seats are part of the structure as there is bracing welded to it.
The 2 middle braces go right to the floor,where my tunnel hull is.
The 2 stainless bolts you might see is where I had another outboard mounted.
The tubing seems to be around 11/4" by 3",sorry didn't bring a ruler to get better measurements for you.
Maybe someone without a false floor can post you a picture to see how they are welded to the ribs/floor.

Zum,

I want to make sure I'm understanding you here. Please confirm if the statements I make about welding are correct.

You're saying your boat's overall aluminum sheathing is .100" and the tubing used for bracing the transom is one quarter inch thick.

There are two large, very thick aluminum braces that go straight to the floor and from what I can see, are welded at all attachment points.

The tubing dimensions are 11" long, 4" wide and 3" deep and are also welded in place.

The two stainless bolts are filling holes where another outboard was mounted.

Let me know if that's got it.

Thank you for posting this. It's very useful information. Was the big bracing always there? As in part of the original setup?

Keep in mind, his hull being a tunnel hull is going to have a few differences over designing for a conventional hull. Tunnels inherently lack certain strengths that conventional hulls have anyway, and as such, needs to be designed for differently than would a conventional hull's transom.
 
bassboy1 said:
Keep in mind, his hull being a tunnel hull is going to have a few differences over designing for a conventional hull. Tunnels inherently lack certain strengths that conventional hulls have anyway, and as such, needs to be designed for differently than would a conventional hull's transom.

I agree and understand what you're saying. But for the purposes of making sure the transom is over engineered instead of under engineered, such a transom may just be ideal. So far, what I'm getting from his pictures and the other pictures you posted of home builds is the approach appears to be one of building a sandwich out of structural aluminum tubing and capping the front and back with fairly heavy sheet aluminum (.125") or something along those lines.

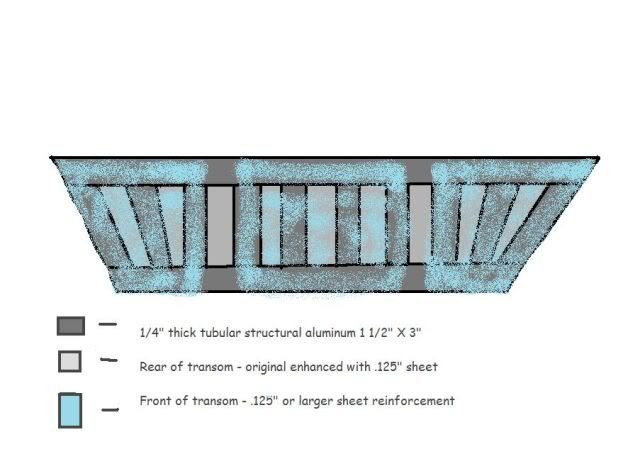
Here's something I've come up with tonight and thumbnail sketched in paint for thinking purposes (Nope, I'm not an arteest. :D ):

ProposedTransomBuild.jpg


The tubular box frame in dark grey could be 1 inches thick and width could vary, depending on availability. If it were 1" thick, then it could be sandwiched either side with .125" sheet, giving the desired 1.25" the original transom this boat had. This should give reasonable rigidity and stability from most directions when the torsional forces of the outboard motor acts upon it. This frame "sandwich" would be inserted in place of the original transom board and welded into place.

To further enhance the "sandwich" strength and rigidity, thick sections of aluminum could be placed at key areas (See the blue "airbrush in the drawing above - the corners of the transom and mounting area for the motor). These enhancing sections could be significantly thick, perhaps as thick as diamond plate.

Additional rigidity could be achieved using two part flotation foam poured into the tubing through weep holes or before final weld up.

Finally, the drawing doesn't show these, but 2 to 4 vertical supports similar to the one's in Zum's picture could be added to aid the "sandwich" in supporting the 300 plus pound outboard motor I have. These may not need to be so large and thick, but I'd love to have a mechanical or structural engineer toss their two cents in on this one.
 
That transom wouldnt go anywhere. If I were building a boat that I planned on keeping forever then this is the only option I would consider for a transom.
 
You could probably halve the number of vertical supports shown and be fine. Keep two right where the motor clamps are. I wonder what they used to skin the trackers? Usually they are .080 or .063". The tie plates that go to the floor should go to stringers or at lest the next forward rib. One nice thing is if they build that frame seperate you should be able to slide it in place and then puddle weld the existing sheets to it.

Call some welding shops and see if anyone would be interested in doing it.

Jamie
 
Zum,

I want to make sure I'm understanding you here. Please confirm if the statements I make about welding are correct.

You're saying your boat's overall aluminum sheathing is .100" and the tubing used for bracing the transom is one quarter inch thick.
Yes,to the sheathing,not sure about the tubing thickness,maybe 3/16"
There are two large, very thick aluminum braces that go straight to the floor and from what I can see, are welded at all attachment points.
I'm thinking yes but with the false floor hard to see,I will post another picture down below.The 2 braces on the seats are only welded to the seats not the floor and there only bolted to the transom

The tubing dimensions are 11" long, 4" wide and 3" deep and are also welded in place.
I was trying to say 1 1/4" wide by 3".I went out with the ruler just now and the tubing is 1 1/2" by 2 1/2",sorry my picture of this didn't come out clear and it's raining and blowing to hard right now to get another.

The two stainless bolts are filling holes where another outboard was mounted.
Yes

Let me know if that's got it.

Thank you for posting this. It's very useful information. Was the big bracing always there? As in part of the original setup?
The bracing is all factory.
I see your diagram below,looks real sturdy.The tubing on my boat is more like a 10-12" ladder just across the top of the transom.It has acouple extra pieces of tubing where the motor would mount.
Pa150075.jpg
Pa150076.jpg
 
Something interesting about those braces in the middle.
There not welded(atleast what I can see)at the top by the tubing.
Only welded below the tubing right to the stern.The side ones aren't either but they were bolted.
Maybe it's to allow for some flexing in the transom?
Oct.14 (1) - Copy.JPG
Hope you can see in the picture were I say "weldings here"that there is a tab that skirts out to the sides where the welding takes place.You can see it even on the side braces.
Edit:Those triangle braces have like a "tee"part where there welded.Flared out,not just a butt weld.
Trying to explain myself...don't think it's working.
 

Latest posts

Top