86BassTrackerV17 1st fishing trip w/son 10/11/13 vids p15

TinBoats.net

Help Support TinBoats.net:

This site may earn a commission from merchant affiliate links, including eBay, Amazon, and others.
Troutman3000 said:
That transom wouldnt go anywhere. If I were building a boat that I planned on keeping forever then this is the only option I would consider for a transom.

The only thing that might keep me from doing this is money considerations due to all the expenses I had this one. Then again, I might be able to delay doing the transom for a bit while I'm finishing up the trailer while I recover from the week's activities.
 
DaveInGA said:
ProposedTransomBuild.jpg

Whoa, keep in mind, the original transom was just 1.25 inches of plywood. Obviously going a little above and beyond is always good, but at the end of the day, all the boat really needs is that 1.25 sheets of plywood amount of strength.

You may be underestimating the strength the .125 sheet on either side is going to give that thing. You are making one big, stout box beam, with the design you drew, and shouldn't need nearly as many tubes.

I've seen successful transoms made with half as many tubes as shown (although usually 1.5 or larger inch tubes), and no sheet on either side, save for the outer transom skin (which is often .090 - .125 on some of the rigs with aluminum, welded into place transoms).

If you did foam fill it, weep holes are a necessity, as that piece is going to get far too hot during weld-out for the foam to withstand.
 
Bassboy and Ranchero,

Both you guys are saying I've over engineered my first cut at the design thrown out for response and criticism. It was late last night, I was taking Lortab for pain and had a shot of brandy in the hopes of getting some sleep with the pain from my tooth.

I was hoping you guys would come back with an altered design or suggestions on tweaking that design, which now that you did, I can modify. Then getcha to look at it again. I'm excited it may cost a good bit less materials wise.

A couple of the design thoughts I had when I drew that drawing:

1. The design has to be 1.25 inches thick when finished to fill the "hole" I have.
2. I'm not sure I can get 1.25" tubing, but I can get 1" tubing and .125" sheeting. (Note: If you guys know I can 1.25 inch tubing, I can eliminate the sheeting except for "exposed areas of the transom or areas I want to build up for addition stiffness.)
3. Stiffness is a concern when supporting 300 pounds of outboard I'm thinking, so I don't want to under engineer. I'd rather have it too strong than have to go back and reinforce it.
4. I want to be sure to have enough reinforcement nothing will flex and pop a weld down the road at an inconvenient time.
 
okay, here's a second cut with some of the tubing eliminated and the .125 taken out. I've kept some sheeting in areas where there is no sheeting now or there may be a need for some reinforcement:

ProposedTransomBuild.jpg


Whatcha think?
 
Zum said:
Something interesting about those braces in the middle.
There not welded(atleast what I can see)at the top by the tubing.
Only welded below the tubing right to the stern.The side ones aren't either but they were bolted.
Maybe it's to allow for some flexing in the transom?

Hope you can see in the picture were I say "weldings here"that there is a tab that skirts out to the sides where the welding takes place.You can see it even on the side braces.
Edit:Those triangle braces have like a "tee"part where there welded.Flared out,not just a butt weld.
Trying to explain myself...don't think it's working.

You're doing fine, I'm getting it. Thank you for posting more data. Helps a lot.
 
DaveInGA said:
Bassboy and Ranchero,

Both you guys are saying I've over engineered my first cut at the design thrown out for response and criticism. It was late last night, I was taking Lortab for pain and had a shot of brandy in the hopes of getting some sleep with the pain from my tooth.

I was hoping you guys would come back with an altered design or suggestions on tweaking that design, which now that you did, I can modify. Then getcha to look at it again. I'm excited it may cost a good bit less materials wise.

A couple of the design thoughts I had when I drew that drawing:

1. The design has to be 1.5 inches thick when finished to fill the "hole" I have.
2. I'm not sure I can get 1.5" tubing, but I can get 1" tubing and .125" sheeting. (Note: If you guys know I can 1.25 inch tubing, I can eliminate the sheeting except for "exposed areas of the transom or areas I want to build up for addition stiffness.)
3. Stiffness is a concern when supporting 300 pounds of outboard I'm thinking, so I don't want to under engineer. I'd rather have it too strong than have to go back and reinforce it.
4. I want to be sure to have enough reinforcement nothing will flex and pop a weld down the road at an inconvenient time.

1.5 tubing is no problem to get. One of the more commonly used sizes. I last bought some of that on 9/22, and as of that date, the price for 21' (.125 wall) was $54.90, just so you can get a price reference. You can also get 1.25" square tube, without a problem (probably takes ordering, but locally, I have to order all my aluminum, and it usually reaches my supplier within 2 days, with no price difference over an in stock item).
 
bassboy1 said:
DaveInGA said:
Bassboy and Ranchero,

Both you guys are saying I've over engineered my first cut at the design thrown out for response and criticism. It was late last night, I was taking Lortab for pain and had a shot of brandy in the hopes of getting some sleep with the pain from my tooth.

I was hoping you guys would come back with an altered design or suggestions on tweaking that design, which now that you did, I can modify. Then getcha to look at it again. I'm excited it may cost a good bit less materials wise.

A couple of the design thoughts I had when I drew that drawing:

1. The design has to be 1.5 inches thick when finished to fill the "hole" I have.
2. I'm not sure I can get 1.5" tubing, but I can get 1" tubing and .125" sheeting. (Note: If you guys know I can 1.25 inch tubing, I can eliminate the sheeting except for "exposed areas of the transom or areas I want to build up for addition stiffness.)
3. Stiffness is a concern when supporting 300 pounds of outboard I'm thinking, so I don't want to under engineer. I'd rather have it too strong than have to go back and reinforce it.
4. I want to be sure to have enough reinforcement nothing will flex and pop a weld down the road at an inconvenient time.

1.5 tubing is no problem to get. One of the more commonly used sizes. I last bought some of that on 9/22, and as of that date, the price for 21' (.125 wall) was $54.90, just so you can get a price reference. You can also get 1.25" square tube, without a problem (probably takes ordering, but locally, I have to order all my aluminum, and it usually reaches my supplier within 2 days, with no price difference over an in stock item).


That's sounding good. Sounds like the tubing is within the affordability range and I already have any sheeting I may need for this task. The only choice now is which size tubing 1.25" square or 1.25" X 2" rectangle. I'm leaning towards the rectangle.

Any changes from the second drawing?
 
Dave. this has to be one of the most interesting and best conversions done thus far on tin boats. Your step by step progress is the bomb. When you posted a thousand bucks for your V-17, I thought "Milka-What?" has he lost his mind? But you snached your boat from the jaws of the recycler. Put an extra couple of ribs in your transom and let's get going. It's killing me. I think that foam was just poor quality control at the factory. My hat's off to ya.
 
One thing I would consider is getting a big chunk of carboard from the grocery store or furniture place to make a template for you new transom. It's a lot easier to cut and fit vs. aluminum and you can use it to mock up your metal.

Are you going all the way to the floor? Any allowances for drains or through transom fittings for tie downs?

Jamie
 
tccanoe said:
Dave. this has to be one of the most interesting and best conversions done thus far on tin boats. Your step by step progress is the bomb. When you posted a thousand bucks for your V-17, I thought "Milka-What?" has he lost his mind? But you snached your boat from the jaws of the recycler. Put an extra couple of ribs in your transom and let's get going. It's killing me. I think that foam was just poor quality control at the factory. My hat's off to ya.

Yes, that price was a little high, but I was willing to pay it for the size boat I was getting. I knew the boat, once rebuilt, would be ideal for most of the larger local waters. It is a bit on the big side for a quick, easy reconstruction and remodel. Add onto that my adventure this week: https://www.tinboats.net/forum/viewtopic.php?f=2&t=16118 and you have a serious delay. I've been using the delay (I'm trying to heal up and the dr/dentist bills ate up my cash reserved for this project.) to figure some things out I'm going to do long term.

So while it's been slow and deliberate, the long term results will hopefully be worth it.
 
Ranchero50 said:
One thing I would consider is getting a big chunk of carboard from the grocery store or furniture place to make a template for you new transom. It's a lot easier to cut and fit vs. aluminum and you can use it to mock up your metal.

Are you going all the way to the floor? Any allowances for drains or through transom fittings for tie downs?

Jamie

Yep, cardboard is in the plan for making a good fit and preventing material waste.

I'm not going all the way to the floor. I'm going to do nothing more than replace where the wood was, a little over half way down the back of the boat. And yes, allowances for everything and thank you for reminding me of all those things.
 
Well, the swelling in my face is going down and I didn't have a fever today, so I decided to try and do some work on the boat. While I'm planning the transom, the boat project as a whole has moved to the stage I'm almost ready to get it off the trailer. All that remains is stripping the paint and cleaning most of the filth out of the inside of the boat before removing it from the trailer and putting it up on blocks. I had the materials on hand, so I decided to start stripping the paint. Some pics:

DSCN1034.jpg


Supplies on hand - SOS pads (Wife says they work the best.), some 4/0 steel wool I had on hand for areas where no soap is needed/wanted, some chip brushes from Harbor Freight and a gallon of aircraft stripper from the local auto parts store (in this case, Auto Zone). Note: The brand is less important than the fact it's aircraft stripper. I've used strippers before many times in both wood and metal stripping and it's more how you use it than anything else.

DSCN1037.jpg


Applying stripper - note: Get a good coat on, let it soak, then come back with another coat. When you're using these chip brushes and have lots of them like I do, you can use your brush as a "scrubber" to help you remove the paint as it breaks down. This works the best and let's the chemical do the work without applying anything that'll weaken the chemical stripping action.

DSCN1041.jpg


Sticker and paint ready to go. Note: Do not rush this process, other than work just fast enough to prevent the stripper from drying out.

DSCN1046.jpg


Begin by using a scraper to break the edge of sticker off the side of the boat. Paint should peel away easily.

DSCN1050.jpg


Peeling back the sticker. Note: Go slow and let the sticker fall away as a whole piece as much as you can.

DSCN1051.jpg


Sticker almost off. I'm going as slow as I can here.

DSCN1052.jpg


Sticker broke. I was a bit too impatient and I'll have to slop on a bit more stripper and this will be right off.

DSCN1054.jpg


End result, starboard side. You can see the white haze from the SOS pad. I should have used a 4.0 steel wool to scrub this. So now I'll have to wash the soap off before I paint.

DSCN1056.jpg


End result, port side. Again, you can see a white haze from the SOS pad soap. This will have to be cleaned off before painting begin. The lucky thing it won't take much work.

My wife came out and helped clean the rear transom after some stripper was applied to remove a couple stickers back there. She worked hard and did a great job. I feel lucky to have a good woman like this. Here's some pics of the cleaned transom sheet metal:

DSCN1057.jpg


Rear transom cleaned, outside view

DSCN1059.jpg


Rear transom cleaned, another view

DSCN1058.jpg


Rear transom cleaned, inside view. This had a lot of rust and a mix of applying the aircraft stripper acid and scrubbing with an SOS pad took off most of it.

Some end notes:

1. Use the SOS pad to scrub down the rusty mess in the boat.
2. Apply aircraft stripper to the rusty areas before hitting it with the SOS pad.
3. Use the 4/0 steel wool to scrub down the paint and break up the last of the paint before rinsing off with the water hose.
4. Your wife can be a great partner to help you get things done. She was helping me stripping the outside as well. She scrubbed with the steel wool while I applied the stripper and did the water hosing. Not everybody is as lucky as I am.
 
Looking good Dave. Glad to hear you're on the mend too.

I meant to comment earlier, but it looks like trimming that foam was a good (and neurotic) call. Love to see folks with attention to detail. =D>
 
Brine said:
Looking good Dave. Glad to hear you're on the mend too.

I meant to comment earlier, but it looks like trimming that foam was a good (and neurotic) call. Love to see folks with attention to detail. =D>

Thank you Sir, glad to be on the mend. Hope it keeps going that way. Still don't feel "good" but do feel "passable."

"attention to detail" - Isn't that a nice way to say Obsessive Compulsive Disorder? :D Yes, like most medical personnel, I have a good dose of that.

I'm not sure if trimming the foam will help or hurt, but at least the back decking will be square and won't pull out the rivets. When I was cleaning out the carpet stuff, I noticed a lot of pulled out rivets and separated sheeting/paneling. I hope to strengthen and eliminate this during the rebuild.
 
that's the curse of tracker boats, they are mass produced for the maximum profit while hitting the minimum standards of safety and usability...

Jamie
 
Ranchero50 said:
that's the curse of tracker boats, they are mass produced for the maximum profit while hitting the minimum standards of safety and usability...

I'd much rather of had an alumacraft, but I couldn't find one anywhere near like what I wanted for anything the money I had to spend. This is the reason Tracker is still in business when other boat builders are long gone - they build a product that works and while it isn't perfect or the best, it'll get the job done and people can afford it.
 
Like you said early on. The foam was/is used to give the deck support but got over poured. I think squaring it up is the only way you're going to pull the hull back together. I don't think you over paid for your boat by a long shot. I just think you were able to see past the rot and ruin to what it could be. You will have a boat worth may thousands of dollars when done and (this is the best part) you get to keep all those new tools for your next project. Dere will be a next project cause you are a PROJECT GUY.
 
tccanoe said:
Like you said early on. The foam was/is used to give the deck support but got over poured. I think squaring it up is the only way you're going to pull the hull back together. I don't think you over paid for your boat by a long shot. I just think you were able to see past the rot and ruin to what it could be. You will have a boat worth may thousands of dollars when done and (this is the best part) you get to keep all those new tools for your next project. Dere will be a next project cause you are a PROJECT GUY.

Yes, there probably will. Most likely some book shelves to replace the particle board we have now. The wife's been on me for ten years to build.

Had a frustrating day today. Spent a significant amount of time running around trying to find etching primer in a quart can. No joy. If I want it in this area, I'm going to have to order it. Considering if I want to order online or have my local NAPA, the only outfit that didn't try to sell me a two part paint.

The good thing is I finished stripping the paint off the inside of the boat. Tomorrow the boat comes off and trailer breakdown begins. Hopefully, I can get most of it done because after that I have to work Wednesday through Saturday long hospital shifts.
 
Today wasn't a bad day, considering I didn't sleep much last night (dunno why, oldmanitis I suppose), finally got to sleep, slept late and went out to get a haircut.

Came back home just after lunch and got the boat off the trailer, then started stripping the trailer down. Things went really smoothly. Here's what went on:

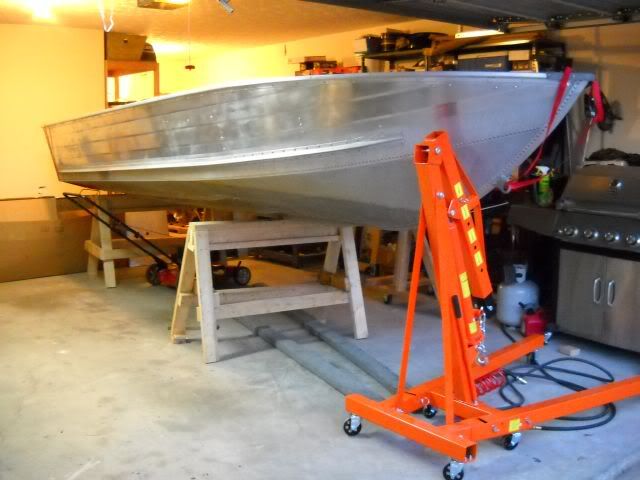
Used some security straps I had on hand, my cherry picker and a 1 X 4 scrap board I had to pull the boat off the trailer and put it on the saw horses I built a while back just for the purpose. Here's some pics with explanations:

DSCN1067.jpg


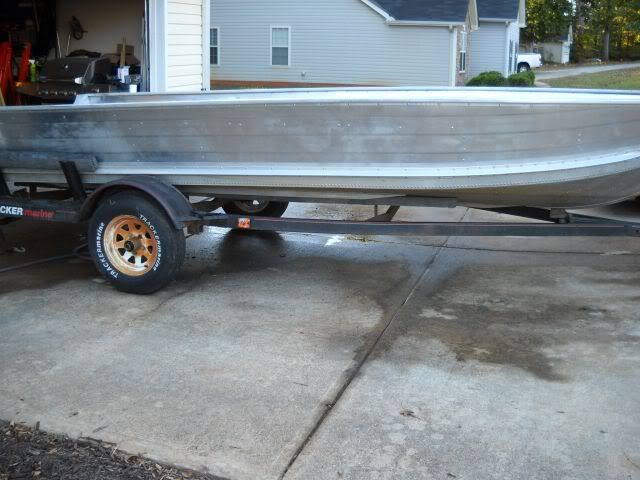
Boat on trailer. This turned out to be a slow, but not difficult process. Because of the size of the boat and weight issues, I needed to be careful and think about things before I did them. I tend to move slow with such things anyway and in this case, probably made the overall job faster with no accidents/disasters.

DSCN1070.jpg


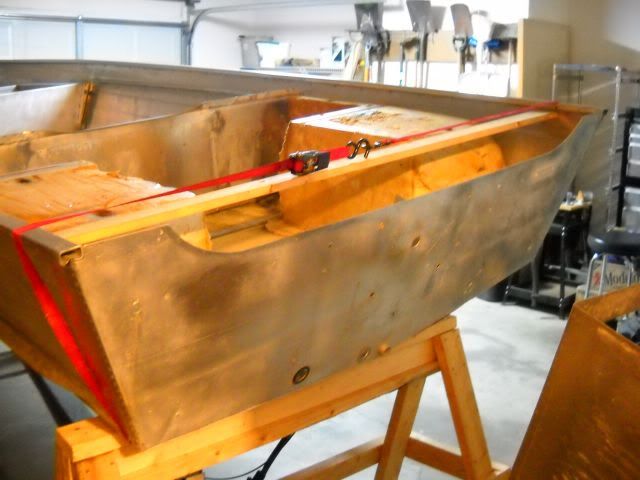
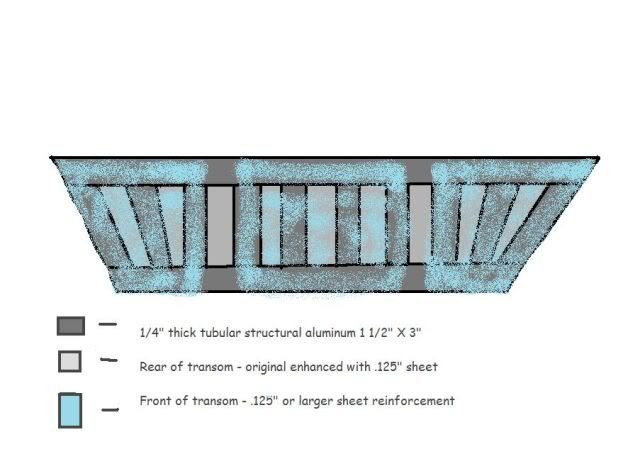
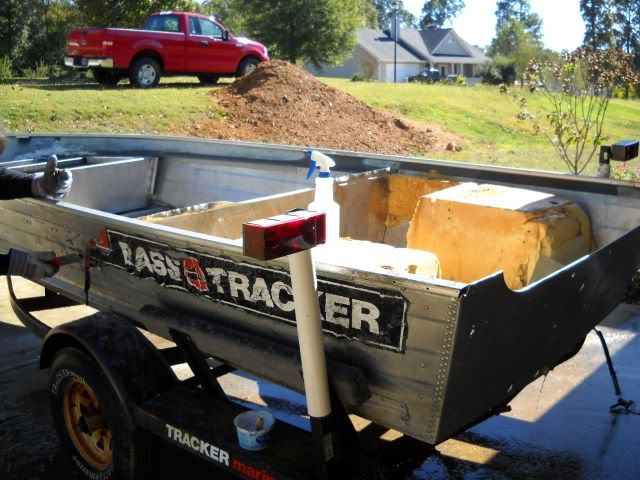
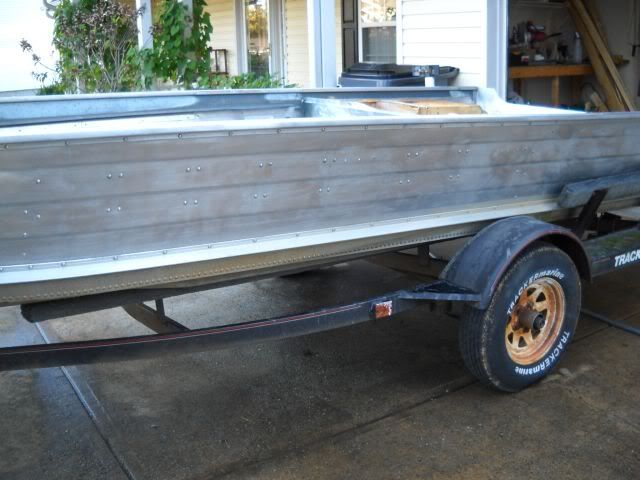
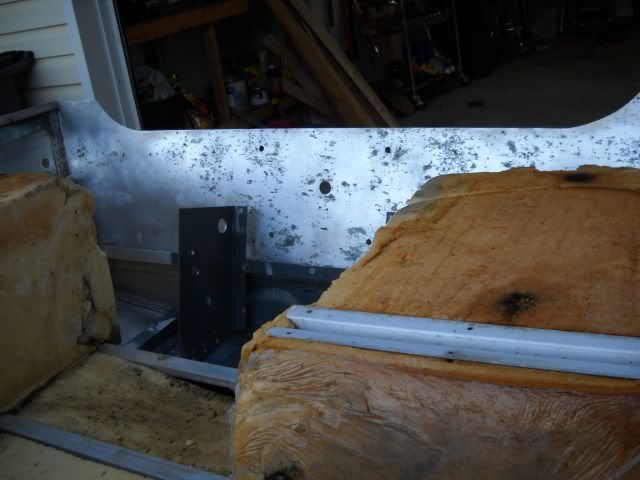
Picture of the rear transom reinforced with a 1 X 4 scrap board I cut to length with a handsaw and stuck in there to keep the transom from collapsing (I haven't replaced the wood I removed with anything yet, so the transom is very thin and fragile right now. The board stabilized it and kept it from collapsing while I removed the boat. The scrap worked perfectly in conjunction with the cherry picker to lift the rear of the boat high enough to slip a saw horse under the rear of the boat. At that point, I could slide the boat back a bit and the trailer forward, as the front of the boat was on the trailer rollers.

DSCN1068.jpg


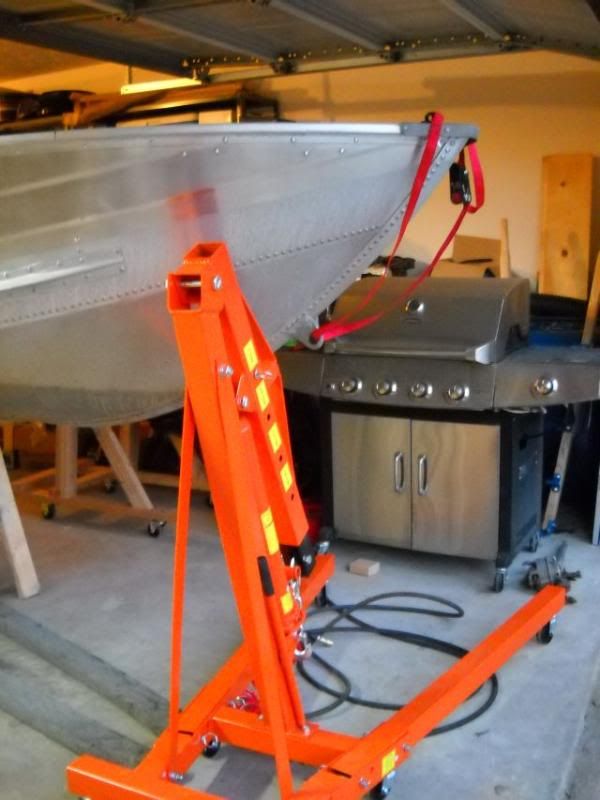
Here's a picture of the strap still hooked up and the cherry picker lowered. You can see how I ran the strap through the bow eye, then over the top of the boat and hooked the cherry picker boom to the center of the boat area of the strap. As I cranked the boom up, the strap was caught on the bow cap and was very stable there. The only problem was I had to locate the cherry picker in such a way as to enable me to roll the trailer out once the boat was clear of the trailer.

All done and the total amount of time was about 30 minutes, including a lot of checks and think it throughs to prevent any accidents.

DSCN1065.jpg


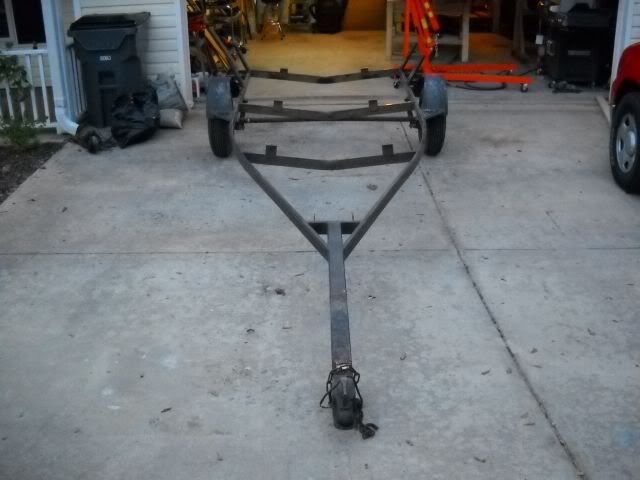
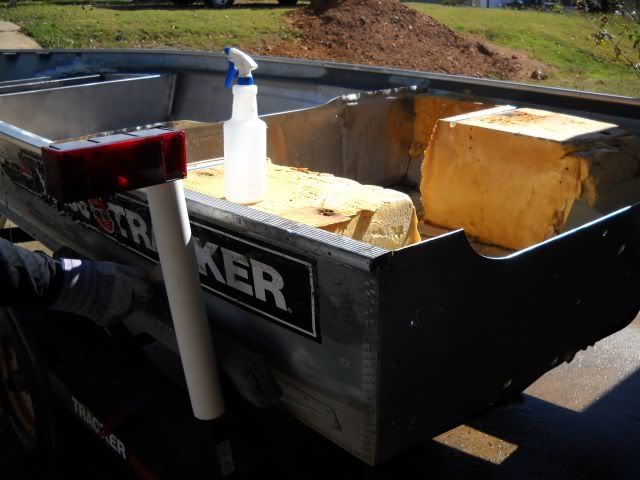
Trailer out of the garage with most of the stripping done. Once I had the boat off of it, stripping went fairly quickly and about all I have to do now is weld on a new hitch, cut off the old safety chain, rework the bearings, sandblast trailer/rims and replace the tires.

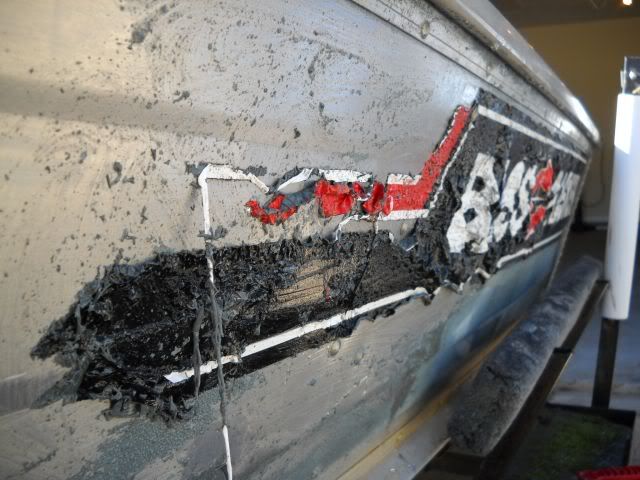
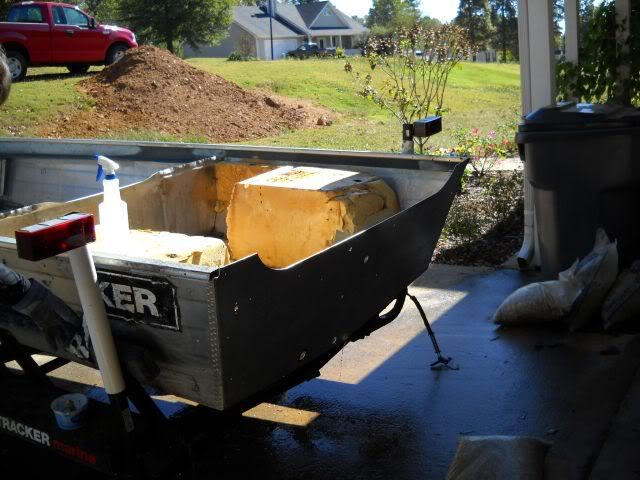
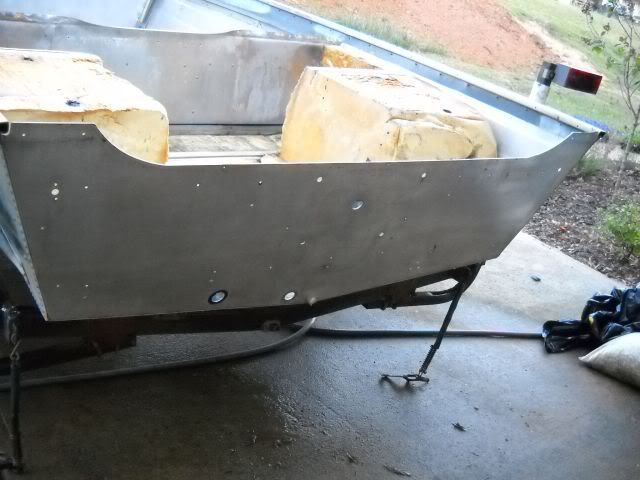
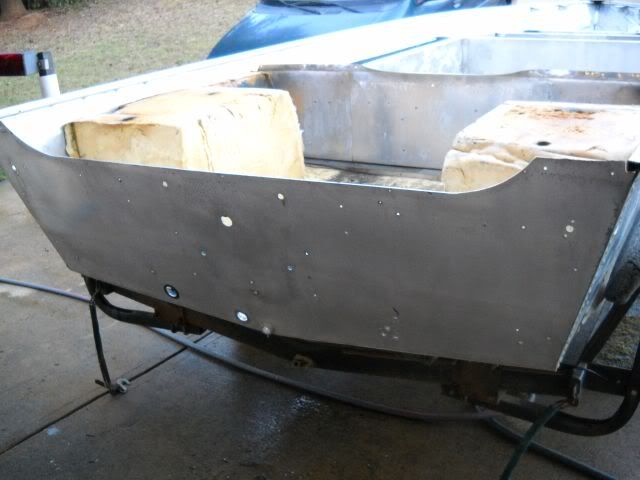
A close look will show you that part of the fenders and side steps are missing. Turns out the carpet on the fenders and the side steps were made of a carpet covered board. I'm going to have to come up with an alternative for those carpeted boards, including the bunks, because I don't think I want to use carpeted bunks on this build. May take some thought and some price comparisons. Right now, the plan is to use some type of plastic board to replace the bunks and the boards if I can find something suitable.

Some useful information notes:

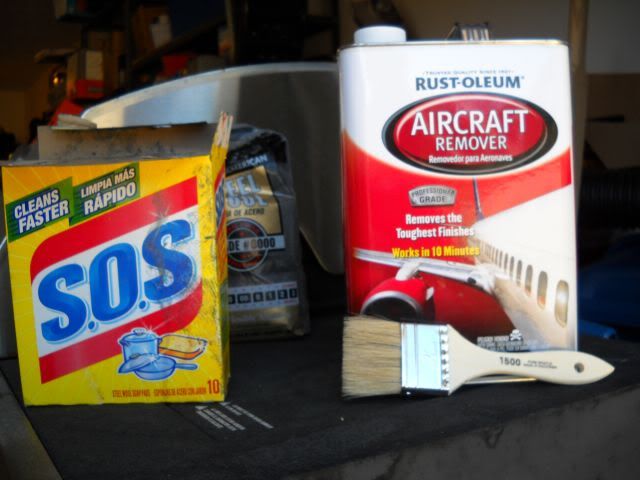
1. When taking trailers apart, penetrating oil used generously on old bolts is your friend. I used PB blaster (really like this stuff, comes out generously in a pressurized stream and saturates the desired area) and soaked every single nut and bolt I could find. Once I soaked it, I went inside, got something to drink, rested for a few minutes and let the PB Blaster (A good penetrant) do it's thing.

2. When wrestling with old nuts and bolts, the larger size the tools you have are, the more leverage you have and the easier the work is. I used half inch sockets with a 1/2" breaker bar on one side and a larger box end wrench on the other side to break the nuts loose, then used a 1/2" ratchet to crank the nuts off.

3. If you have a compressor, then a 1/2" air ratchet would be even better. I regret not buying one from Harbor Freight. These air tools I have are very hand. I used my pneumatic screw driver and pneumatic drill to remove a lot of the smaller nuts and screws. This made things a lot faster and saved me a lot of physical labor.

4. I also used a pneumatic cut off tool to cut the bolts for the old, broken jack. The bolts for that were rusted shut and I didn't feel like messing with them, knowing the new jack had new bolts in the box. I borrowed this tool from a buddy of mine and this is another tool I wish I had bought and will buy next time I make a Harbor Freight run. What a labor saver to get rid of junk bolts quick and easy.

Tomorrow I'll rework the trailer axle bearings and get it ready to take to my buddy for a new hitch getting welded on.
 
Dave, Sorry to keep chiming in but I just got to talk to ya. I'm a 22yr RN by profession if you know what I mean. Anyway. After getting all the decals off, I can really see the lines of the hull and that is an outstanding looking boat. I guess the decals are like a bill-board and just draw my eyes to them, blurring the overall boat. That hull is one of those that looks fast sitting still.
 

Latest posts

Top