Rhyan Craft: Now BRINE CRAFT

TinBoats.net

Help Support TinBoats.net:

This site may earn a commission from merchant affiliate links, including eBay, Amazon, and others.
they did a pretty good job.. welds are average for aluminum, just looks like it got a little hot on the welds.

Either way that will seal the boat man - nice job.
 
Thanks for the feedback Russ.

Your build has been great to watch, and it's given me lots of ideas I otherwise may not have considered.
 
Got the ACM panel today. The sheet was 5 x 12, and I took the boat just so I could transport it. I had visions of just strapping it to the boat, but it didn't take long at staring at it in the rearview to convince myself that I'd prefer not to end up on the evening news. [-X

Good thing too, it's all interstate for over an hour from where I picked it up.

Glad I brought the cordless saw. It cut easy.

Hope to pick up some 1 1/2 foam board later this week. It took forever for me to find it in that thickness around here.
 
Looks great man, i had a 15' cajun special that was almost identical to that several years ago. Just crawled the thread, cant wait to see the final result.
 
Well....for those that are considering it, I'd say from a first impression, I think the ACM is gunna work fine. For the folks wondering exactly what it is, here is a link to the specific panel I bought. https://www.alpolic-usa.com/pages/products.php It happens to be the Mica series, but I didn't pay much attention to brand name. It was all about the size of the sheet, the thickness, and the price.

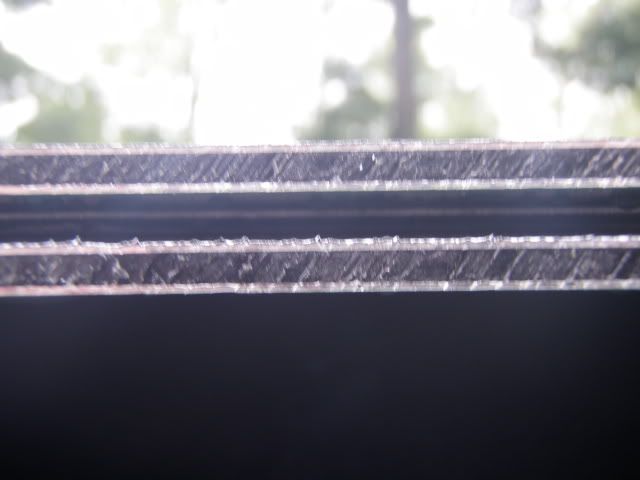
Here is a pic of a couple sheets from the side. You can see the aluminum skin on each side of the panel with the black composite in the middle. The panel is 4mm thick.
P5210195.jpg


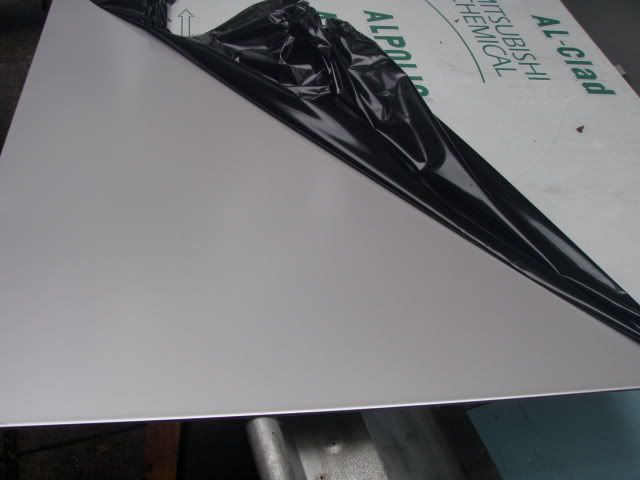
The sheet has a plastic film you peel off. This happens to be colored platinum, which looks good if I decide not to cover it inside what will be the bottom of the hatches.
P5210196.jpg


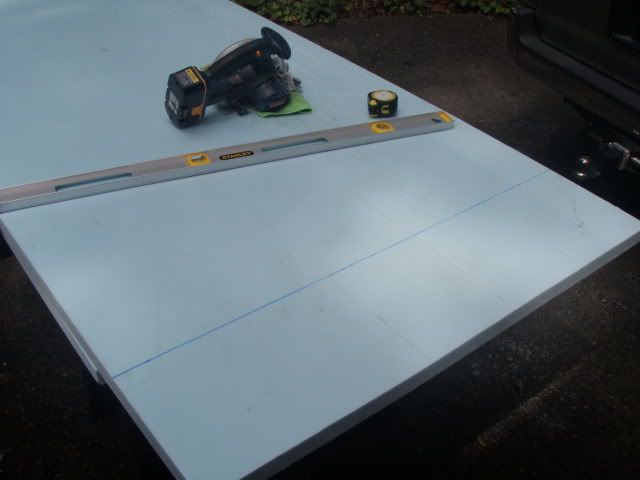
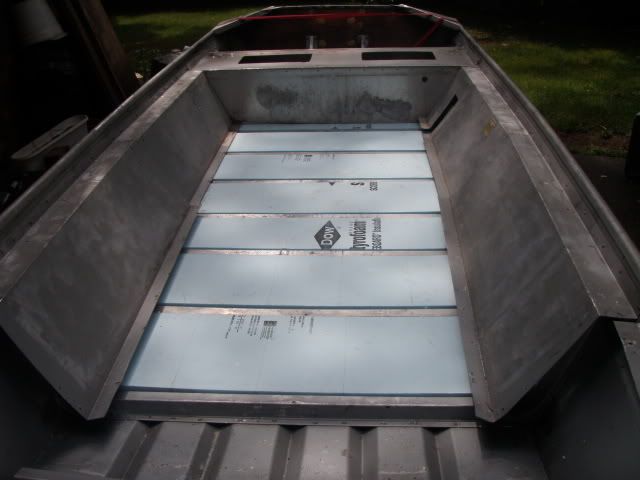
First thing I had to do was cut and lay down the 1 1/2" foam.
P5210192.jpg


Prior to foam
P5190191.jpg


After cutting and putting in foam
P5210193.jpg


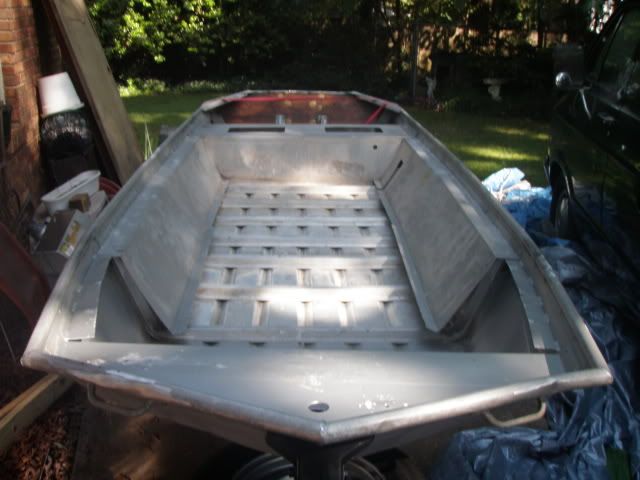
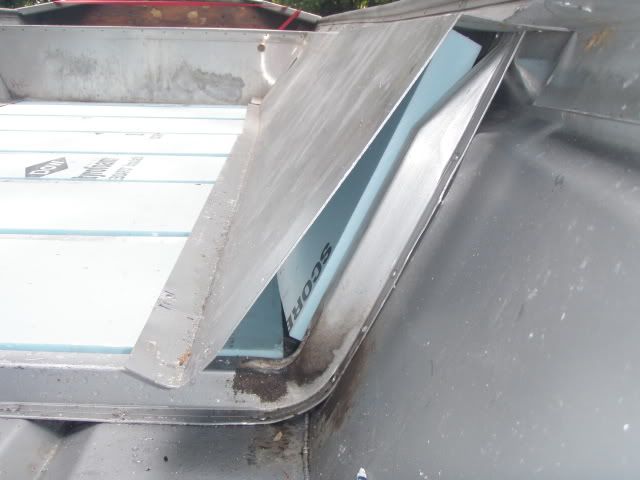
I also tucked up pieces on the side
P5210194.jpg


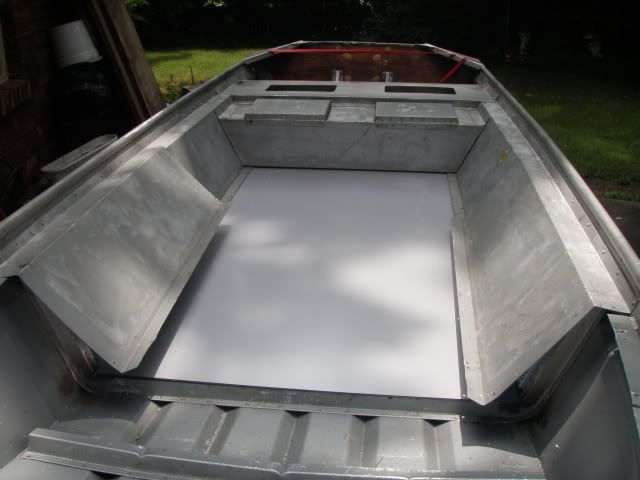
Then slid in the ACM panel. This pic also has the livewell placed in the boat.
P5210197.jpg


Me and the rivet tool are about to get a workout. :)
 
I'm now remembering the the post where someone mentioned how angle aluminum cannot be riveted together plumb at right angles without a spacer.

I'm seeing the same with my angle iron wars :evil:
 
That stuff should work just fine the way you are using it. I'm only using .050 aluminum in my floor, the key is dense foam sandwiched between two hard surfaces. Fiberglass and wood boats are often made this way (Boston Whalers for instance) and it works even better with aluminum. You essentially have a 1 1/2" or 2" thick hull now. A little tip, put the foam in the bottom and walk around on it as much as possible so it will form to the rivets and rib flanges on the bottom before you rivet it in place. My boat is a modified V jon and I sacrificed having a flat floor for a slightly sloped one just to get this strength while saving a ton of weight over leveling the floor and having to double the thickness (and weight) of my flooring and the extra weight of the framing. And in the end it's still not as strong as the 'sandwich'. Ever notice how a lot of old jon boats have dips between the ribs on the bottom? The 'sandwich' prevents a lot of that from happening, it also stiffens up the boat a lot and makes up for taking out seats.

Most people tend to over do it, ideally your framing, flooring, and decks should only be as heavy as needed to get the job done and no more. Weight is your enemy, it slows you down and it eats up a lot of extra electricity and/or gasoline. Like designing anything it's a series of trade offs and compromises. Do I sacrifice low weight for extra (perhaps unnecessary) strength? Do I sacrifice a flat floor in order to get the strength of the 'sandwich'? Do I sacrifice low weight and use wood because it's much cheaper and much easier to work with over aluminum?
 
Really bad when you start thinking about hatch layouts on a DAILY basis :oops:

Not sure how many hours I've logged on the subframe, but I would guess around 40. Yes, FORTY. That doesn't take into account the trips to the metal market, and the hardware store for rivets, then back to the metal market for different metal, then back to the hardware store for different rivets, then BACK TO THE HARDWARE STORE FOR MORE RIVETS..... #-o

On to the build...

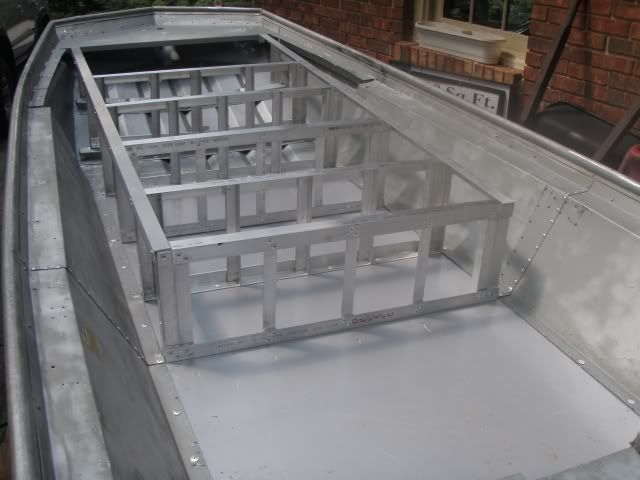
First thing I did was rivet 1.5 x 1.5 angle crosswise through the ACM panel and into each rib. Had I used .125 aluminum sheet, I assume I would have skipped this part, but because I used the ACM, I didn't want to risk cracking the panel by having the uprights sit directly on it.

As I mentioned in a previous post, I soon realized that I would have to use a spacer to allow the angle to be connected at right angles with a tight fit.

Here is a pic of said spacer x 2/each vertical x 49 = 98 of these little pain in the necks...Hence a trip to hardware store for longer rivets...

P6050213.jpg


Of course, when you try to use 1.5 angle as your vertical with a .125 spacer on the back, it makes all your verticals stick out from the crosswise pieces by .25, therefore, one of my return trips to the metal market was to get sticks of 1.25 x 1.25 to use as my verticals while all the pieces that run crosswise are 1.5.

cont....
 
cont...

So here is the subframe about 95% done. (I hope)

P6050216.jpg


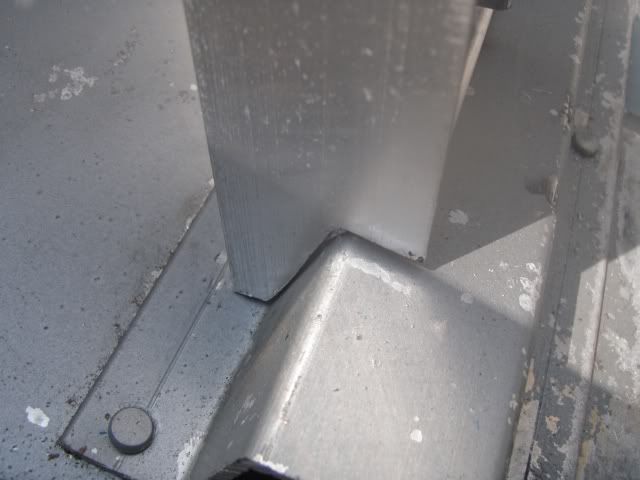
I have installed 5 of 6 total crosssiwise pieces at deck level. #6 (closest to the bow) will be installed once I have a foot pedal well, or enough nerve to do it without having it in hand, to work with so I can engineer it the way I want. #5 and #6 are the only crosswise pieces that do not sit on angle, as this is a place in the bow that is not flat, and won't be used for hatch storage, so I simply put cuts like this in each vertical on those two ribs.

P6050214.jpg


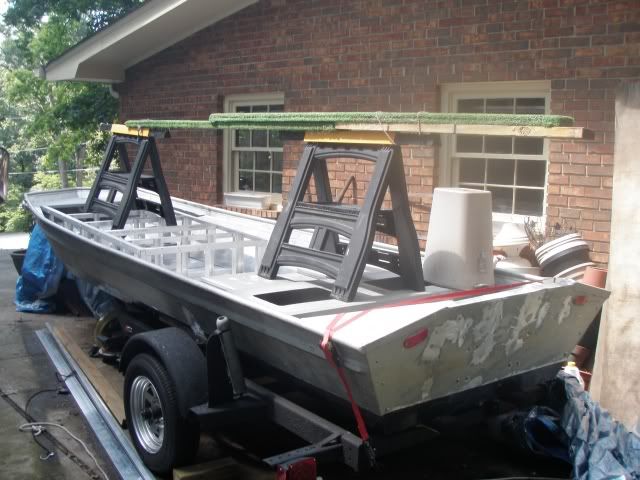
I now realize I didn't take a picture of how I conected all of those to the ribs, so that pic will have to wait, as the boat is tarped, which btw..... Here is my best rendition of a redneck boat cover....

Notice the recycled bunks :)

P6050217.jpg


P6050220.jpg


P6050218.jpg


1" tubing is next to be installed atop the subframe where I will be constructing the hatch lids/openings.
 
(I copied this from another thread, but wanted to include the info in my build)

If I had it to do over again, I'm fairly certain I wouldn't use angle. At least not exclusively.

You can't attach angle (at least the size I bought of 1.5 x 1.5 x .125) at right angles without using a spacer. I bought different size angle to accomodate the spacer. Might be hard to visualize, and I need to post some pics of what I'm talking about. Unfortunately, I remembered reading this same thing on the site once upon a time but didn't remember it until I went to join my first piece.

IMO, tubing is a much better option and makes engineering the deck much easier and cleaner. Seems as though lots of folks use angle, so I'm not sure if they just aren't attaching it what I would consider "correctly". Not to say it didn't do exaxtly what someone else wanted it to do though.

I'd guess that the problem using 1/8" angle is much more noticeable than 1/16", but I wouldn't use 1/16" angle for any framing.
 
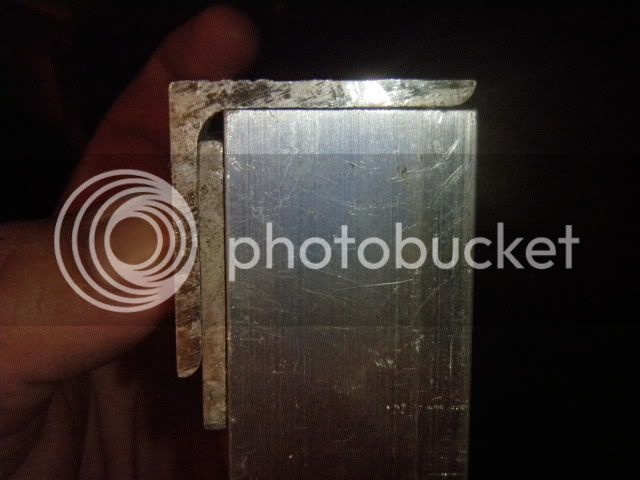
Here's what I mean....

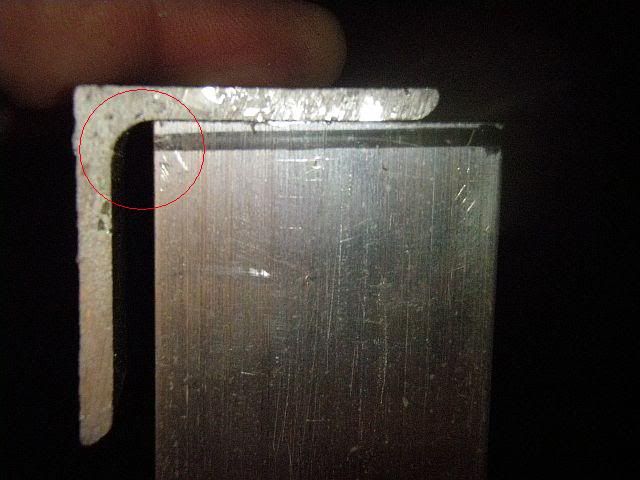
Here are two pieces of 1.5 x 1.5 x .125 angle.

Notice the radius shown in the horizontal piece prevents the vertical from butting up tightly at right angles to both sides of the horizontal. In my case, the gap is 1/8" wide. Also notice that once joined like this with a spacer of .125 behind the vertical, that the vertical now sticks out from the horizontal a total of .25

P6160265-1.jpg


Therefore, I used 1.5 angle as the horizontal, with 1.25 as the vertical. Once the spacer is installed, the pieces align like this...

P6160266.jpg


On the boat, it looks like this...

P6050213.jpg


Doing it this way added material, more labor, and longer rivets than originally planned, and this finished product (although extremely solid) just isn't clean enough for my taste. Tubing simply attached with angle brackets would be easier and cleaner IMO.
 
I've now learned that there are two kinds of angle available. Naturally, the one I used (which was suggested to me from the Metal Retailer) had the radius. On the bright side, I guess I did use the one designed for Structural support though.

aluminum-angle-group-labeled-300x300.jpg


6061 angle has rounded corners and is generally used for structural applications where strength is important.

6063 angle has sharp corners and is generally used where surface finish is more important than strength. 6063 is often called architectural aluminum for two reasons - first, it has a surface finish that is far smoother than the other commercially available alloys, and second, its strength is significantly less (roughly half the strength of 6061), making it suited for applications where strength is not the foremost consideration.
 
A 60 grit flap wheel on a hand held grinder makes things fit together very quickly. Looks like an interesting build.

Jamie
 
Brine said:
popped rivet number 799 today..... #-o


Just wait until you start sticking the deck down, and decide to use 1/8 inch rivets to have less head to stick up. You'll then be spacing them about every 6 inches or so, and they add up quick. I just popped rivet 150 (I keep count just by boxes, not down to the rivet), on a customer's boat yesterday, and it is primarily welded.
 
Yep, the boxes are how I'm keeping track too. I'll have to check out the 1/8 rivets. I've been using the 3/16 for all my framing.
 
Brine said:
Yep, the boxes are how I'm keeping track too. I'll have to check out the 1/8 rivets. I've been using the 3/16 for all my framing.
I don't know where you are getting the rivets, but Northern Tool has rivets $2.00 - $2.50 cheaper (per box) than Lowes/Home Depot. They only have 3/16 and 1/8, whereas the home centers also have 5/32, but I rarely use the 5/32 anyway.
 

Latest posts

Top