Alumacraft 1236 Makeover- livewell pg 11 - update front deck

TinBoats.net

Help Support TinBoats.net:

This site may earn a commission from merchant affiliate links, including eBay, Amazon, and others.
dedawg1149 said:
looks good,question why didn't you angle the trolling motor were it would be center of the boat do you like it to one side

3 reasons:

1 - I like to have the center more open because I can drop anchor off the front there
2 - I can use the center to put drinks, baits, or whatever else I set up there to get out of the way (more room)
3- when I pull the trolling motor up, I don't want the head of the TM to be hanging off the side of the boat or hitting the side rail; the way I have it mounted, it sets just insdie the rail and it doesn't hit anything when travelling down the road. It's also easier to pull it up and let it down.

It doesn't throw me off course at all with it being on the side, it still tracks true
 
How are you going to finish off the inside face of your deck?

I saw on another website where this guy used that area to store Plano boxes. He just stretched bungie cords across the front to hold them in.
 
the face is finished.. I was going to carpet the 2x4, but I figured what the hay and let it go. I'm using the space underneath to store my reel line spooler, a couple of packs of worms, pliers, etc... nothing slides out even going down the road. I was going to put plano boxes in, but I figured I would put whatever the "worm of the day" I would be using, then another pack of backup.
 
OK.. I know a few of you have been waiting for this.. and it actually works (tried it out today)

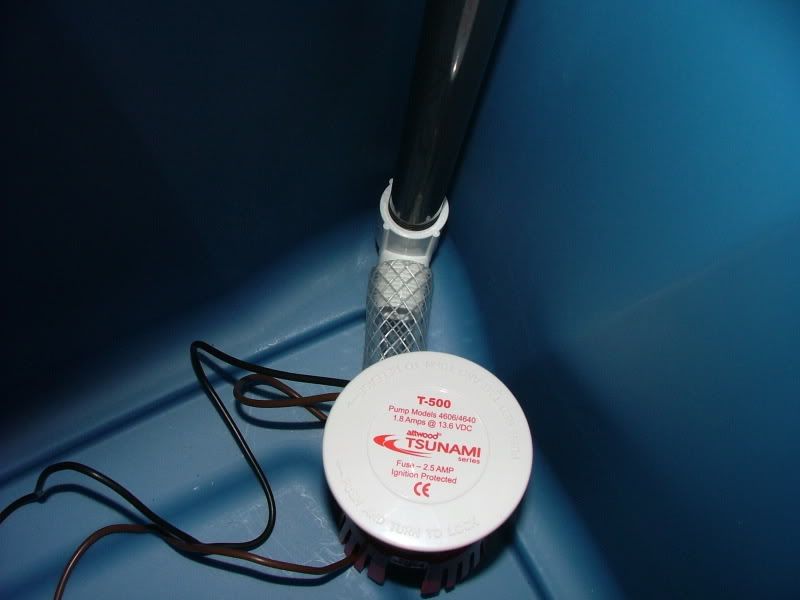
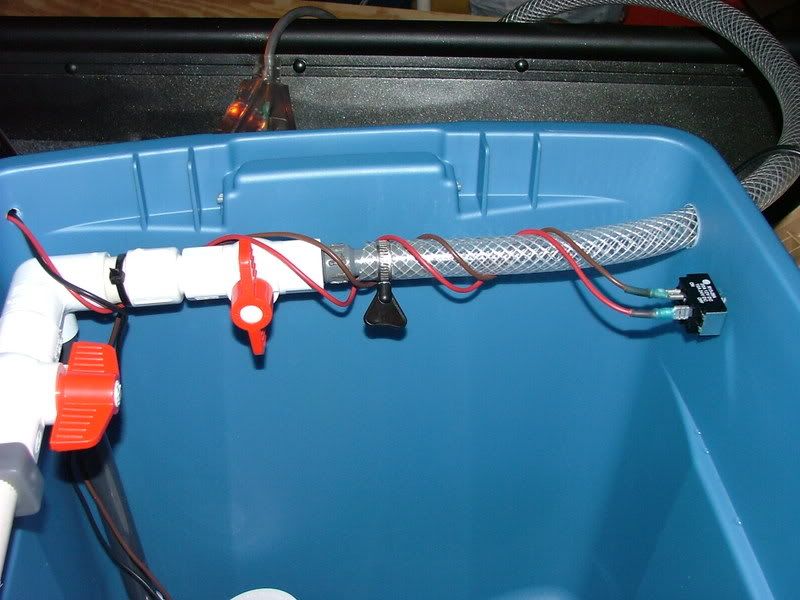
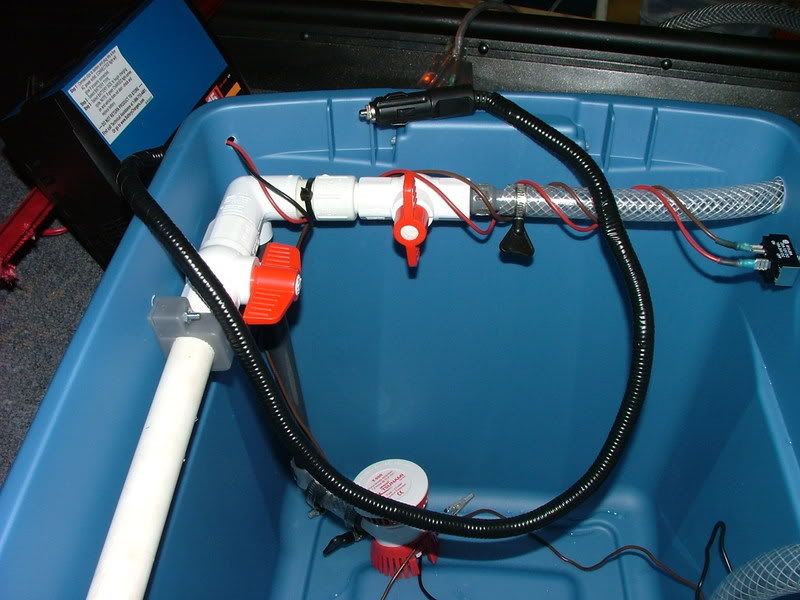
So first things first... I bought a 500 GPH bilge to serve as my aerator AND bilge for the livewell. So after I got this, I went to Home Depot to buy some plumbing supplies. I had an idea of what I wanted it to do, but I didn't know what all I would have to have because I forgot to look at the diameter sizes of the bilge, so I call bassboy1 from HD and he gives me all the details as I knew he would. I should mention, this is actually his design - I just kind of tweaked it a little bit.

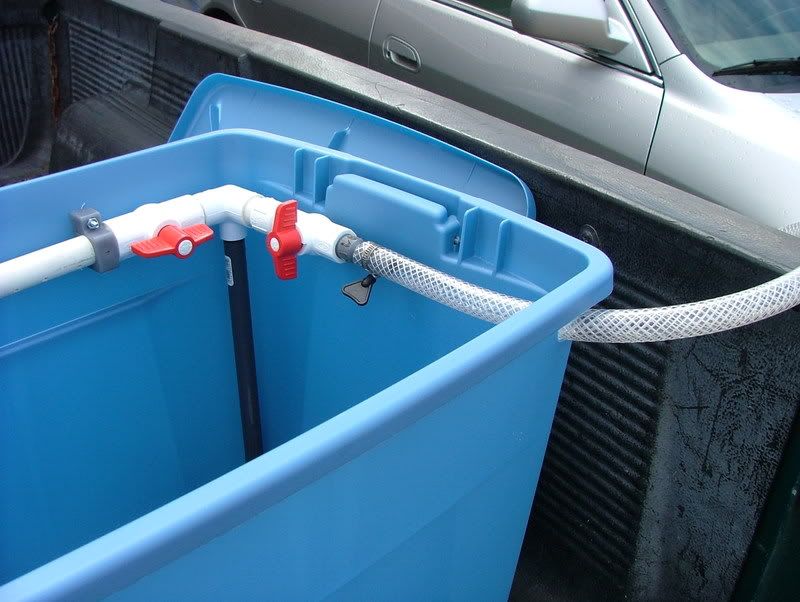
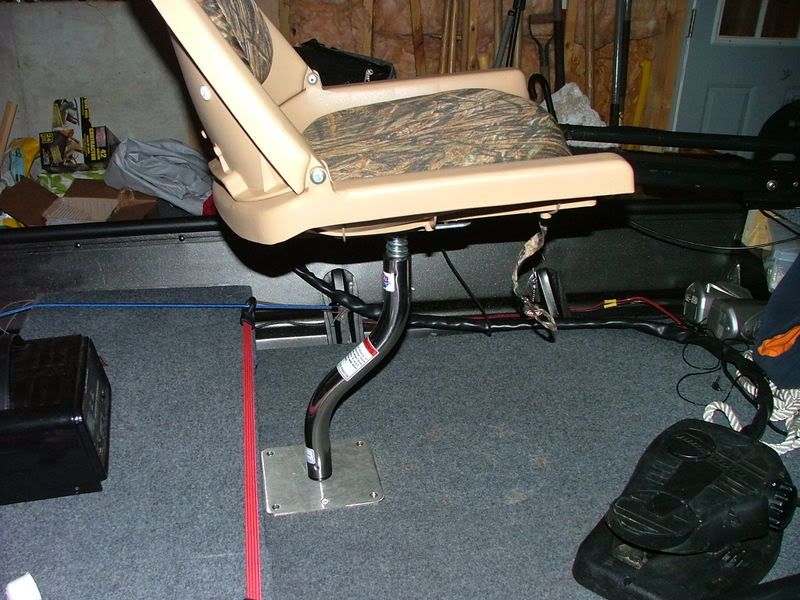
I'm pretty sure the hose size that I bought is 3/4" OD (outside diameter) and the ID (inside diameter) is 5/8". Either way, the hose clamps snugs it up securely and it's in the livewell underwater so I'm not worried about leaking. That hose runs from the bilge pump to the first 45 pvc. I got 1/2" threaded elbows, and the gray pvc is actually a 12" riser which is used for sprinkler systems. I would have used regular pvc, but this was only .99 cents and I wouldn't have to buy a full stick of 10' since they won't sell in pieces.

DSCF0557.jpg


DSCF0669.jpg


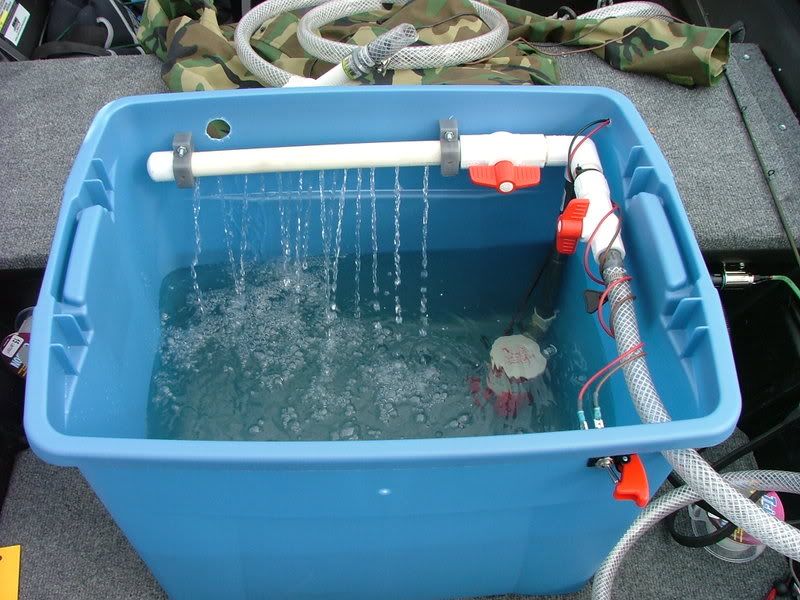
On the top of the riser, I put a 1/2" - 3/4 Side Outlet 90. The side coming up from the riser is threaded 1/2" fips (female threaded) and the 90 is 3/4". The pump is not fastened to the bottom of the livewell. There are 2 pvc clamps that are attached to the aerator pipe - this keeps the whole thing in the same position.

DSCF0673.jpg


One side at a time...... The aerator side first.

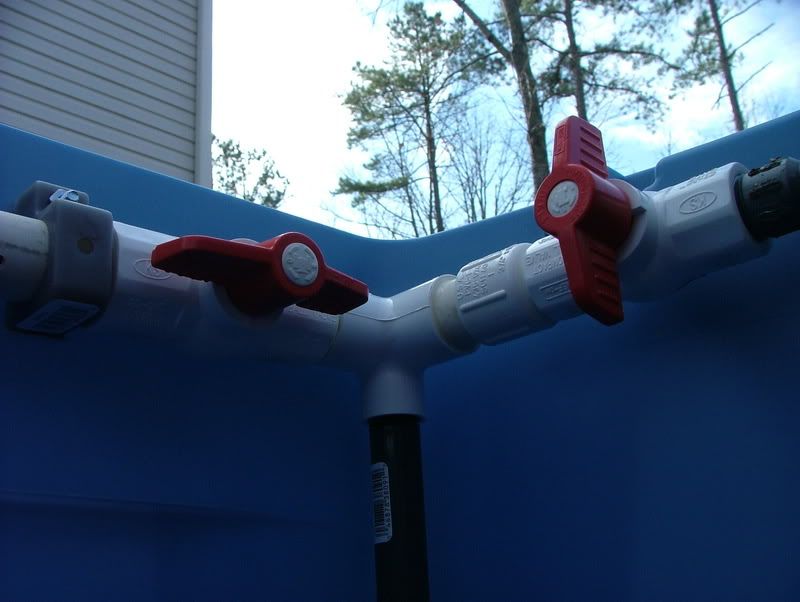
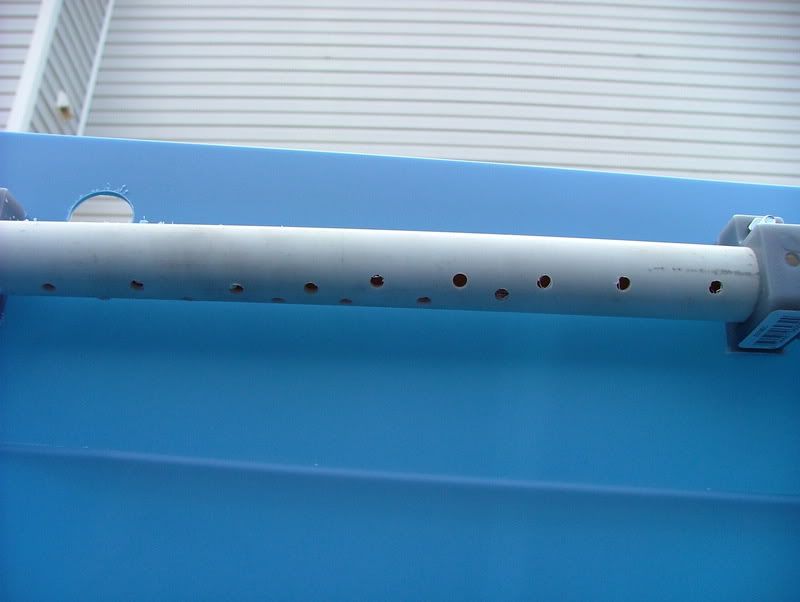
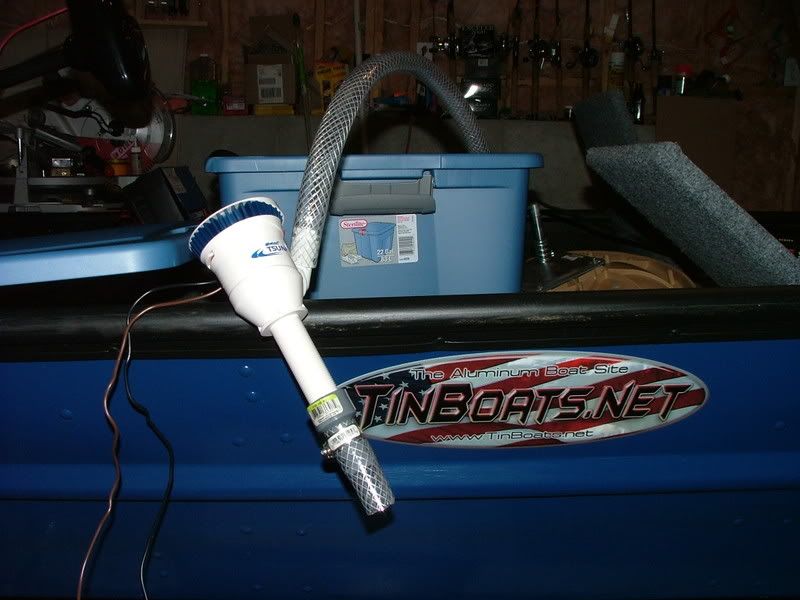
Coming out the right side is 3/4" pvc into a 3/4" PVC Ball check valve. The next piece is about 18" of 3/4" pvc which has holes drilled in various places. I didn't care if I had a straight line of holes, I actually offset them one after the other so water would hit all over the livewell. In the very end is a 3/4" cap.

DSCF0672.jpg


DSCF0687.jpg


Bilge Side....

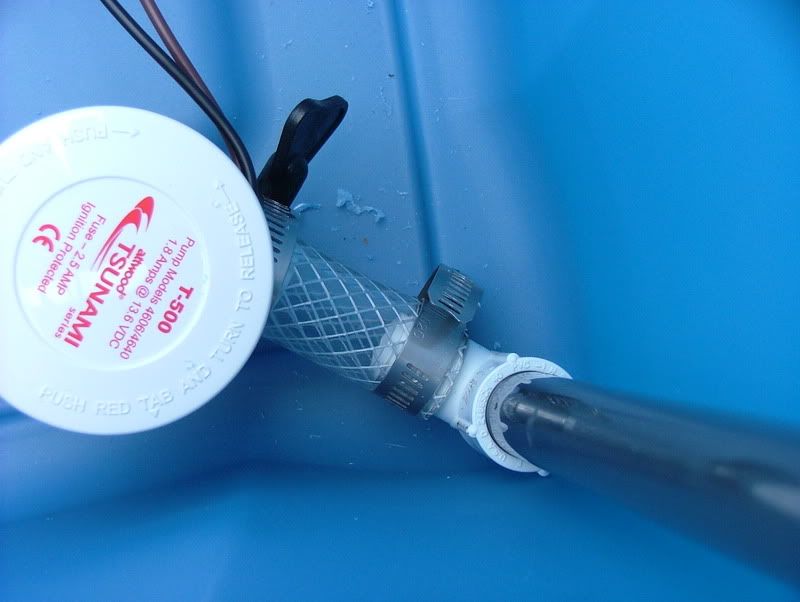
This side has a bout an 1.5" of 3/4" pvc that goes into a reducer. I took this from 3/4" down to 1/2" because I didn't want to buy more hose. I bought a 10' section and it was expensive because I got all they had in that one spot. They do have cheaper and I would suggest getting that. This 10' roll was about $18, ridiculous...

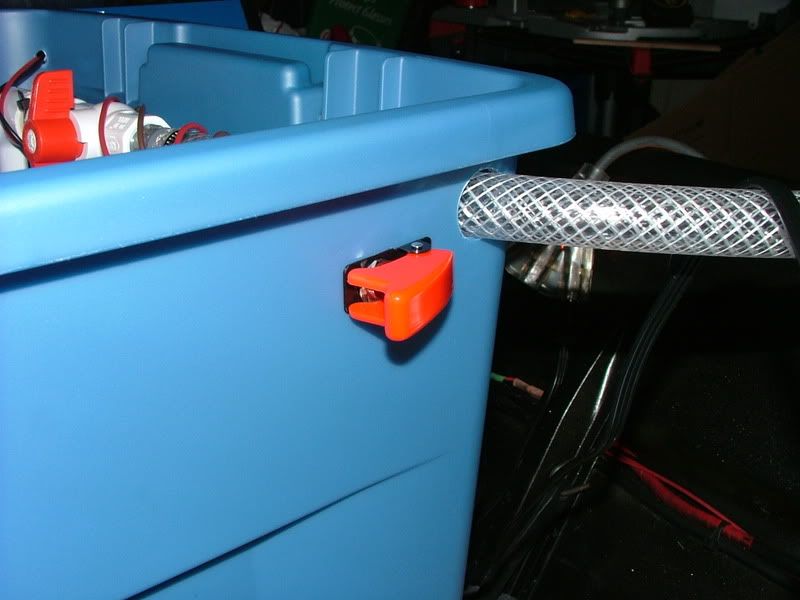
Anyways, the reducer is male threaded on the 1/2" side, and it screws directly into the 1/2" ball check valve. The fitting coming out of the check valve is a slip barbed adapter, which will let the hose slide right up on and then a hose clamp to hold it in in place. The hose is about 40" long and I drilled a hole dead even on the tub so that it can run straight out the front of the livewell and can be hung over the side when I'm ready to empty the livewell. When it's not hanging over the side, I can fold it up out of the way to the side.

DSCF0671.jpg


DSCF0674.jpg


DSCF0675.jpg


DSCF0689.jpg


Wiring...

Wiring is a little tricky. I wanted this to serve multiple purposes, so I installed a 12v power source for the livewell to plug in to. I wired the cigarette lighter first so I would know how much wire I needed to add to my livewell pump depending on its' location.

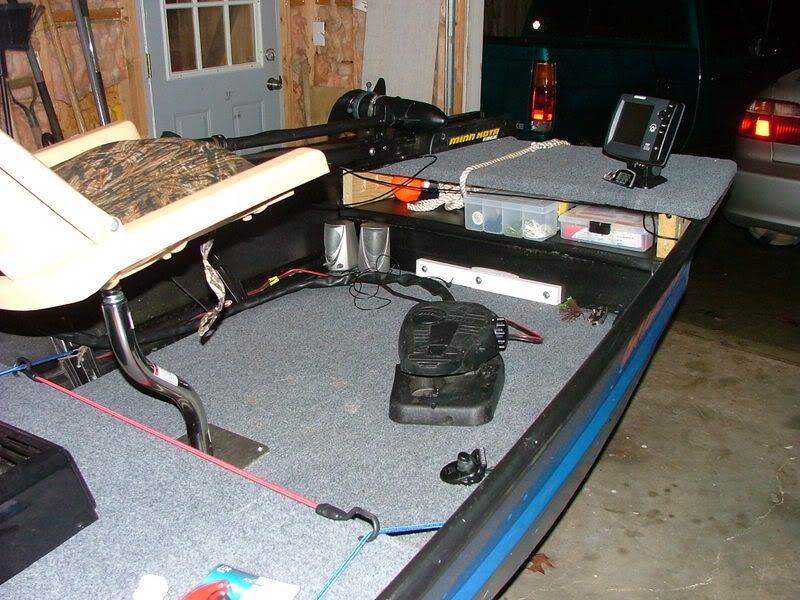
I started at 12v power source. I plugged a few different adpaters into it so that I could make sure that no matter where I installed it, everything with a 12v power adapter could plug into it. So, right in front of the rear bench, next to the side wall is where it was placed. It also made running wires to the battery easy because I could just run them down the side wall channel.

DSCF0677.jpg


DSCF0680.jpg


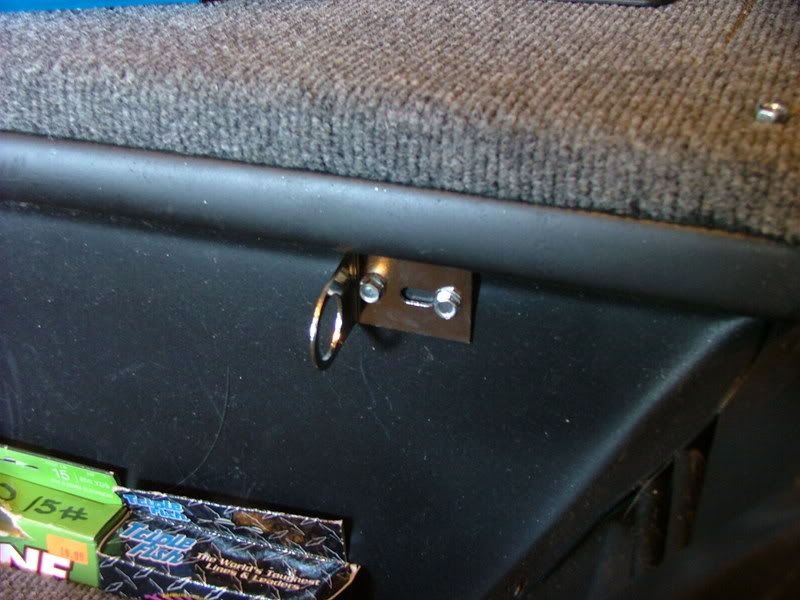
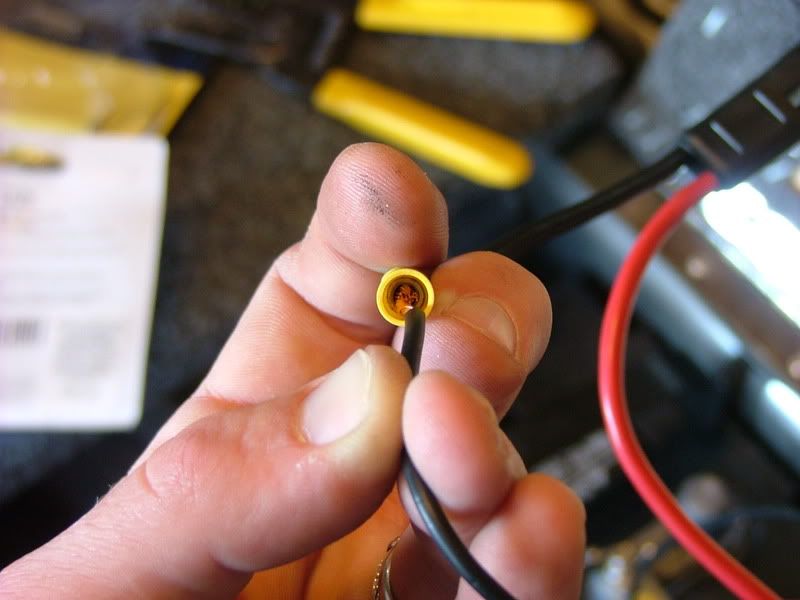
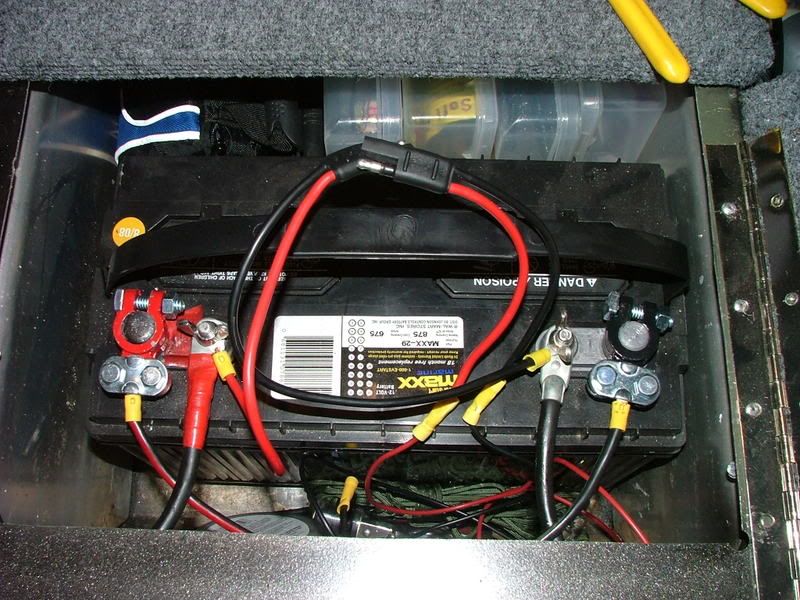
With that in, I need to get power from the battery. I found an old Minn Kota battery connector and fabricated it to work for me. This allows me to simply unplug the power source to the connector. Now this connector has 10ga wire, and I'm running 14ga. To make 14ga fit in a 10ga connector, strip off a little more line and bend it back over itself... then you can just crimp it down.

DSCF0685.jpg


Here's what I have at the battery. This is one battery that is ran in parallel to another battery on the other side of the bench. The main terminals with the large connectors is my front trolling motor. On the studs, there is the trolling motor connector which powers the 12v power source, and the other is the 4ga cable ends running to the other battery.

DSCF0686.jpg


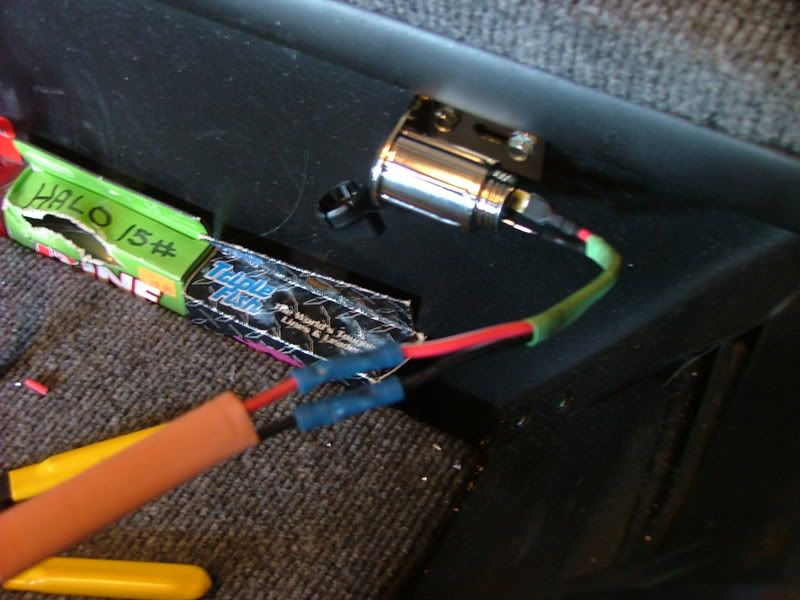
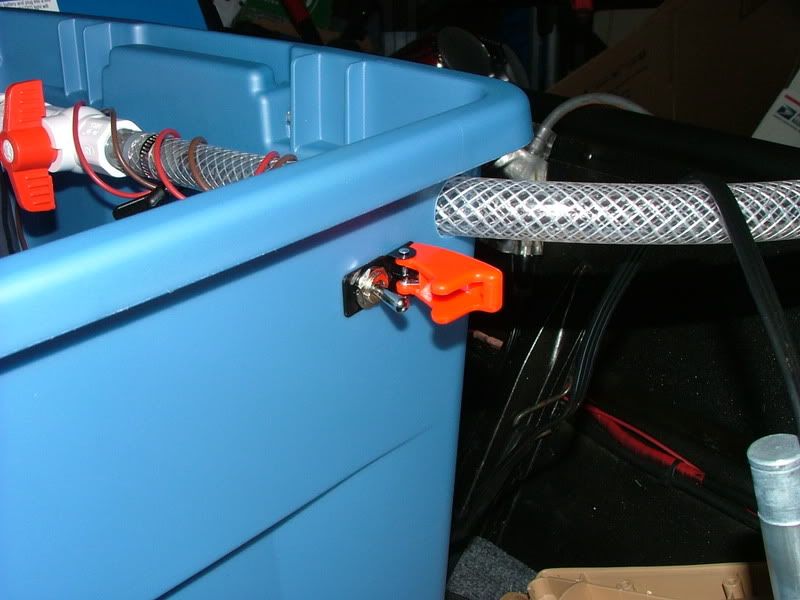
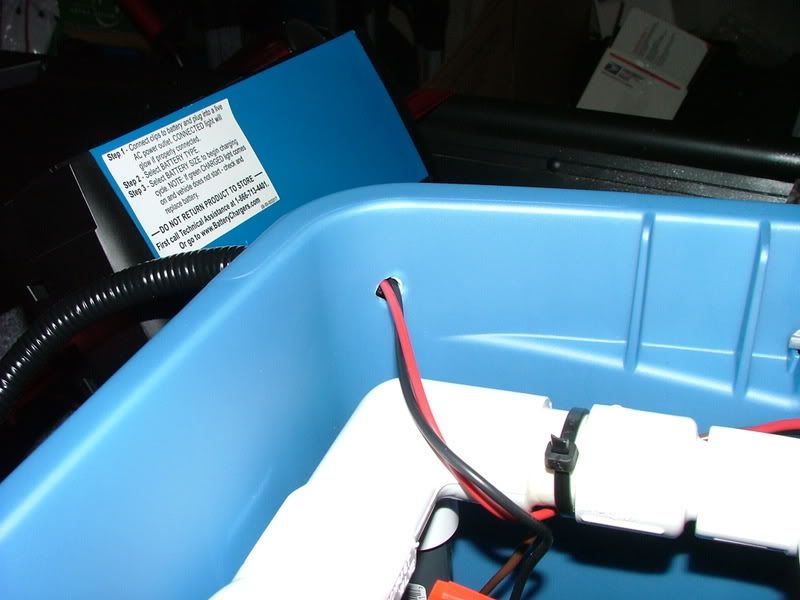
The livewell is next to wire. First, I ran the bilge pump positive wire (brown) up the riser and down the bilge side of the livewell.. this is how I determined where to place my toggle switch. I placed waterproof connectors on this, and ran an additional power line (red) back to the 12v adapter (plug-in).

DSCF0696.jpg


DSCF0697.jpg


DSCF0698.jpg


If you follow the wires to the corner, you'll see where I drilled a 3/16" hole to run out. I have about 36" of positive and negative wire so that I can move the livewell around a little bit if needed.

DSCF0699.jpg


DSCF0700.jpg


Filling up the Livewell...

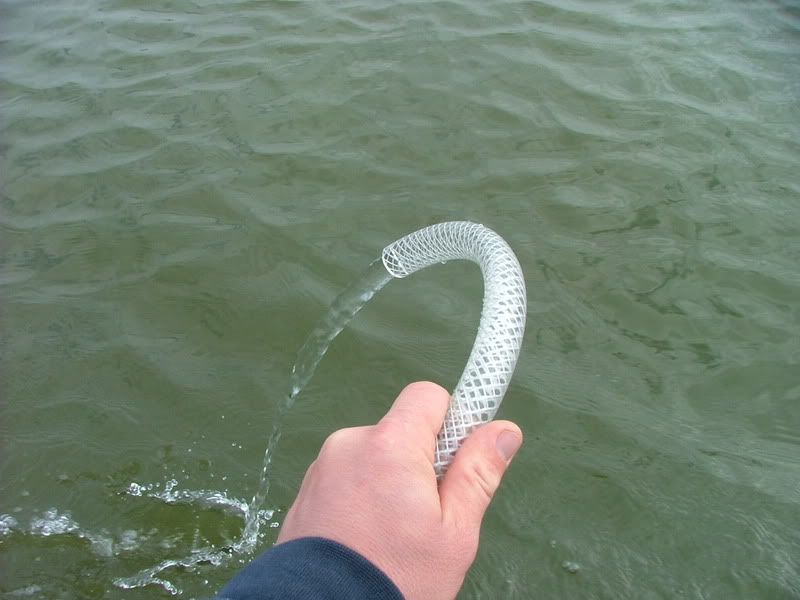
I didn't want to carry extra stuff with me to fill the livewell with, so I got this 800GPH aerator pump from walmart on clearance for $10.. but I think it was mismarked. They didn't look, and I didn't tell at the register. Gotta love self check out!

Anyways, I had longer hose to draw water up with, but that didn't work. While out on the water today I took my knife and cut the hose to about 3". I don't know if it's even needed.. I ended up dumping the hole thing in the water and water started pouring in! I did attach alligator clips to power this - so no switch. I only wanted this to be temporary since I won't be using it but a few times throughout the day.

DSCF0701.jpg


Pricelist...

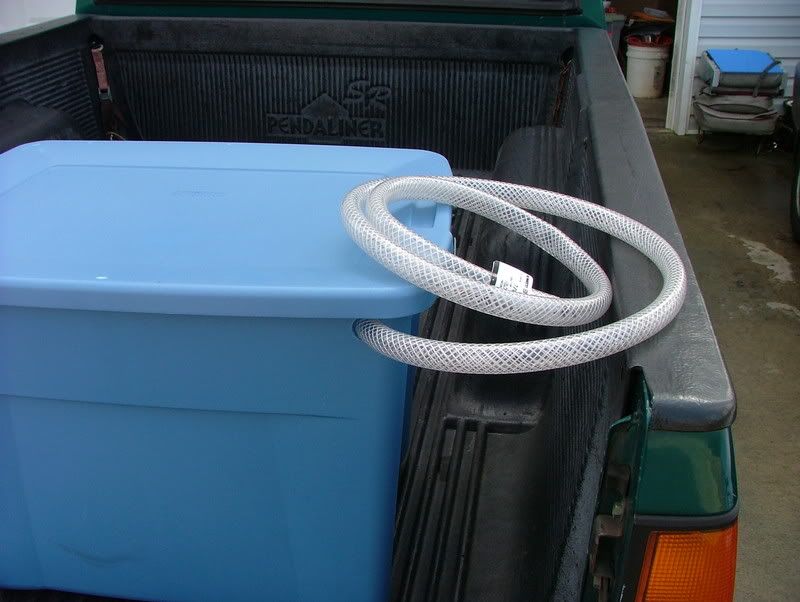
Keep in mind a few things.. the braided hose I used is expensive stuff, and you don't need to use this kind. This was all I could find on the aisle I was on (I built this thing in my head while in the store).

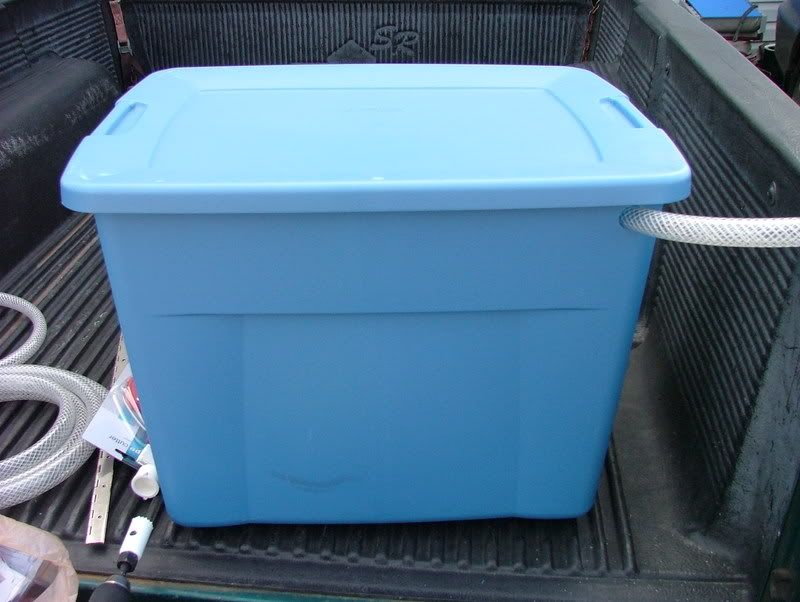
Rubbermaid Tub, 22gal - $5 @ Wal-Mart
500 GPH Bilge Pump - $20 approx
PVC Fittings - $15 (the check valves are like $4-5 each)
10' 3/4" pvc pipe - $2
3/4" OD braided hose - $18 (get the cheaper stuff, but this stuff will last forever - atleast it better for that price)
Toggle Switch - $10
2 - 25' power wire rolls - $5
12v power source/plug-in - $6
Total Price - $85 roughly... You might have this stuff laying around like I did. I just priced it to help out with this post.

You don't have to put the bilge side in the livewell, but it sure does make it easy to drain. I put about 18 gallons of water in there today, and when I tried to pick it up... well, lets just say that water wasn't going to be poured out by me that easily.
 
Wow, Very impressive idea.... I'd like to see / know more! Also, will you just have to turn it off to keep it from overfilling?
 
baptistpreach said:
Wow, Very impressive idea.... I'd like to see / know more! Also, will you just have to turn it off to keep it from overfilling?
That particular pump doesn't fill the tub. He has another pump, connected to a length of flexible hose, that fills the tub. Then, when it is full, he puts that pump away. Then, the pump seen inside the tub is for aerating and emptying only. When the valve to the flex hose is closed, and the other is open, the water goes to the horizontal piece of PVC. This has holes in it, so the water rushes out of these at a pretty high pressure. This water mixes with air in the tank, and that is what gets fresh oxygen to the fish. The more bubbles you see in the tank when the spray bar is on, the better.

Now, if you turn off the valve to the spray bar, and open the other one, that is how he drains it. That flex hose is just thrown over the side.

I probably should post pictures of mine. It is a little simpler than his, as I had a tourney in about 3 days, and needed something functional, that would still work on my budget of about 15 bucks. Joy of being a teenager. No real disposable income to speak of. So, mine used mostly pieces I already had. Thereby, it only has the pump going up to the spray bar, and I fill/empty it with an aluminum bucket. Mine seemed to do a fine job keeping fish alive though. Just a bit more work at the beginning/end of the day, or in the summer when I would want to change the water out every few hours.

Another way to do it, that leaves the valves out, is just to use the same pump/hose that he fills it with to empty it. Just put the pump in the well, and throw the hose overboard. Little cheaper than the valve trick.
 
Russ, you've done a nice clean rework of your boat. I've always been a fan of creating storage under the benches. Your boat will catch ten times the amount of fish that most guys with their 30k rigs will. Looks great!
 
bassboy is right about using the same pump for filling and emptying at the same time.. the only reason I did it like this is because I want to pump water in and out at the same time while fish are in there, therefore 2 separate pumps..

I'll try to work on it some this week after work and take more pictures. I've been on vacation for the last week and a half, and now I have 3 days to work and then it's back to South Carolina for a 4-day military exercise. I promise I'll have this done within the month baptistpreach!
 
Thanks Russ! I'm making some good progress on my boat, I'd be done with the carpet but the wife's been sick. I've got a 22 gallon tub that I'm hoping to turn into a livewell with your help!
 
I promised I'd get pictures of the front deck redo I have done... I added this pedestal type seat as opposed the one that took up a lot of space. With this I can stand without taking out the seat, or I can take the whole pedestal off and set it in the rear of the boat out of the way.

I like the fact that I can face either side of the boat to fish and still have foot/leg room without having to put my legs on the edge of the boat. That will probably make the most difference this summer since I fish barefoot and the rails are painted flat black..

DSCF0614.jpg


You can see in this picture where the mount was... I'm not going to worry with how this looks

DSCF0616.jpg


In this picture is where I usually leave the foot control while I'm driving... also notice the foot switch that controls the rear trolling motor - I can finally turn the switch on and off with my large boots on. Before I had it mounted too close to the front and I couldn't pull it back unless I did it by hand.

DSCF0619.jpg
 
Russ I like the way the seat came out it definatly takes up less room. By the way how do you like those seats (other than the back problems)? Do they handle leaning back in them or will they crack easier/quicker than other styles?
 
These seats are actually pretty comfortable... But, when you lean back (you can do it a little, but you can't stretch out in it with all your weight pushing the back) the screws holding the mounting plate to the plastic base of the seat will pull the screws out. I've had one screw strip out, but I fixed it with a toothpick put in on each side in the hole and then put the screw in and then tightened it down - no problems out of it anymore.
 
how/where are your wires for trolling motor/ lights i seen where you got the baterys really like that,just wondering how you runing your wires
:?
 
fishsalot said:
how/where are your wires for trolling motor/ lights i seen where you got the baterys really like that,just wondering how you runing your wires
:?

For the front trolling motor, you can see the wires running along the left side inside the ribs. These go into the middle bench section where I have the 2 batteries running in parallel. Those wires are running along the lip that forms the top of the bench seat. I just have some self tapping screws holding them in place since there was nothing to attach wire ties to. I'll take more pics of it tonight when I get home and post it here.
The rear trolling motor now has it's own battery in the rear. I do have the option of hooking it up to the 2 batteries in the bench - for that I ran 2 4ga wires down the same side thru the ribs from the bench to the rear.

As far as lights - well, I haven't ran any yet, but I'll put them in the plastic corrugated wire sleeves and run them down the side of the boat opposite the power lines. I don't plan on fishing where I need lights, so what I'll probably do is just buy the removable battery operated bow light and stern light.
 
Top